Automate your network with Red Hat
Speed operations with network automation
Traditional, manual approaches to network configuration and updates are too complicated and error-prone to effectively support today’s rapidly shifting application and data transfer requirements. Programmable, software-based automation technologies can help your team better support and scale your organization’s digital initiatives.
With network automation, network operations (NetOps) teams can quickly respond to dynamic needs for capacity, application security, load balancing, and multicloud integrations. They can also implement self-service and on-demand network activities.
As a result, NetOps teams can become as agile and flexible as applications and infrastructure teams to support modern business demands.
Speed operations with Red Hat Ansible Automation Platform
With Red Hat® Ansible® Automation Platform, Red Hat brings the popular community Ansible project to the enterprise, adding the features and functionality needed for team-based automation at scale. This powerful IT automation platform combines a simple, easy-to-read automation language with a flexible architecture, and security-focused sharing and collaboration capabilities. Because programming skills are not required, teams across your organization can readily use Ansible Automation Platform.
Ansible Automation Platform helps you streamline and manage complex datacenter environments, from servers and networks to applications and DevOps. It provides support for multivendor network infrastructure devices across campus, branch, cloud, and edge environments so you can automate everything using a single tool.
This e-book explains how to get started with common network automation tasks.
Key resources
Check out these resources to learn the basics of Ansible Automation Platform:
- Online training: Ansible Basics: Automation Technical Overview
- E-book: Network automation for everyone
NOTE: The commands in this e-book are written for Ansible Automation Platform 2.x and are not applicable for Ansible Automation Platform 1.0 and previous versions.
Install and configure Red Hat Ansible Automation Platform
Install Ansible Automation Platform
Installing and setting up Ansible Automation Platform is easy and fast.
Step 1a: Install command-line Ansible using yum
Run the following command:
$ sudo yum install ansible
Read the Ansible installation guide for complete instructions.
Step 1b: Install Ansible Automation Platform using the installation tool
- Make sure you have the latest edition or download a free trial at red.ht/try_ansible.
- Unpack the tar file (version and name may be different):
$tar xvzf ansible-automation-platform-setup-bundle-<version>.tar.gz$ cd ansible-automation-platform-setup-bundle-<version> - Open the inventory file with a text editor:
$vi inventory
- Set up your IP address or fully qualified domain name (FQDN) for the [automationhub] and [automationcontroller] hosts and define your passwords:
- admin_password for administration
- pg_password for database
- Run the setup script.
$sudo ./setup.sh
- Once installation has completed, navigate to your Ansible Automation Platform host using Google Chrome or Mozilla Firefox by using either the hostname or IP addres. Log in using the administrative credentials defined in the inventory file.
- Add your subscription via the settings menu in the web user interface.
Read the Ansible Automation Platform Installation Guide and the Automation Controller Quick Setup Guide for complete instructions.
Step 2: Install Ansible Automation Platform Content Collections for networking
Red Hat offers certified, supported Content Collections for a wide variety of network devices, tools, and infrastructure through Ansible Automation Hub. Each Collection exists within a namespace that contains one or more Collections. Use the ansible-galaxy command to install these Collections:
$ ansible-galaxy collection install namespace.collection_nameundefined
Follow the instructions in the Ansible Automation Platform documentation to configure Ansible Automation Hub to access and manage your Collections. You can find community-supported Collections on Ansible Galaxy.
Step 3: Create your execution environments
Execution environments are containers that include all of the required dependencies to perform network automation. They replace Python virtual environments. You can create execution environments using ansible-builder.
Install ansible-builder:
$ pip install ansible-builder
Read the Ansible Builder documentation to learn more about requirements, installation, and use.
Automation developers can use ansible-navigator to test and run playbooks locally within an execution environment. You can also import the same container into your automation controller to run network automation job templates.
Follow the instructions in the Ansible Automation Platform documentation to create and consume execution environments.
Set up your network environment
Configure your network environment for Ansible Automation Platform according to these best practices.
Ensure connectivity to your network environment
Configure an Ansible Automation Platform service account on authentication, authorization, accounting (AAA) systems for login. Ansible Automation Platform supports enterprise authentication methods like Terminal Access Controller Access-Control System Plus (TACACS+), Remote Access Dial-In User Service (RADIUS), and Lightweight Directory Access Protocol (LDAP). Learn more in the Setting up enterprise authentication section of the documentation.
Create your playbook repository
Connect Ansible Automation Platform to your source control management (SCM) tool by setting up a project in the web interface, giving you access to all playbooks in that project repository.
Configure your inventory
Create an inventory of the network devices you want to automate. Ansible Automation Platform can manage multiple inventories. You can dynamically load inventories from popular tools like Amazon Web Services (AWS) EC2, Microsoft Azure Resource Center, and VMware vCenter using inventory plugins. You can also load inventories from an Ansible Automation Platform project. The Build your inventory chapter of this e-book describes more about building and using inventories.
Set your network firewall rules
Set your firewall rules to allow Ansible Automation Platform to connect to routers and switches using the default secure shell (SSH) port 22. If desired, you can change this port number using the ansible_port host variable.
Set your Ansible Automation Platform passwords
Create a credential for holding your passwords. You can grant users and teams the ability to use credentials without actually exposing the credential to the user.
Create an Ansible job template
Create a job template to connect your inventory, credential, and project. Job templates define sets of parameters for running automation jobs, allowing you to execute the same set of tasks many times and reuse content across teams. Each job template includes:
- A project from which to load Ansible playbooks.
- An inventory or list of automation targets like network switches.
- A credential for logging into and automating the devices in your inventory.
An execution environment to pull the required dependencies for the automation job.
Run your first command and playbook
Get to know playbooks
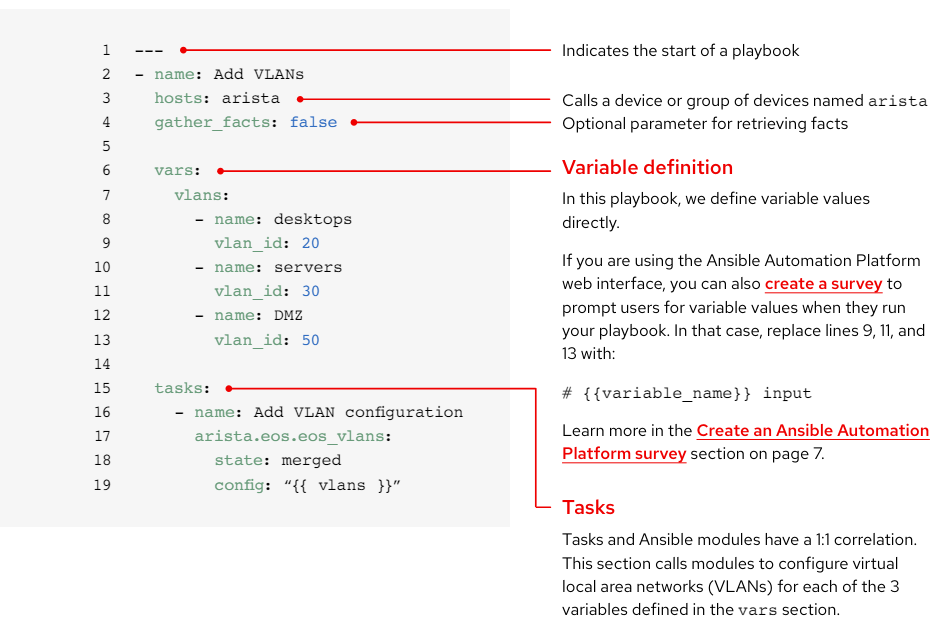
Playbooks are Ansible’s configuration, deployment, and orchestration language. They consist of sets of human-readable instructions called plays that define automation across an inventory of hosts. Each play includes one or more tasks that target one, many, or all hosts in an inventory. Each task calls an Ansible module that performs a specific function like collecting useful information, backing up network files, managing network configurations, running commands, or validating connectivity.
Playbooks can be shared and reused by multiple teams to create repeatable automation.
Anatomy of a playbook
This example shows the common parts of an Ansible playbook.
Create an Ansible survey
Surveys set extra variables for your playbook in a user-friendly question-and-answer way. To create a survey:
- Click the Add survey button in the Ansible Automation Platform web interface.
- For each question fill out the following information:
- Question: The question to ask the user
- Description (optional): A description of what is being asked
- Answer variable name: The Ansible variable name in which the response will be stored
- Answer type: The format — single or multi-line text, password, multiple choice, or integer or decimal number — of the response
- Default answer (optional): The default value of the variable
- Minimum and maximum length (optional): The minimum and maximum allowed length of the answer
- Required: Whether or not the question is optional
- Click the + button to add the question to the survey.
- Repeat step 3 to add more questions to the survey.
- Click the Save button to save the survey when you are finished.
Read the Surveys section of the Ansible Automation Platform documentation to learn more.
Run your playbook
Running a playbook is simple, but the process is different for command-line Ansible and the Ansible Automation Platform web interface.
Command-line Ansible
Run the following command:
ansible-navigator run <playbook name> -i <inventory file>
Red Hat Ansible Automation Platform web interface
Press the launch job (rocket) button next to your template in the Ansible Automation Platform web interface.
Build your inventory
Understand inventories
An inventory is a collection of hosts that may be acted on using Ansible commands and playbooks. Inventory files organize hosts into groups and can serve as a source of trust for your network. These files can be formatted as simple INI or YAML. Many organizations choose to write their inventories in YAML for consistency with their playbooks. Using an inventory file, a single playbook can maintain hundreds of network devices with a single command.
This chapter explains how to build an inventory file.
Create a basic INI-formatted inventory
First, group your inventory logically. Best practices are to group servers and network devices by their what (application, stack, or microservice), where (datacenter or region), and when (development stage).
- What: db, web, leaf, spine
- Where: east, west, floor_19, building_A
- When: dev, test, staging, prod
This example code, in INI format, illustrates a basic group structure for a very small datacenter. You can group groups using the syntax [metagroupname:children] and listing groups as members of the metagroup.
Here, the group network includes all leafs and all spines. The group datacenter includes all network devices plus all webservers.
Read the Build your inventory section of the Ansible documentation to learn more. You can also find a sample inventory report playbook on GitHub.
Anatomy of a YAML-formatted inventory
1 [leafs]undefined2 leaf01undefined3 leaf02undefined4 undefined5 [spines]undefined6 spine01undefined7 spine02undefined8 undefined9 [network:children]undefined10 leafsundefined11 spinesundefined12 undefined13 [webservers]undefined14 webserver01undefined15 webserver02undefined16 undefined17 [datacenter:children]undefined18 networkundefined19 webservers
Group inventory by platform
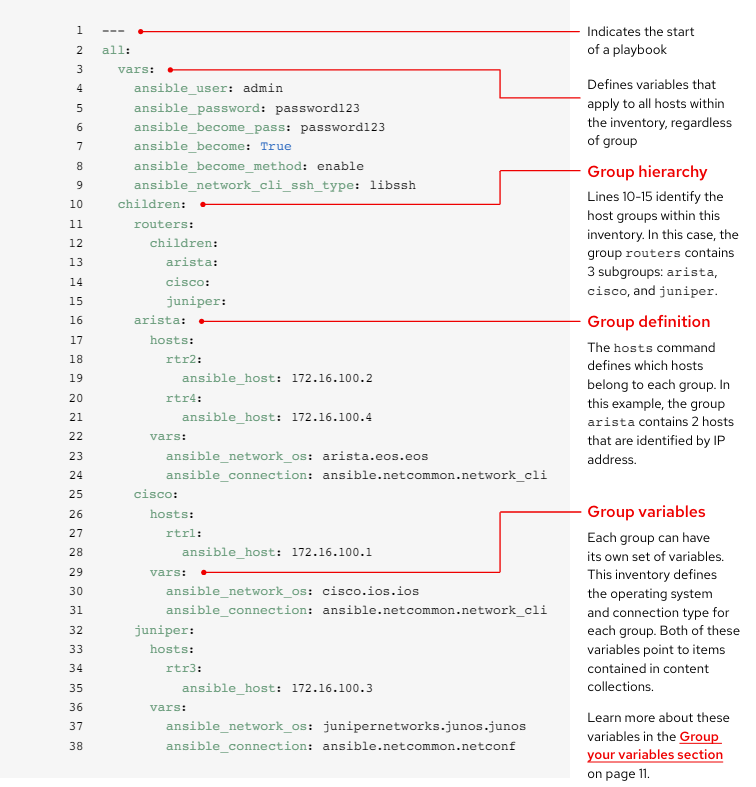
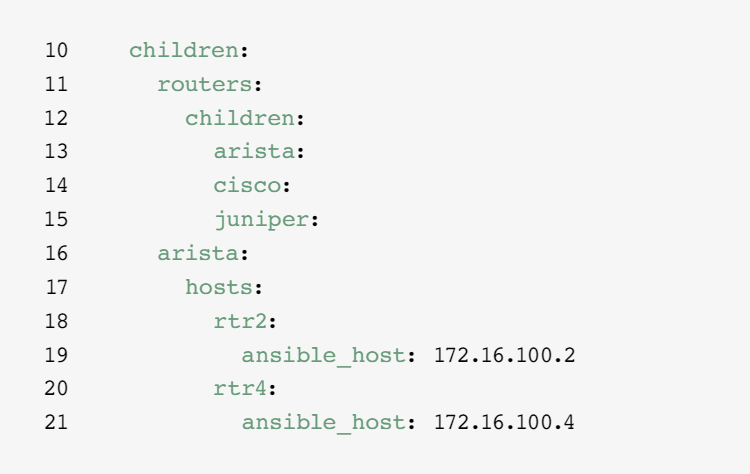
As your inventory grows, you may want to group devices by platform so you can easily define platform-specific variables for all devices on that platform. Lines 10-15 of the example inventory identify the hierarchy of host groups for this inventory. The routers group contains three children or subgroups categorized by platform: arista, cisco, and juniper. Each of these subgroups contains one or more hosts, defined by IP address in lines 16-21, 25-28, and 32-35.
Read the Group inventory by platform section of the Ansible documentation to learn more.
Set your variables
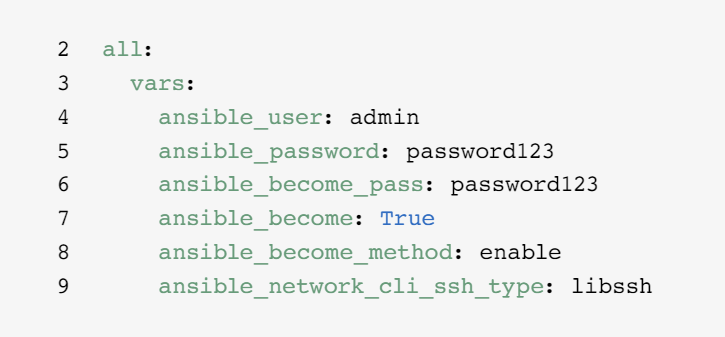
You can set values for many of the variables you needed in your first Ansible command in the inventory, so you can skip them in the ansible-playbook command. Lines 2-9 of the example inventory define variables that apply to all hosts listed in the inventory, regardless of which group they belong to.
You can set and store variables in several different files. As a best practice, set variables used to connect to devices — like login information or IP address — in inventory files or playbooks. Set variables related to device configuration in separate files stored in the group_vars directory. Read the Organizing host and group variables section of the Ansible documentation to learn more.
Group your variables
When devices in a group share the same variable values, like operating system (OS) or SSH user, you can reduce duplication and simplify maintenance by consolidating these into group variables. Group variables are set within their respective group definitions. Lines 22-24, 29-31, and 36-38 of the example inventory set group variable values for each of the three host groups.
This example defines network operating system (NOS) and connection type variables for each of the three subgroups. In this case, these variables point to items contained in Red Hat Ansible Automation Platform Content Collections. Content Collection items are formatted as namespace.collection_name.item. For example, arista.eos.eos points to the EOS operating system plugin within the EOS Collection delivered through the Arista namespace, while ansible.netcommon.network_cli points to the network CLI plugin within the Netcommon Collection delivered through the Ansible namespace.
Variable syntax
The syntax for variable values is different in inventory, in playbooks and in group_vars files, which are covered below. Even though playbook and group_vars files are both written in YAML, you use variables differently in each.
INI-style inventory files
Use the syntax key=value for variable values:
ansible_network_os=cisco.ios.ios
Files with .YML and .YAML extensions
Use YAML syntax:
key: value
Group_vars and playbook files
Use the full key name:
ansible_network_os: cisco.ios.ios
Read the Variable syntax section of the Ansible documentation to learn more.
Protect sensitive variables
Best practices are to use additional protection for sensitive variables like passwords.
Ansible Automation Platform provides credential management for passwords and key information. Using the Credentials page in the web interface, you can grant users and teams the ability to use credentials without exposing the credential to the user. Read the Credentials section of the Ansible documentation to learn more.
Note that Ansible Automation Platform can run on systems with Federal Information Processing Standards (FIPS) mode enabled.
Implement common use cases
This chapter shows sample playbooks for common network automation use cases, including adding a VLAN, gathering facts, retrieving resource information, and backing up configurations.
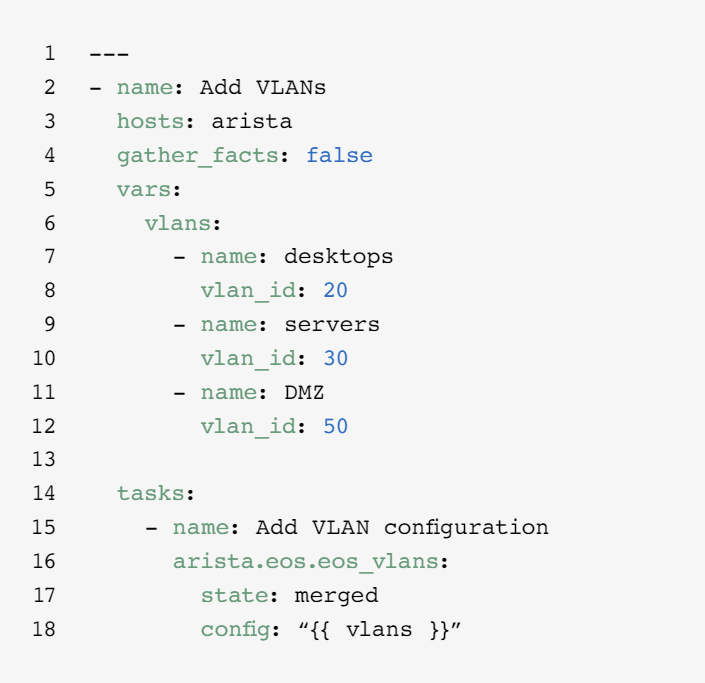
Add a VLAN
Configuring VLANs that span multiple network devices is an ongoing activity for NetOps. Ansible makes it easy to create a VLAN and propagate it across your network.
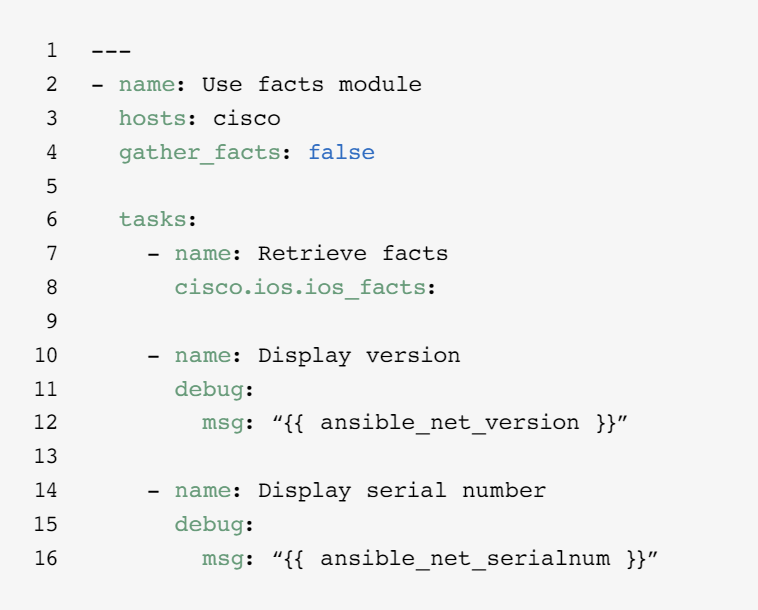
Gather facts
Most networks contain many different platforms and devices. Ansible can query, store, and report on network data like software versions and interface information.
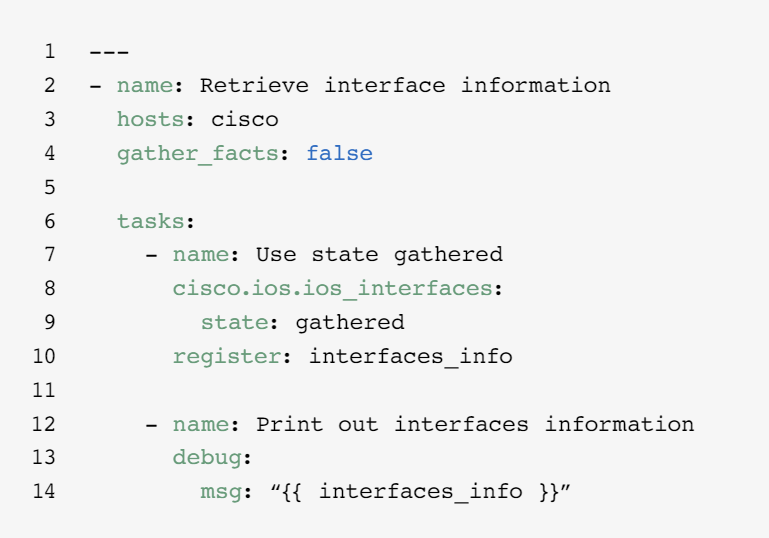
Retrieve resource information
Ansible network resource modules simplify and standardize how you manage different network devices. Any resource module can use state: gathered to retrieve information about network resources.
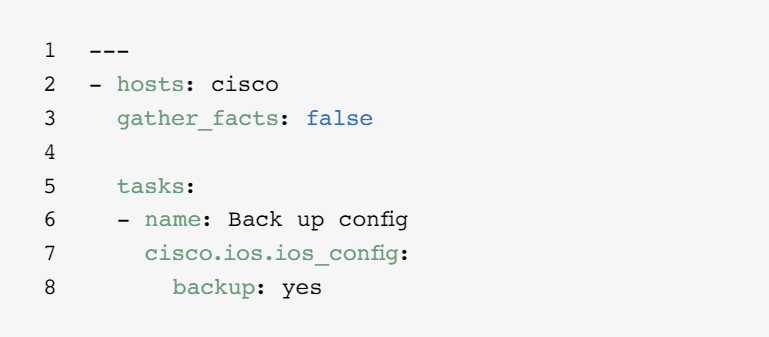
Back up configurations
Storing backups of configurations is a critical activity for NetOps. Ansible Automation Platform makes it easy to pull parts of or an entire configuration from a network device.
Access content to use with Ansible Automation Platform
You can access ready-to-use automation content to make adoption of Ansible Automation Platform even faster and easier.
Ansible Content Collections
A Content Collection is a standardized distribution format for Ansible content that can include playbook examples, roles, modules, and plugins and more. Ansible Automation Platform offers certified, supported Content Collections to extend platform capabilities, integrate with third-party technologies, expand automation across domains, and ease adoption. You can also access validated Content Collections that provide tested, opinionated references, including routing protocol, interfaces, access lists, and networking base configurations. You can install fully supported, certified Content Collections and access validated reference content from Ansible Automation Hub, available with your Ansible Automation Platform subscription.
Ansible roles
Ansible roles bundle automation content to make it reusable. Instead of creating long playbooks with hundreds of tasks, you can use roles to organize and break tasks apart into smaller, more discrete units of work. A role includes all of the tasks, variables, and handlers needed to complete a unit of work. Roles are distributed either as standalone entities or as part of Content Collections.
Ansible Automation Hub
Ansible Automation Hub gives Red Hat Ansible Automation Platform subscribers access to fully supported and certified Content Collections developed, tested, and maintained by Red Hat and its technology partners. It gives you a secure portal to Content Collections, as well as a private network for internal and third-party automation content. Automation Hub is the de-facto repository for content used in production automation environments.
Ansible Galaxy
Ansible Galaxy houses all community Ansible Collections, as well as existing standalone roles. You can also contribute the Collections and roles you create to the community through Ansible Galaxy.
Take your automation even further
Create advanced automation workflows
Once you’ve gained experience and are confident managing your network with Ansible Automation Platform, you can explore advanced use cases with event-driven automation. Event-driven automation is the next logical step in the journey to end-to-end IT and network automation. It lets you respond in a predetemined way to changing network conditions, without manual intervention. Event-Driven Ansible is included with Ansible Automation Platform and takes advantage of the same constructs as playbooks, so it’s easy to get started whenever you’re ready. For example, you can use Event-Driven Ansible to automatically gather facts to enhance service tickets, handle user administration tasks like password resets, or perform basic troubleshooting actions.
You can also use Red Hat Ansible Lightspeed with IBM watsonx Code Assistant to help your automation teams learn, create, and maintain Ansible Automation Platform content like playbook more efficiently. With this generative artificial intelligence (AI) service, you can build, find, understand, and optimize your automation content rapidly.
Find more information
Red Hat provides many resources — including detailed documentation, articles, videos, and discussions — for Ansible Automation Platform. Most are located at ansible.com and on the Red Hat customer portal.
- Product website: Red Hat Ansible Network Automation
- Hands-on labs: Interactive Ansible Automation Platform labs
- Documentation:
Network platform index
Ansible community documentation - User guides:
Inventories and variables
Surveys
Credentials - E-book: Network automation guide
- Training classes:
Ansible Basics: Automation Technical Overview
Ansible for Network Automation - Free trial: Ansible Automation Platform trial download
Ready to automate your network?
Using an intuitive, human readable language, Red Hat Ansible Automation Platform gives you a simple, powerful path to modern network operations, while supporting your current processes and existing infrastructure. With a flexible, scalable automation framework, you can improve infrastructure availability, staff productivity, network security, and configuration compliance more easily.
Try Red Hat Ansible Automation Platform for free:
red.ht/try_ansible
Deploy faster with Red Hat experts
Automating your network may seem like a daunting task, but Red Hat Consulting can help. All Red Hat Consulting engagements begin with a half-day complimentary on-site discovery session. During these sessions, Red Hat experts work with you to identify your most pressing business challenges, viable approaches for overcoming them, and desired outcomes for implementing network automation.


