Whether you use Red Hat OpenShift or Kubernetes in a bare-metal cluster, the cloud, or a simple virtual machine created with OpenShift Local or minikube, you always have a kubeconfig file. The file contents may differ in some cases, but the principle is the same.
[ Do you know the difference between Red Hat OpenShift and Kubernetes? ]
This post uses a minikube installation to explain the kubeconfig file, but you can use this information for almost any OpenShift or Kubernetes installation.
The kubeconfig file components
Kubernetes components like kubelet, kube-controller-manager, or kubectl use the kubeconfig file to interact with the Kubernetes API. Usually, the kubectl or oc commands use the kubeconfig file.
The kubeconfig file's default location for kubectl or oc is the ~/.kube directory. Instead of using the full kubeconfig name, the file is just named config. The default location of the kubeconfig file is ~/.kube/config. There are other ways to specify the kubeconfig location, such as the KUBECONFIG environment variable or the kubectl --kubeconfig parameter.
The kubeconfig file is a YAML file containing groups of clusters, users, and contexts.
- A cluster is a Kubernetes or OpenShift cluster.
- A user is a credential used to interact with the Kubernetes API.
- A context is a combination of a cluster and a user. Every time you execute an
ocorkubectlcommand, you reference a context insidekubeconfig.
[ Read Kubernetes: Everything you need to know ]
The following is a sample kubeconfig file from a new minikube installation:
apiVersion: v1
kind: Config
clusters:
- name: minikube
 cluster:
   certificate-authority: /home/hector/.minikube/ca.crt
   server: https://192.168.39.217:8443
users:
- name: minikube
 user:
   client-certificate: /home/hector/.minikube/profiles/minikube/client.crt
   client-key: /home/hector/.minikube/profiles/minikube/client.key
contexts:
- name: minikube
 context:
   cluster: minikube
   namespace: default
   user: minikube
current-context: minikube
Here are some additional details on clusters, contexts, and users.
The clusters section lists all clusters that you already connected. In this case, there is only one, named minikube. This name is arbitrary and can be any name you like. Inside the cluster are two keys:
- certificate-authority contains a certificate for the certificate authority (CA) that signed all internal Kubernetes certificates. This can be a file path or a Base64 string of the certificate's Privacy Enhanced Mail (PEM) format.
- server is the address of the server.
The users section lists all users already used to connect to a cluster. In this case, there is only a single user, named minikube. This name is arbitrary, and there is no relationship with any object inside Kubernetes or OpenShift. There are some possible keys for a user:
- client-certificate contains a certificate for the user signed by the Kubernetes CA. This can be a file path or a Base64 string in the certificate PEM format.
- client-key contains the key that signed the client certificate.
- token contains a token for this user when there is no certificate.
The contexts section specifies a combination of a user and a cluster. It also defines a default namespace for this pair. The context name is arbitrary, but the user and cluster should be predefined inside the kubeconfig file. If the namespace does not exist inside Kubernetes, the commands will fail and display the default Kubernetes message for a nonexistent namespace.
[ Cheat sheet: Kubernetes glossary ]
Authentication with kubeconfig
By default, there is no user object inside Kubernetes. Kubernetes uses an X.509 certificate to authenticate the default cluster administrator. The X.509 certificate tells Kubernetes about the user trying to access resources.
To inspect an X.509 certificate, use the openssl command. The example above contains a client-certificate pointing to a file. You can use the following command to check it:
$ openssl x509 -noout -text -in /home/hector/.minikube/profiles/minikube/client.crt
The output is large, but I'll focus on specific lines:
Certificate:
   Data:
       Version: 3 (0x2)
       Serial Number: 2 (0x2)
       Signature Algorithm: sha256WithRSAEncryption
       Issuer: CN = minikubeCA
       Validity
           Not Before: Nov 23 18:50:27 2022 GMT
           Not After : Nov 23 18:50:27 2025 GMT
       Subject: O = system:masters, CN = minikube-user
       Subject Public Key Info:
                               ...
       X509v3 extensions:
           X509v3 Key Usage: critical
               Digital Signature, Key Encipherment
           X509v3 Extended Key Usage:
               TLS Web Server Authentication, TLS Web Client Authentication
           X509v3 Basic Constraints: critical
               CA:FALSE
                               ...
Look for the Subject information and X.509v3 extensions. The concepts and requirements for these extensions are outside the scope of this article, but they are necessary for this kind of authentication.
The Subject is an X.509 directive that specifies information like the CN (Common Name), O (Organization), OU (Organization Number), C (Country), and so forth. Take a closer look at the O field. The value is system:masters. This tells Kubernetes that this certificate belongs to a member of the group system:masters. In this case, there is no user, but the group is enough.
Take a look inside Kubernetes and find the role-based access control (RBAC) objects that manage this authentication:
$ kubectl get clusterrolebinding cluster-admin -o yaml
# Output:
apiVersion: rbac.authorization.k8s.io/v1
kind: ClusterRoleBinding
metadata:
 labels:
   kubernetes.io/bootstrapping: rbac-defaults
 name: cluster-admin
roleRef:
 apiGroup: rbac.authorization.k8s.io
 kind: ClusterRole
 name: cluster-admin
subjects:
- apiGroup: rbac.authorization.k8s.io
 kind: Group
 name: system:masters
This clusterrolebinding connects the cluster-admin clusterrole to the system:masters group.
The same logic is used for other Kubernetes components, as you can see inside /etc/kubernetes:
$ ls /etc/kubernetes/*.conf
# Output:
/etc/kubernetes/admin.conf  /etc/kubernetes/controller-manager.conf  /etc/kubernetes/kubelet.conf  /etc/kubernetes/scheduler.conf
Each of these files is a kubeconfig file for a specific component with a particular user and certificate.
[ Want to test your sysadmin skills? Take a skills assessment today. ]
Modify contexts
You can change the context manually by editing the kubeconfig file, but this can lead to errors. If you want to change the default namespace for Kubernetes, you can execute the following command:
$ kubectl config set-context --current --namespace kube-system
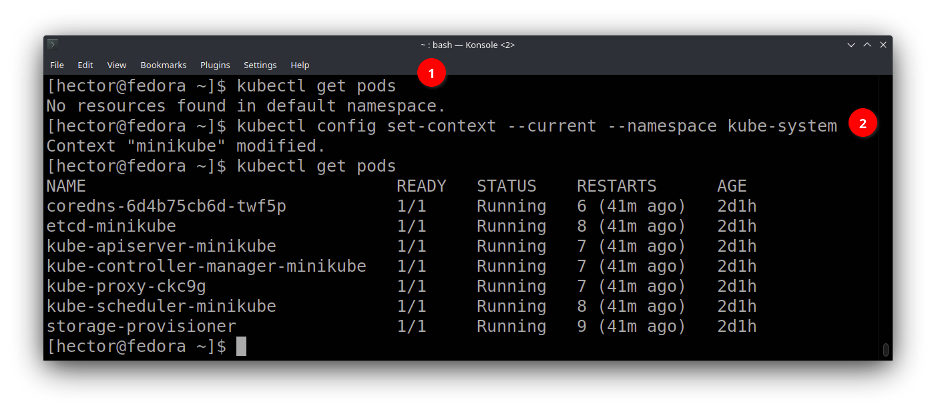
This command is safer. It will modify the kubeconfig file, changing the namespace inside the current context.
You can use other commands. For example, commands exist to completely change a context or even create a new one from scratch.
Wrap up
The kubeconfig file is the default way to authenticate to a Kubernetes cluster. It can be a little cryptic because of the embedded certificates, but it is easy to understand if you look closely. The kubeconfig file can contain clusters, users, and contexts. It is possible to switch between them with kubectl config use-context.
The OpenShift client is user-friendly because it can create a kubeconfig file if none exists after the oc login command. However, you can create a kubeconfig by executing some kubectl config commands.
About the author

Hector Vido serves as a consultant on the Red Hat delivery team. He started in 2006 working with development and later on implementation, architecture, and problem-solving involving databases and other solutions, always based on free software.
More like this
Simplify Red Hat Enterprise Linux provisioning in image builder with new Red Hat Lightspeed security and management integrations
F5 BIG-IP Virtual Edition is now validated for Red Hat OpenShift Virtualization
Can Kubernetes Help People Find Love? | Compiler
Scaling For Complexity With Container Adoption | Code Comments
Browse by channel

Automation
The latest on IT automation for tech, teams, and environments

Artificial intelligence
Updates on the platforms that free customers to run AI workloads anywhere

Open hybrid cloud
Explore how we build a more flexible future with hybrid cloud

Security
The latest on how we reduce risks across environments and technologies

Edge computing
Updates on the platforms that simplify operations at the edge

Infrastructure
The latest on the world’s leading enterprise Linux platform

Applications
Inside our solutions to the toughest application challenges
Virtualization
The future of enterprise virtualization for your workloads on-premise or across clouds