Mastering systemd: Securing and sandboxing applications and services

Image by patrickbrassard0 @Pixabay
This series of articles will explore some of my favorite Red Hat Enterprise Linux (RHEL) 8 capabilities that are enabled by systemd. Thus, this series assumes familiarity with the basic concepts of systemd. If you need a good introduction, there is a wealth of product documentation on the Red Hat Customer Portal as well as on the project site. Alternatively, there are a number of presentations available on YouTube to catch you up as well before you continue.
Systemd provides a significant number of security features that can be used to isolate services and applications from each other as well as from the underlying operating system. In many cases, systemd provides easy access to the same mechanisms provided by the Linux kernel that are also used to create isolation for Linux containers. Having the ability to provide container-esque isolation for traditional applications and services is powerful because it’s now easy to improve the security and isolation of workloads without the operational impact that containers require. It’s worth noting that the operational and organizational changes inspired by container adoption are indeed healthy and worthwhile. However, even in the most container-savvy enterprise, there are large numbers of traditional Linux deployments where security is a top priority. As we’ll see, the workloads on these systems can benefit from just a few tweaks to the corresponding unit files.
Security options common to Red Hat Enterprise Linux 7 and 8
The majority of the options explored below accept a binary true or false configuration that makes them easy to enable. There are a few that contain additional options, and the most significant of these are shown as well. Refer to the full documentation and man pages for further details. If you don’t care about the nitty-gritty of these options, feel free to skip to the next section where we will put these options together for more coherent examples:
| Option | Description |
|---|---|
PrivateTmp=yes |
Creates a file system namespace under /tmp/systemd-private-*-[unit name]-*/tmp rather than a shared /tmp or /var/tmp. Many of the unit files that ship with Red Hat Enterprise Linux include this setting and it removes an entire class of vulnerabilities around the prediction and replacement of files used in /tmp. |
PrivateNetwork= |
Provides a network namespace for the service with only a loopback interface available. A great option for applications that do not require external network communication. |
SELinuxContext= |
Runs the application in a specific context. This option is a good idea for defining when a policy is available for applications shipped outside of RHEL. A good SELinux primer is available here. |
NoNewPrivileges= |
Prevents the service and related child processes from escalating privileges. |
ProtectSystem=yes |
Makes /usr and /boot read-only to the application. Setting this option to full also makes /etc read-only. In Red Hat Enterprise Linux 8, there’s an additional option called strict that also makes /dev, /proc, and /sys read-only. |
ProtectHome=yes |
Makes /home, /root, and /run/user appear empty. An additional option is read-only, which does exactly what it says. Also new to RHEL 8, tmpfs will overlay a writeable, ephemeral file system at these points. Because these directories are used to store SSH keys and other potentially sensitive information, it’s a good idea to prohibit applications from having access. |
ProtectDevices=yes |
Creates a private /dev namespace containing only pseudo devices like /dev/null and /dev/random, which do not give access to actual hardware. It also disables CAP_MKNOD so that new device nodes cannot be created. |
CapabilityBoundingSet= |
Accepts a whitelist and blacklist of privileged capabilities for the unit. Linux capabilities break down the root user access to the system so privileged access can be better pinpointed. The classic example is for NTP or chrony to be able to configure the system clock but take no other privileged actions. More details are available in the capabilities (7) man page. |
|
|
Behaves similarly to ProtectSystem, but all three of these options allow fine-grained control of file system access. |
New security options in Red Hat Enterprise Linux 8
The new systemd security options available in Red Hat Enterprise Linux 8 are:
| Option | Description |
|---|---|
ProtectKernelTunables=yes |
Disables modification of /proc and /sys. |
ProtectKernelModules=yes |
Prohibits loading or unloading modules and masks /usr/lib/modules from the application. |
ProtectControlGroups=yes |
Disables write access to /sys/fs/cgroup/. |
RestrictNamespaces= |
Restrict all or a subset of namespaces to the service. Accepts cgroup, ipc, net, mnt, pid, user, and uts. |
AssertSecurity= |
Takes a number of requirements that must be met by the system for the service to start. If the listed capabilities are not available the service will fail to run and the event is logged. Options like selinux and uefi-secureboot are useful for many environments. |
MemoryDenyWriteExecute= |
Disables memory mapping that is simultaneously writeable and executable. |
RestrictRealtime=yes |
Prohibits real-time scheduling. |
PrivateMounts=yes |
Causes the service to run in a private mount namespace. |
DynamicUser=yes |
Effectively creates a transient user for the application. This option probably warrants its own post to explore, but briefly, the systemd implementation is brilliant because it dynamically (as the name suggests) creates a UID and GID by plugging in an nss module that "creates" the user on the fly. These users simply don’t exist when the service isn’t running. This feature is most useful for stateless applications, but directories can be mapped in for writing to. |
SystemCallFilter= |
Lets you whitelist and blacklist individual syscalls or use the user-friendly groups of calls that systemd provides. If you are familiar with seccomp filtering with containers, this option provides the exact same thing. In a general sense, most users will find the @system-service filter valuable, which enables the relevant system calls needed by most services. Users can view the list of groups and available system calls by running systemd-analyze syscall-filter. |
[Want to try out Red Hat Enterprise Linux? Download it now for free.]
An example
If you have made it this far, you might be thinking, "OK, this seems really powerful, but this is a lot to remember." Luckily, as of Red Hat Enterprise Linux 8.1, we have added a command to make it much easier to reference and check the status of these options:
systemd-analyze security [unit]
This command generates a quick snapshot of how the system is leveraging systemd’s sandboxing, and can also view the individual settings per unit. This design makes it simple to identify the available options as well as view their usage at a granular level.
Here’s the output of the default httpd.service unit:
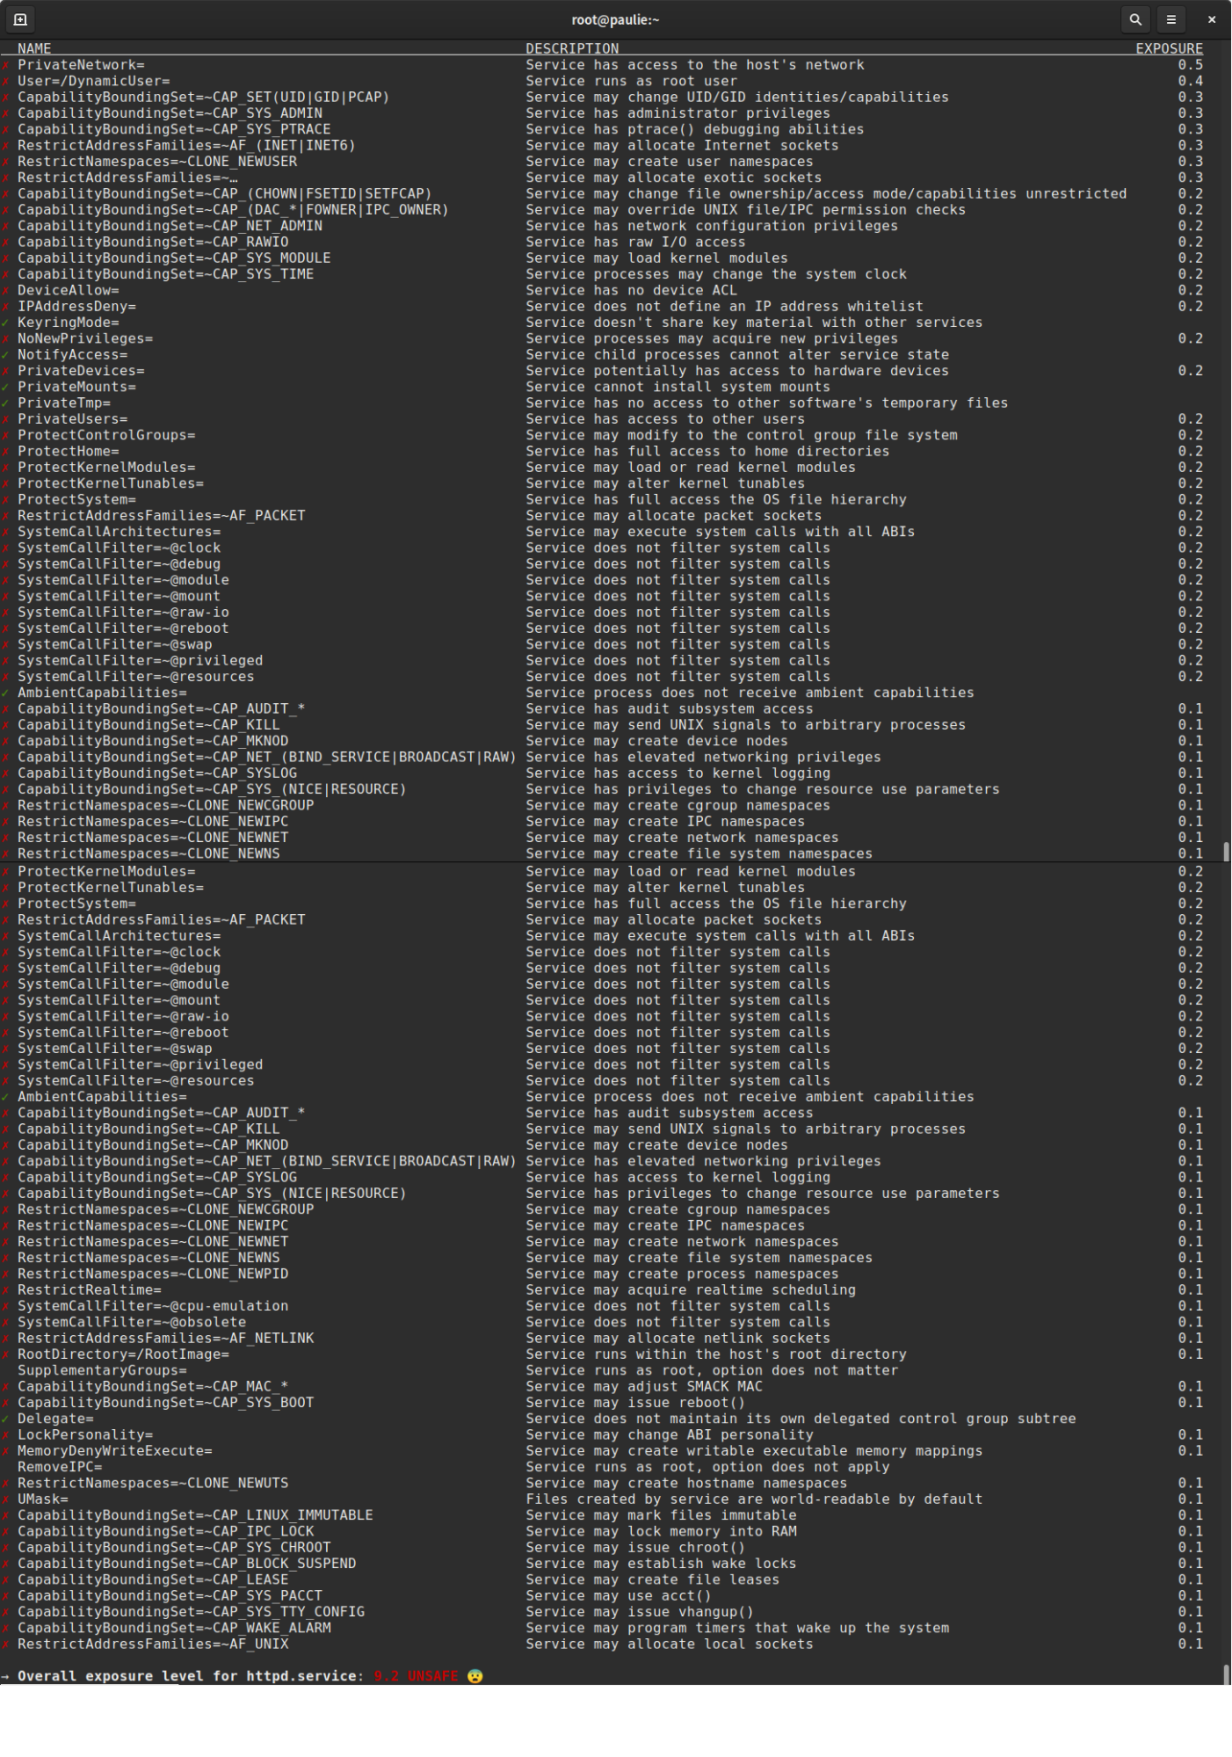
This output from systemd-analyze security shows the name, a convenient description, and an exposure rating, which demonstrates the consumption of available security settings per service and generates a weighted exposure score from how isolated the service is. It’s worth noting that this tool is not meant to provide a holistic view or opinion of security for the code or application running on the system. Just because httpd.service comes back as UNSAFE on a default install does not mean the service is insecure.
Now that we know how to query units and see which controls are in use, let’s look at applying these to a simple web server. This general-purpose example serves as an easy starting point for other services and applications.
Turn on the security options
First, create a systemd drop-in to add the security options. For Red Hat Enterprise Linux 8, run:
# systemctl edit httpd
Or, if you prefer, manually create /etc/systemd/system/httpd.service.d/security.conf.
Regardless of the way you accessed the file, now add:
[Service]
ProtectSystem=strict
ProtectHome=yes
PrivateDevices=yes
ProtectKernelTunables=yes
ProtectKernelModules=yes
ProtectControlGroups=yes
SystemCallFilter=@system-service
SystemCallErrorNumber=EPERM
NoNewPrivileges=yes
PrivateTmp=yes
For Red Hat Enterprise Linux 7, we can use a similar template:
[Service]
ProtectSystem=full
ProtectHome=yes
PrivateDevices=yes
NoNewPrivileges=yes
PrivateTmp=yes
Once you save the file and restart the service, the httpd service will be significantly isolated from the rest of the operating system. If the service is ever compromised, the potential for a breakout and ensuing damage is drastically reduced.
The examples above are a great starting point for locking down services, applications, and units running on your system. You should, of course, test these to make sure they are appropriate for your use case before rolling them out to your entire fleet. For example, if we wanted to serve content from users’ home directories, we would not include ProtectHome=yes, but instead, use ProtectHome=read-only. Also worth noting is that there’s no harm in including the newer options added in RHEL 8 on a unit file that’s run in RHEL 7. A notification message will be issued and the option will be ignored.
View the results
We can now view options in use by running systemd-analyze httpd:

You can see that a number of options are now being enforced on the web server. The rating has also changed from UNSAFE to MEDIUM. While it’s entirely possible to enable more options and further lock the service down, we would be straying from the goal of providing a practical example that will successfully apply to many services and applications in the real world. Never before has it been so simple to limit a traditional service’s access to the underlying OS.
Conclusion
For developers interested in securing your own software, the relevant security options can easily be added to the unit file(s) included with your application. Red Hat strongly encourages developers to "bake in" as much security as possible by default, and this is one of the easiest ways to achieve that goal.
For those wondering if the security features shown here are redundant with SELinux, there is overlap in function but they are largely independent. These settings will apply regardless of whether SELinux being used or not. This feature is a huge value when SELinux is not a viable option due to policy or application requirements for certain systems. In an ideal world, these would be used with SELinux as part of a layered approach to security.
I hope you have enjoyed learning how easy it is to isolate and sandbox workloads installed on Red Hat Enterprise Linux 8 with systemd. Now, go forth and, where appropriate, apply this knowledge throughout your environment(s). In the next article in this series, we will look at using Linux control groups, aka cgroups, via systemd to protect valuable system resources and solve the "noisy neighbor" problem.

Ben Breard
Ben Breard is a principal product manager for Red Hat Enterprise Linux and OpenShift and focuses on immutable operating systems and edge computing. As a true believer in open source, he also enjoys evangelizing containers, systemd, kubernetes, and Linux. More about me
Try Red Hat Enterprise Linux
Download it at no charge from the Red Hat Developer program.
Related Content


