PAM by example: Use authconfig to modify PAM

Pluggable Authentication Modules (PAM) have been around in Linux for a long time now. The goal of PAM is to centralize authentication and authentication requirements for services and modules.
In a recent article introducing PAM, I mentioned that many configuration changes are made using other utilities. One of those utilities is authconfig. This tool is used with Red Hat Enterprise Linux, up to and including, RHEL7. The latest versions of Fedora and RHEL8 use authselect instead, although you may find the authconfig utility in a compatibility mode.
The authconfig tool was created to assist in client configuration for centralized authentication. PAM files are only a part of this configuration. For example, using authconfig to enable Kerberos authentication makes changes to the /etc/nsswitch.conf file and the /etc/krb5.conf file in addition to adding the pam_krb5 module to the /etc/pam.d/{system,password}-auth files. Additional PAM configuration is also now possible with the authconfig tool, as we will see in the examples below.
Three authconfig interfaces
Like many system configuration utilities, authentication can be configured with a graphical user interface (GUI) tool, via an interactive text interface (TUI), or at the command-line. Let's look at all three options.
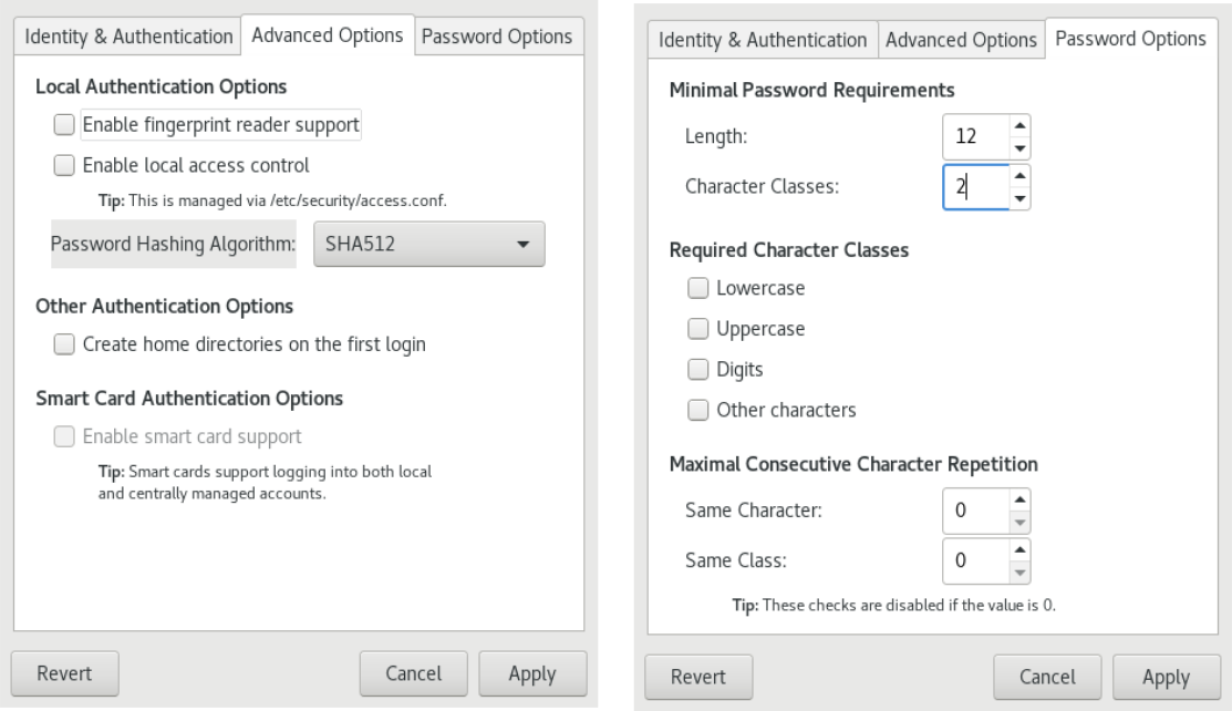
The graphical tool is provided by the authconfig-gtk package. This utility has multiple tabs to organize the options:
The interactive text version ("TUI") is accessed with the authconfig-tui command. Use the TAB key to move fields and the SPACE bar to select or deselect options:

Finally, there is the scriptable command-line tool authconfig. This command also has many options which are described with the --help option and in the man page.
The graphical and text versions are interactive, but have limited options. For example, you can enable authentication using a fingerprint reader in all three interfaces, but only the command-line tool has an option to configure the pam_faillock module. Changes in password strength using the pam_pwquality module are made with the graphical tool and the command-line tool but not the interactive text interface.
First example: Enable the fingerprint reader
Before we get to the specifics of using the command-line options, let's look at the changes made by enabling the fingerprint reader using either authconfig-tui or authconfig-gtk:
[demo]$ grep fprintd /etc/pam.d/* # before enabling the fingerprint reader
/etc/pam.d/fingerprint-auth:auth        sufficient    pam_fprintd.so
/etc/pam.d/fingerprint-auth-ac:auth        sufficient    pam_fprintd.so
With the option disabled, only the fingerprint-auth file contains references to the fprintd module. After enabling the option, new lines are added to the /etc/pam.d/system-auth files:
[demo]$ grep fprintd /etc/pam.d/* # after enabling the fingerprint reader
/etc/pam.d/fingerprint-auth:auth        sufficient    pam_fprintd.so
/etc/pam.d/fingerprint-auth-ac:auth        sufficient    pam_fprintd.so
/etc/pam.d/system-auth:auth        sufficient    pam_fprintd.so
/etc/pam.d/system-auth-ac:auth        sufficient    pam_fprintd.so
Second example: pwquality settings
The graphical tool also has a Password Options tab which controls the /etc/security/pwquality file:
[demo]# grep '^[^# ]' /etc/security/pwquality.conf # before changing a field
This file has a lot of useful comments showing syntax and default values. After changing one of the fields, all the options are set at the end of the file:
[demo]# grep '^[^# ]' /etc/security/pwquality.conf # after changing a field
minlen = 12
minclass = 2
maxrepeat = 0
maxclassrepeat = 0
lcredit = 0
ucredit = 0
dcredit = 0
ocredit = 0
I changed the required length and the required number of character classes.
Use the authconfig CLI tool
One of the tricky things to remember when using authconfig at the command-line is to add the --update option. There is a --test option to check syntax, an --update option to update the authconfig information and the actual configuration files for the options specified, and an --updateall option that resets all configuration files to match the authconfig settings. The --updateall option is a great way to delete all the manual changes that an administrator may have made to the system. My workflow typically just uses the --update option for each change.
If you run the authconfig commands as an ordinary user, you are prompted for a password to escalate privileges before the commands run. This is even true with the --help queries:
[demo]# authconfig --help
Usage: authconfig [options] {--update|--updateall|--test|--probe|--restorebackup <name>|--savebackup <name>|--restorelastbackup}

Options:
...omitted...
  --test                  do not update the configuration files, only print new settings
  --update, --kickstart   opposite of --test, update configuration files with changed settings
  --updateall             update all configuration files
As seen in the GUI and TUI versions, fingerprint authentication is an on/off toggle. The command line options are:
[demo]# authconfig --help | grep finger
    --enablefingerprint     enable authentication with fingerprint readers by default
    --disablefingerprint    disable authentication with fingerprint readers by default
And the command to enable the fingerprint feature is:
[demo]# authconfig --enablefingerprint --update
The password settings that are available in the GUI version but not the TUI version can also be set at the command-line.
[demo]# authconfig --help | grep passmin
  --passminlen=<number>          minimum length of a password
  --passminclass=<number>        minimum number of character classes in a password
You can set multiple options at the same time:
[demo]# authconfig --passminlen=12 --passminclass=2 --update
Since not all of the pwquality settings can be made with all versions of authconfig, it is common to use one of the command-line options, such as the --passminlen option, to initially configure the /etc/security/pwquality file. The utility sets values for all the options at the bottom of the file. An administrator can then manually edit any of those fields easily with a sed command, or by using the Ansible lineinfile module.
The faillock module is an example of a change to PAM configuration files that is only available with the command-line version of authconfig. This module counts failed authentication attempts per user during a specified interval and locks the account if there are too many consecutive failed authentications.
[demo]# authconfig --help | grep fail
  --enablefaillock           enable account locking in case of too many consecutive authentication failures
  --disablefaillock          disable account locking on too many consecutive authentication failures
  --faillockargs=<options>   the pam_faillock module options
The faillock module is also a bit different. There are options for enabling and disabling, but there is also an option to pass arguments. The count threshold can be adjusted, as can the interval length and the unlock timeout. You can also choose if the module applies only to ordinary users or also to the root account. The man page for pam_faillock shows the valid options and samples of the final line in the/etc/pam.d/* files. The --faillockargs option for authconfig expects a quoted string of all the options you set in the PAM files. If you leave it off, the module's default options are used.
When disabled, there are not any references to the pam_faillock module. However, if you grep for just fail you may see the pam_faildelay module:
[demo]# grep faillock /etc/pam.d/* # before enabling the faillock module
Be sure to quote the faillock arguments if you include that option:
[demo]# authconfig --enablefaillock --faillockargs='deny=4 unlock_time=300' --update
After enabling the module, several lines are added to several /etc/pam.d/*auth files.
What about manual edits to the PAM files?
During the exploration of PAM files modified by authconfig, you may notice that several files in the /etc/pam.d directory have a comment at the top about manual edits being overwritten by the utility. The utility has expanded to cover many of the standard PAM features, but sometimes there is a need to make manual changes. If you do make manual changes, you need to disable changes directly from authconfig.
There is a knowlegebase article and a services blog post that provide steps for manual edits. You can also find formal training exercises for manual changes and dig deeper into several specific modules by attending the Red Hat Security: Linux in Physical, Virtual, and Cloud (RH415) course.
After all that, it is a deprecated tool?
The authconfig utilities were originally created to assist with configuring different types of centralized authentication. Over many years, it has expanded to also handle other PAM configurations. In current systems, most of the centralized authentication is now configured through ipa-client-install or realmd, both of which expect the sssd and the pam_sss modules. The authselect utility replaces authconfig in recent versions of Fedora and was introduced to Red Hat Enterprise Linux with version 8. This new tool manages configurations through profiles and no longer edits all the different centralized configuration files. The focus is on the /etc/nsswitch.conf file and the PAM configuration files. It has many similar options for enabling and disabling features such as fingerprint readers, smartcards, and the faillock module. You can learn more about the migration with man authselect-migration.
[ Free download: Advanced Linux commands cheat sheet. ]

Susan Lauber
Susan Lauber is a Consultant and Technical Trainer with her own company, Lauber System Solutions, Inc. More about me
Try Red Hat Enterprise Linux
Download it at no charge from the Red Hat Developer program.
Related Content


