Die Netzwerkarchitektur von Red Hat OpenShift bietet ein robustes und skalierbares Frontend für unzählige containerisierte Anwendungen. Services bieten einfaches Load Balancing auf Basis von Pod-Tags, und Routen stellen diese Services für das externe Netzwerk bereit. Diese Konzepte funktionieren sehr gut für Microservices, können sich jedoch bei Anwendungen, die in virtuellen Maschinen in OpenShift Virtualization ausgeführt werden, als Herausforderung erweisen, wenn eine bestehende Serververwaltungsinfrastruktur bereits vorhanden ist und davon ausgegangen wird, dass der vollständige Zugriff auf virtuelle Maschinen immer verfügbar ist.
In einem vorherigen Artikel habe ich gezeigt, wie OpenShift Virtualization installiert und konfiguriert und eine einfache virtuelle Maschine ausgeführt wird. In diesem Artikel erläutere ich verschiedene Optionen zum Konfigurieren Ihres OpenShift Virtualization-Clusters, um virtuellen Rechnern den Zugriff auf das externe Netzwerk zu ermöglichen, ganz ähnlich wie bei anderen gängigen Hypervisoren.
Verbinden von OpenShift mit externen Netzwerken
OpenShift kann so konfiguriert werden, dass zusätzlich zum internen Pod-Netzwerk auf externe Netzwerke zugegriffen wird. Dies wird mithilfe des NMState-Operators in einem OpenShift-Cluster erreicht. Sie können den NMState-Operator über OpenShift Operator Hub installieren.
Der NMState-Operator arbeitet mit Multus, einem CNI-Plugin für OpenShift, das Pods ermöglicht, mit mehreren Netzwerken zu kommunizieren. Da wir bereits mindestens einen sehr guten Artikel zu Multus haben, verzichte ich auf die ausführliche Erklärung und konzentriere mich stattdessen auf die Verwendung von NMState und Multus, um virtuelle Rechner mit mehreren Netzwerken zu verbinden.
Übersicht der NMState-Komponenten
Nach der Installation des NMState-Operators werden drei CustomResoureDefinitions (CRD) hinzugefügt, mit denen Sie Netzwerkschnittstellen auf Ihren Cluster-Knoten konfigurieren können. Sie interagieren mit diesen Objekten, wenn Sie Netzwerkschnittstellen auf den OpenShift-Knoten konfigurieren.
NodeNetworkState
(
nodenetworkstates.nmstate.io) erstellt ein NodeNetworkState-Objekt (NNS) für jeden Cluster-Knoten. Der Inhalt des Objekts gibt den aktuellen Netzwerkstatus dieses Knotens wieder.NodeNetworkConfigurationPolicies
(
nodenetworkconfigurationpolicies.nmstate.io) ist eine Richtlinie, die den NMState-Operator anweist, wie verschiedene Netzwerkschnittstellen auf Knotengruppen konfiguriert werden sollen. Kurz gesagt, diese stellen die Konfigurationsänderungen an den OpenShift-Knoten dar.NodeNetworkConfigurationEnactments
(
nodenetworkconfigurationenactments.nmstate.io) speichert die Ergebnisse der einzelnen angewendeten NodeNetworkConfigurationPolicy (NNCP) in NodeNetworkConfigurationEnactment-Objekten (NNCE). Es gibt eine NNCE für jeden Knoten und jede NNCP.
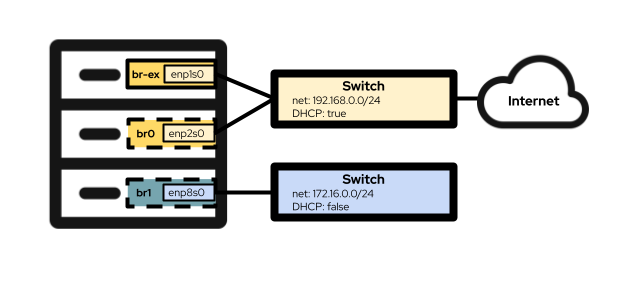
Jetzt können Sie mit der Konfiguration der Netzwerkschnittstellen auf Ihren OpenShift-Knoten fortfahren. Die Hardwarekonfiguration des von mir für diesen Artikel verwendeten praktischen Labs umfasst drei Netzwerkschnittstellen. Die erste ist enp1s0, die bereits während der Cluster-Installation mit der Bridge br-ex konfiguriert wird. Dies ist die Bridge und Schnittstelle, die ich unten in Option 1 verwende. Die zweite Schnittstelle, enp2s0, befindet sich im selben Netzwerk wie enp1s0, und ich verwende sie, um die OVS-Bridge br0 in Option #2 unten zu konfigurieren. Schließlich ist die Schnittstelle enp8s0 mit einem separaten Netzwerk ohne Internetzugriff und ohne DHCP-Server verbunden. Ich verwende diese Schnittstelle zum Konfigurieren der Linux-Bridge br1 in Option #3.
Option 1: Verwenden eines externen Netzwerks mit einer einzelnen NIC
Wenn Ihre OpenShift-Knoten nur über eine einzelne NIC für das Netzwerk verfügen, besteht Ihre einzige Option zum Verbinden virtueller Rechner mit dem externen Netzwerk in der Wiederverwendung der Bridge br-ex, die die Standardeinstellung auf allen Knoten ist, die in einem OVN-Kubernetes-Cluster ausgeführt werden . Dies bedeutet, dass diese Option für Cluster, die das ältere OpenShift-SDN verwenden, möglicherweise nicht verfügbar ist.
Da es nicht möglich ist, die Bridge br-ex vollständig neu zu konfigurieren, ohne den grundlegenden Betrieb des Clusters zu beeinträchtigen, müssen Sie stattdessen ein lokales Netzwerk zu dieser Bridge hinzufügen. Sie können dies mit der folgenden Einstellung NodeNetworkConfigurationPolicy erreichen:
$ cat br-ex-nncp.yaml
apiVersion: nmstate.io/v1
kind: NodeNetworkConfigurationPolicy
metadata:
  name: br-ex-network
spec:
  nodeSelector:
    node-role.kubernetes.io/worker: ''
  desiredState:
    ovn:
      bridge-mappings:
      - localnet: br-ex-network
        bridge: br-ex
        state: present
Das obige Beispiel ist größtenteils in jeder Umgebung, die der Bridge br-ex ein lokales Netzwerk hinzufügt, identisch. Die einzigen Teile, die im Allgemeinen geändert werden, sind der Name der NNCP (.metadata.name) und der Name des localnet (.spec.desiredstate.ovn.bridge-mappings). In diesem Beispiel sind beide br-ex-network, die Namen sind jedoch beliebig und müssen nicht identisch sein. Der für localnet verwendete Wert wird bei der Konfiguration von NetworkAttachmentDefinition benötigt. Merken Sie sich diesen Wert also für später!
Wenden Sie die NNCP-Konfiguration auf die Cluster-Knoten an:
$ oc apply -f br-ex-nncp.yaml
nodenetworkconfigurationpolicy.nmstate.io/br-ex-network
Überprüfen Sie den Fortschritt von NNCP und NNCE mit den folgenden Befehlen:
$ oc get nncp
NAME            STATUS        REASON
br-ex-network   Progressing   ConfigurationProgressing
$ oc get nnce
NAME                               STATUS        STATUS AGE   REASON
lt01ocp10.matt.lab.br-ex-network   Progressing   1s           ConfigurationProgressing
lt01ocp11.matt.lab.br-ex-network   Progressing   3s           ConfigurationProgressing
lt01ocp12.matt.lab.br-ex-network   Progressing   4s           ConfigurationProgressing
In diesem Fall hat die einzelne NNCP mit der Bezeichnung br-ex-network eine NNCE für jeden Knoten erzeugt. Nach einigen Sekunden ist der Vorgang abgeschlossen:
$ oc get nncp
NAME            STATUS      REASON
br-ex-network   Available   SuccessfullyConfigured
$ oc get nnce
NAME                               STATUS      STATUS AGE   REASON
lt01ocp10.matt.lab.br-ex-network   Available   83s          SuccessfullyConfigured
lt01ocp11.matt.lab.br-ex-network   Available   108s         SuccessfullyConfigured
lt01ocp12.matt.lab.br-ex-network   Available   109s         SuccessfullyConfigured
Sie können jetzt zur NetworkAttachmentDefinition wechseln, die definiert, wie Ihre virtuellen Rechner eine Verbindung zu dem neuen Netzwerk herstellen, das Sie gerade erstellt haben.
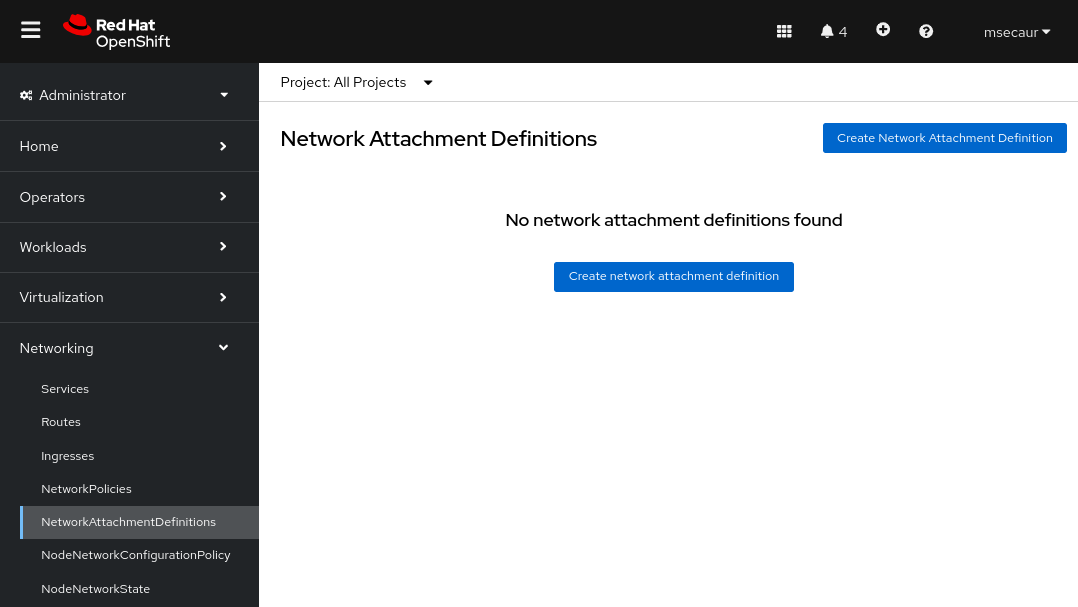
Konfiguration von NetworkAttachmentDefinition
Um eine NetworkAttachmentDefinition in der OpenShift-Konsole zu erstellen, wählen Sie das Projekt aus, in dem Sie virtuelle Rechner erstellen (in diesem Beispiel vmtest), und navigieren Sie zu Networking > NetworkAttachmentDefinitions. Klicken Sie dann auf die blaue Schaltfläche mit der Bezeichnung Create Network Attachment Definition.
Die Console zeigt ein Format an, das Sie zum Erstellen der NetworkAttachmentDefinition verwenden können:
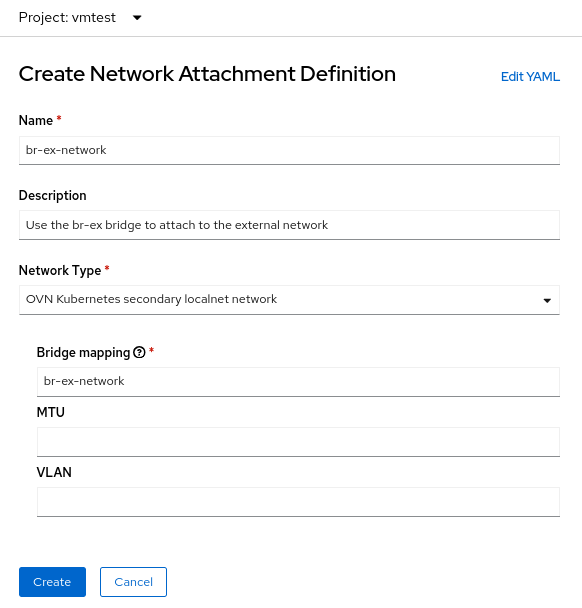
Das Feld Nameist beliebig, aber in diesem Beispiel verwende ich denselben Namen, den ich für die NNCP verwendet habe (br-ex-network). Für Network Type müssen Sie OVN Kubernetes sekundäres localnet network auswählen.
Geben Sie in das Feld Bridge mapping den Namen des von Ihnen zuvor konfigurierten localnet ein (in diesem Beispiel br-ex-network). Da im Feld eine „Bridge-Zuordnung“ angefordert wird, könnten Sie versucht sein, „br-ex“ einzugeben. Tatsächlich müssen Sie jedoch das von Ihnen erstellte localnet verwenden, das bereits mit br-ex verbunden ist.
Alternativ können Sie die NetworkAttachmentDefinition mithilfe einer YAML-Datei anstatt der Konsole erstellen:
$ cat br-ex-network-nad.yaml
apiVersion: k8s.cni.cncf.io/v1
kind: NetworkAttachmentDefinition
metadata:
  name: br-ex-network
  namespace: vmtest
spec:
  config: '{
            "name":"br-ex-network",
            "type":"ovn-k8s-cni-overlay",
            "cniVersion":"0.4.0",
            "topology":"localnet",
            "netAttachDefName":"vmtest/br-ex-network"
          }'
$ oc apply -f br-ex-network-nad.yaml
networkattachmentdefinition.k8s.cni.cncf.io/br-ex-network created
In der obigen NetworkAttachmentDefinition YAML ist der Name im Feldname .spec.config der Name des localnet aus der NNCP, und netAttachDefName ist der Namespace/Name, der mit den beiden identischen Feldern in .metadata-Abschnitt übereinstimmen muss. (in diesem Fall vmtest/br-ex-network).
Virtuelle Rechner verwenden statische IP-Adressen oder DHCP für die IP-Adressierung, daher funktioniert die IP-Adressenverwaltung (IPAM) in einem NetworkAttachmentDefinition
NIC-Konfiguration des virtuellen Rechners
Um das neue externe Netzwerk mit einem virtuellen Rechner zu verwenden, ändern Sie den Abschnitt Network interfaces des virtuellen Rechners und wählen das neue vmtest/br-ex-network als den Network-Typ aus. Es ist auch möglich, die MAC-Adresse in dieser Form anzupassen.
Fahren Sie mit der Erstellung des virtuellen Rechners wie gewohnt fort. Nach dem Booten des virtuellen Rechners ist Ihre virtuelle NIC mit dem externen Netzwerk verbunden. In diesem Beispiel verfügt das externe Netzwerk über einen DHCP-Server. Demzufolge wird automatisch eine IP-Adresse zugewiesen und der Zugriff auf das Netzwerk ist zulässig.
Löschung von NetworkAttachmentDefinition und localnet auf br-ex
Falls Sie die obigen Schritte rückgängig machen möchten, stellen Sie zunächst sicher, dass keine virtuellen Rechner NetworkAttachmentDefinition verwenden, und löschen Sie sie dann mit der Konsole. Verwenden Sie alternativ den Befehl:
$ oc delete network-attachment-definition/br-ex-network -n vmtest
networkattachmentdefinition.k8s.cni.cncf.io "br-ex-network" deleted
Löschen Sie dann die Richtlinie NodeNetworkConfigurationPolicy. Beim Löschen der Richtlinie werden die Änderungen auf den OpenShift-Knoten nicht rückgängig gemacht.
$ oc delete nncp/br-ex-network
nodenetworkconfigurationpolicy.nmstate.io "br-ex-network" deleted
Beim Löschen der NNCP werden auch alle zugeordneten NNCEs gelöscht:
$ oc get nnce
No resources found
Ändern Sie abschließend die NNCP-YAML-Datei, die zuvor verwendet wurde, aber ändern Sie den Bridge-Mapping-Status von present zu absent:
$ cat br-ex-nncp.yaml
apiVersion: nmstate.io/v1
kind: NodeNetworkConfigurationPolicy
metadata:
  name: br-ex-network
spec:
  nodeSelector:
    node-role.kubernetes.io/worker: ''
  desiredState:
    ovn:
      bridge-mappings:
      - localnet: br-ex-network
        bridge: br-ex
        state: absent  # Changed from present
Wenden Sie die aktualisierte NNCP erneut an:
$ oc apply -f br-ex-nncp.yaml
nodenetworkconfigurationpolicy.nmstate.io/br-ex-network
$ oc get nncp
NAME            STATUS      REASON
br-ex-network   Available   SuccessfullyConfigured
$ oc get nnce
NAME                               STATUS      STATUS AGE   REASON
lt01ocp10.matt.lab.br-ex-network   Available   2s           SuccessfullyConfigured
lt01ocp11.matt.lab.br-ex-network   Available   29s          SuccessfullyConfigured
lt01ocp12.matt.lab.br-ex-network   Available   30s          SuccessfullyConfigured
Die localnet-Konfiguration wurde nun entfernt. Sie können die NNCP bedenkenlos löschen.
Option 2: Verwendung eines externen Netzwerks mit einer OVS-Bridge auf einer dedizierten NIC
OpenShift-Knoten können mit mehreren Netzwerken verbunden werden, die unterschiedliche physische NICs verwenden. Es gibt zwar viele Konfigurationsoptionen (wie Bonding und VLANs), aber in diesem Beispiel verwende ich nur eine dedizierte NIC, um eine OVS-Bridge zu konfigurieren. Weitere Informationen zu erweiterten Konfigurationsoptionen, wie dem Erstellen von Bonds oder der Verwendung eines VLAN, finden Sie in unserer Dokumentation.
Mit diesem Befehl können Sie alle Knotenschnittstellen anzeigen (die Ausgabe wird hier aus Gründen der Einfachheit gekürzt):
$ oc get nns/lt01ocp10.matt.lab -o jsonpath='{.status.currentState.interfaces[3]}' | jq
{
…
  "mac-address": "52:54:00:92:BB:00",
  "max-mtu": 65535,
  "min-mtu": 68,
  "mtu": 1500,
  "name": "enp2s0",
  "permanent-mac-address": "52:54:00:92:BB:00",
  "profile-name": "Wired connection 1",
  "state": "up",
  "type": "ethernet"
}
In diesem Beispiel ist der nicht verwendete Netzwerkadapter auf allen Knoten enp2s0.
Beginnen Sie wie im vorherigen Beispiel mit einer NNCP, die eine neue OVS-Bridge mit dem Namen br0 auf den Knoten erstellt, und verwenden Sie dabei eine nicht verwendete NIC (in diesem Beispiel enp2s0). Die NNCP sieht folgendermaßen aus:
$ cat br0-worker-ovs-bridge.yaml
apiVersion: nmstate.io/v1
kind: NodeNetworkConfigurationPolicy
metadata:
  name: br0-ovs
spec:
  nodeSelector:
    node-role.kubernetes.io/worker: ""
  desiredState:
    interfaces:
    - name: br0
      description: |-
        A dedicated OVS bridge with enp2s0 as a port
        allowing all VLANs and untagged traffic
      type: ovs-bridge
      state: up
      bridge:
        options:
          stp: true
        port:
        - name: enp2s0
    ovn:
      bridge-mappings:
      - localnet: br0-network
        bridge: br0
        state: present
Im obigen Beispiel ist zunächst das Feld .metadata.name zu beachten, das beliebig ist und den Namen der NNCP angibt. Sie können auch sehen, dass Sie am Ende der Datei eine localnet bridge-mapping zur neuen Bridge br0 hinzufügen, genau wie Sie es mit br-ex im Beispiel mit der einzelnen NIC gemacht haben.
Im vorherigen Beispiel, in dem br-ex als Bridge verwendet wurde, konnte davon ausgegangen werden, dass alle OpenShift-Knoten über eine Bridge mit diesem Namen verfügen. Daher haben Sie die NNCP auf alle Worker-Knoten angewendet. Im aktuellen Szenario ist es jedoch möglich, dass heterogene Knoten mit unterschiedlichen NIC-Namen für dieselben Netzwerke vorhanden sind. In diesem Fall müssen Sie jedem Knotentyp eine Bezeichnung hinzufügen, um zu ermitteln, welche Konfiguration er aufweist. Wenn Sie dann den .spec.nodeSelector im obigen Beispiel verwenden, können Sie die Konfiguration nur auf Knoten anwenden, die mit dieser Konfiguration funktionieren. Bei anderen Knotentypen können Sie die NNCP und den nodeSelector ändern und die gleiche Bridge auf diesen Knoten erstellen, auch wenn der zugrunde liegende NIC-Name anders ist.
In diesem Beispiel sind alle NIC-Namen gleich, sodass Sie dieselbe NNCP für alle Knoten verwenden können.
Wenden Sie nun die NNCP an, genau wie beim Beispiel mit der einzelnen NIC:
$ oc apply -f br0-worker-ovs-bridge.yaml
nodenetworkconfigurationpolicy.nmstate.io/br0-ovs created
Wie zuvor kann es einige Zeit dauern, bis die NNCP und NNCE erstellt und erfolgreich angewendet werden. Sie können die neue Bridge im NNS sehen:
$ oc get nns/lt01ocp10.matt.lab -o jsonpath='{.status.currentState.interfaces[3]}' | jq
{
…
    "port": [
      {
        "name": "enp2s0"
      }
    ]
  },
  "description": "A dedicated OVS bridge with enp2s0 as a port allowing all VLANs and untagged traffic",
…
  "name": "br0",
  "ovs-db": {
    "external_ids": {},
    "other_config": {}
  },
  "profile-name": "br0-br",
  "state": "up",
  "type": "ovs-bridge",
  "wait-ip": "any"
}
Konfiguration der NetworkAttachmentDefinition
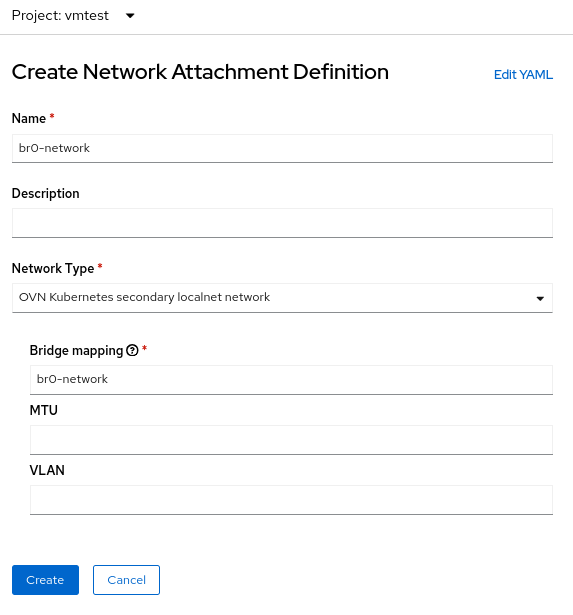
Der Prozess zum Erstellen einer NetworkAttachmentDefinition für eine OVS-Bridge ist identisch mit dem vorherigen Beispiel der Verwendung einer einzelnen NIC, da Sie in beiden Fällen eine OVN-Bridge-Zuordnung erstellen. Im aktuellen Beispiel lautet der Bridge-Zuordnungsname br0-network. Sie verwenden also diesen Namen im Erstellungsformular NetworkAttachmenDefinition:
Alternativ können Sie die NetworkAttachmentDefinition mit einer YAML-Datei erstellen:
$ cat br0-network-nad.yaml
apiVersion: k8s.cni.cncf.io/v1
kind: NetworkAttachmentDefinition
metadata:
  name: br0-network
  namespace: vmtest
spec:
  config: '{
            "name":"br0-network",
            "type":"ovn-k8s-cni-overlay",
            "cniVersion":"0.4.0",
            "topology":"localnet",
            "netAttachDefName":"vmtest/br0-network"
          }'
$ oc apply -f br0-network-nad.yaml
networkattachmentdefinition.k8s.cni.cncf.io/br0-network created
NIC-Konfiguration des virtuellen Rechners
Erstellen Sie wie zuvor einen virtuellen Rechner mit der neuen NetworkAttachmentDefinition namens vmtest/br0-network für das NIC-Netzwerk.
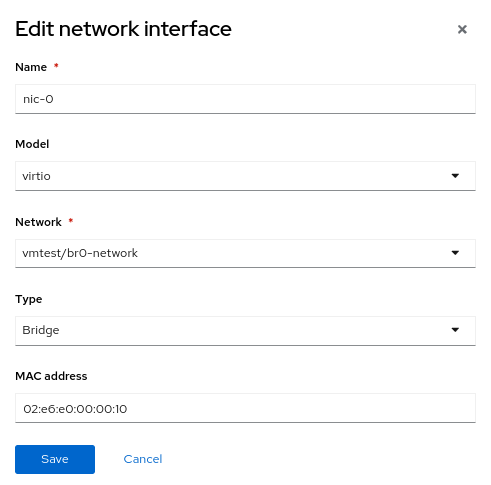
Wenn der virtuelle Rechner bootet, verwendet die NIC die Bridge br0 auf dem Knoten. In diesem Beispiel befindet sich die dedizierte NIC für br0 im selben Netzwerk wie die Bridge br-ex. Sie erhalten also eine IP-Adresse aus demselben Subnetz wie zuvor und der Netzwerkzugriff ist zulässig.
Löschung der NetworkAttachmentDefinition und OVS-Bridge
Der Vorgang zum Löschen der NetworkAttachmentDefinition und der OVS-Bridge ist weitgehend mit dem vorherigen Beispiel identisch. Stellen Sie sicher, dass keine virtuellen Rechner die NetworkAttachmentDefinition verwenden, und löschen Sie sie dann über die Konsole oder die Befehlszeile:
$ oc delete network-attachment-definition/br0-network -n vmtest
networkattachmentdefinition.k8s.cni.cncf.io "br0-network" deleted
Löschen Sie als Nächstes die Datei NodeNetworkConfigurationPolicy (denken Sie daran, dass durch das Löschen der Richtlinie die Änderungen auf den OpenShift-Knoten nicht rückgängig gemacht werden):
$ oc delete nncp/br0-ovs
nodenetworkconfigurationpolicy.nmstate.io "br0-ovs" deleted
Beim Löschen der NNCP wird auch die zugehörige NNCE gelöscht:
$ oc get nnce
No resources found
Ändern Sie abschließend die NNCP-YAML-Datei, die zuvor verwendet wurde, aber ändern Sie den Status der Schnittstelle von „up“ zu „absent“ und den Status der Bridge-Zuordnung von „present“ zu „absent“:
$ cat br0-worker-ovs-bridge.yaml
apiVersion: nmstate.io/v1
kind: NodeNetworkConfigurationPolicy
metadata:
  name: br0-ovs
spec:
  nodeSelector:
    node-role.kubernetes.io/worker: ""
  desiredState:
    Interfaces:
    - name: br0
      description: |-
        A dedicated OVS bridge with enp2s0 as a port
        allowing all VLANs and untagged traffic
      type: ovs-bridge
      state: absent      # Change this from “up” to “absent”
      bridge:
        options:
          stp: true
        port:
        - name: enp2s0
    ovn:
      bridge-mappings:
      - localnet: br0-network
        bridge: br0
        state: absent  # Changed from present
Wenden Sie die aktualisierte NNCP erneut an. Nachdem die NNCP erfolgreich verarbeitet wurde, können Sie sie löschen.
$ oc apply -f br0-worker-ovs-bridge.yaml
nodenetworkconfigurationpolicy.nmstate.io/br0-ovs created
Option 3: Verwendung eines externen Netzwerks mit einer Linux-Bridge auf einer dedizierten NIC
In Linux-Netzwerken dienen OVS-Bridges und Linux-Bridges demselben Zweck. Die Entscheidung für das eine oder das andere hängt letztlich von den Anforderungen der Umgebung ab. Im Internet gibt es zahlreiche Artikel, in denen die Vor- und Nachteile beider Bridge-Typen erörtert werden. Linux-Bridges sind ausgereifter und einfacher als OVS-Bridges, allerdings sind sie nicht so funktionsreich. Demgegenüber haben OVS-Bridges den Vorteil, dass sie mehr Tunneltypen und andere moderne Features als Linux-Bridges bieten, bei denen die Fehlerbehebung allerdings etwas schwieriger ist. Für OpenShift Virtualization sollten Sie aufgrund von Dingen wie MultiNetworkPolicy wahrscheinlich standardmäßig OVS-Bridges anstelle von Linux-Bridges verwenden, aber Bereitstellungen können mit beiden Optionen erfolgreich sein.
Beachten Sie, dass die Standard-MTU 1400 ist, wenn eine Schnittstelle eines virtuellen Rechners mit einer OVS-Bridge verbunden ist. Wenn die Schnittstelle eines virtuellen Rechners mit einer Linux-Bridge verbunden ist, lautet der Standard-MTU-Wert 1500.Weitere Informationen zur Cluster-MTU-Größe finden Sie in der offiziellen Dokumentation.
Knotenkonfiguration
Wie im vorherigen Beispiel verwenden wir eine dedizierte NIC, um eine neue Linux-Bridge zu erstellen. Um das Ganze interessant zu gestalten, verbinde ich die Linux-Bridge mit einem Netzwerk ohne DHCP-Server, damit Sie sehen können, wie sich das auf die mit diesem Netzwerk verbundenen virtuellen Rechner auswirkt.
In diesem Beispiel erstelle ich eine Linux-Bridge namens br1 auf der Schnittstelle enp8s0, die an das Netzwerk 172.16.0.0/24 angeschlossen ist, das keinen Internetzugriff oder DHCP-Server hat. Die NNCP sieht folgendermaßen aus:
$ cat br1-worker-linux-bridge.yaml
apiVersion: nmstate.io/v1
kind: NodeNetworkConfigurationPolicy
metadata:
  name: br1-linux-bridge
spec:
  nodeSelector:
    node-role.kubernetes.io/worker: ""
  desiredState:
    interfaces:
      - name: br1
        description: Linux bridge with enp8s0 as a port
        type: linux-bridge
        state: up
        bridge:
          options:
            stp:
              enabled: false
          port:
            - name: enp8s0
$ oc apply -f br1-worker-linux-bridge.yaml
nodenetworkconfigurationpolicy.nmstate.io/br1-worker created
Wie zuvor dauert es einige Sekunden, bis die NNCP und NNCE erstellt und erfolgreich angewendet werden.
Konfiguration der NetworkAttachmentDefinition
Der Prozess zum Erstellen einer NetworkAttachmentDefinition für eine Linux-Bridge unterscheidet sich ein wenig von den beiden vorherigen Beispielen, da Sie diesmal keine Verbindung zu einem OVN-Localnet herstellen. Bei einer Linux-Bridge-Verbindung stellen Sie eine direkte Verbindung zur neuen Bridge her. Hier ist das Erstellungsformular für die NetworkAttachmenDefinition:
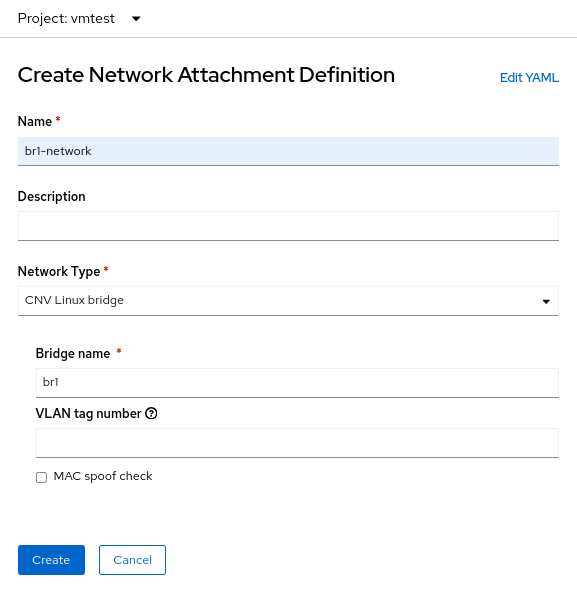
Wählen Sie in diesem Fall den Network Type der CNV Linux Bridge aus, und geben Sie den Namen der tatsächlichen Bridge in das Feld Bridge name ein, in diesem Beispiel br1.
NIC-Konfiguration des virtuellen Rechners
Erstellen Sie jetzt einen weiteren virtuellen Rechner, aber verwenden Sie die neue NetworkAttachmentDefinition mit dem Namen vmtest/br1-network für das NIC-Netzwerk. Dadurch wird die NIC an die neue Linux-Bridge hinzugefügt.

Wenn der virtuelle Rechner bootet, verwendet die NIC die Bridge br1 auf dem Knoten. In diesem Beispiel befindet sich die dedizierte NIC in einem Netzwerk ohne DHCP-Server und ohne Internetzugriff. Geben Sie der NIC daher eine manuelle IP-Adresse mit nmcli, und überprüfen Sie die Konnektivität nur im lokalen Netzwerk.
Löschung der NetworkAttachmentDefinition und Linux-Bridge
Wie bei den vorherigen Beispielen müssen Sie zum Löschen derNetworkAttachmentDefinition und der Linux-Bridge zunächst sicherstellen, dass keine virtuellen Rechner die NetworkAttachmentDefinitionverwenden. Löschen Sie es über die Konsole oder die Befehlszeile:
$ oc delete network-attachment-definition/br1-network -n vmtest
networkattachmentdefinition.k8s.cni.cncf.io "br1-network" deleted
Löschen Sie dann die Datei NodeNetworkConfigurationPolicy:
$ oc delete nncp/br1-linux-bridge
nodenetworkconfigurationpolicy.nmstate.io "br1-linux-bridge" deleted
Durch das Löschen der NNCP werden auch alle zugeordneten NNCEs gelöscht (denken Sie daran, dass durch das Löschen der Richtlinie die Änderungen auf den OpenShift-Knoten nicht rückgängig gemacht werden):
$ oc get nnce
No resources found
Ändern Sie abschließend die NNCP-YAML-Datei, indem Sie den Status der Schnittstelle von up zu absent ändern:
$ cat br1-worker-linux-bridge.yaml
apiVersion: nmstate.io/v1
kind: NodeNetworkConfigurationPolicy
metadata:
  name: br1-linux-bridge
spec:
  nodeSelector:
    node-role.kubernetes.io/worker: ""
  desiredState:
    interfaces:
      - name: br1
        description: Linux bridge with enp8s0 as a port
        type: linux-bridge
        state: absent  # Changed from up
        bridge:
          options:
            stp:
              enabled: false
          port:
            - name: enp8s0
Wenden Sie die aktualisierte NNCP erneut an. Nachdem die NNCP erfolgreich verarbeitet wurde, kann sie gelöscht werden.
$ oc apply -f br1-worker-linux-bridge.yaml
nodenetworkconfigurationpolicy.nmstate.io/br1-worker created
Fortschrittliches Networking in OpenShift Virtualization
Viele Nutzende von OpenShift Virtualization können von den zahlreichen erweiterten Netzwerk-Features profitieren, die in Red Hat OpenShift bereits integriert sind. Da jedoch mehr und mehr Workloads von herkömmlichen Hypervisors migriert werden, sollten Sie die vorhandene Infrastruktur nutzen. Dies erfordert möglicherweise eine direkte Verbindung der OpenShift Virtualization-Workloads mit den externen Netzwerken. Der NMState-Operator bietet in Verbindung mit Multus Networking eine flexible Methode zur Steigerung der Performance und Konnektivität, um Ihnen den Übergang von einem herkömmlichen Hypervisor auf Red Hat OpenShift Virtualization zu erleichtern.
Weitere Informationen über OpenShift Virtualization finden Sie in einem weiteren Blog-Beitrag von mir zu diesem Thema oder unter den Produktinformationen auf unserer Website. Weitere Informationen zu den in diesem Artikel behandelten Netzwerkthemen finden Sie in der Dokumentation zu Red Hat OpenShift, die alle benötigten Details enthält. Wenn Sie eine Demo sehen oder OpenShift Virtualization selbst nutzen möchten, wenden Sie sich an Ihren Account Executive.
Über den Autor

Matthew Secaur is a Red Hat Principal Technical Account Manager (TAM) for Canada and the Northeast United States. He has expertise in Red Hat OpenShift Platform, Red Hat OpenShift Virtualization, Red Hat OpenStack Platform, and Red Hat Ceph Storage.
Nach Thema durchsuchen

Automatisierung
Das Neueste zum Thema IT-Automatisierung für Technologien, Teams und Umgebungen

Künstliche Intelligenz
Erfahren Sie das Neueste von den Plattformen, die es Kunden ermöglichen, KI-Workloads beliebig auszuführen

Open Hybrid Cloud
Erfahren Sie, wie wir eine flexiblere Zukunft mit Hybrid Clouds schaffen.

Sicherheit
Erfahren Sie, wie wir Risiken in verschiedenen Umgebungen und Technologien reduzieren

Edge Computing
Erfahren Sie das Neueste von den Plattformen, die die Operations am Edge vereinfachen

Infrastruktur
Erfahren Sie das Neueste von der weltweit führenden Linux-Plattform für Unternehmen

Anwendungen
Entdecken Sie unsere Lösungen für komplexe Herausforderungen bei Anwendungen
Virtualisierung
Erfahren Sie das Neueste über die Virtualisierung von Workloads in Cloud- oder On-Premise-Umgebungen