
Red Hat Satellite allows for the centralized management of Linux servers, using automation to help users and system administrators provision, configure and update their systems more quickly and easily.
Satellite has so many features, however, that it can be hard to take advantage of everything it has to offer. So here are 21 tips to help you make the most of this powerful tool.
- Tip 1: Operating system
- Tip 2: Network time protocol
- Tip 3: Red Hat Insights
- Tip 4: OpenSCAP
- Tip 5: Old tasks cleanup
- Tip 6: Remote execution
- Tip 7: Audit logs
- Tip 8: Basic health check
- Tip 9: Simple Content Access for subscriptions
- Tip 10: Inventory auto upload
- Tip 11: Sync Plans
- Tip 12: Life cycle environments
- Tip 13: Host collections
- Tip 14: Content views
- Tip 15: Ansible Roles
- Tip 16: Host groups
- Tip 17: Activation keys
- Tip 18: Compliance reports
- Tip 19: Advanced host registration
- Tip 20: Hypervisor integration
- Tip 21: Registry troubleshooting
Tip 1: Operating system
First, if you already have Satellite, check which operating system it was installed on. Newer versions of Satellite require Red Hat Enterprise Linux (RHEL) 8.
If you are using RHEL 7, you can upgrade to RHEL 8 by using Leapp.
Additional packages
If you are doing a fresh install of Satellite, these packages can be of great help when investigating remote command access and execution issues:
- setroubleshoot
- setroubleshoot-server
- chrony
- sos
Tip 2: Network time protocol
Make sure the NTP (network time protocol) service is active and the server time is synchronized with the time source:
# systemctl enable --now chronyd

# chronyc tracking

  Reference ID    : 8A24A423 (138.36.164.35)
  Stratum         : 3
  Ref time (UTC)  : Mon Feb 13 14:19:55 2023
  System time     : 0.000324393 seconds slow of NTP time
  Last offset     : -0.000123486 seconds
  RMS offset      : 0.000903467 seconds
  Frequency       : 7.525 ppm slow
  Residual freq   : -0.018 ppm
  Skew            : 1.163 ppm
  Root delay      : 0.013419098 seconds
  Root dispersion : 0.003460045 seconds
  Update interval : 260.4 seconds
  Leap status     : Normal

# chronyc sources

  MS Name/IP address         Stratum Poll Reach LastRx Last sample
  ===============================================================================
  ^+ 177.91.162.90                 2   8   377   181   -115us[ -233us] +/-   12ms
  ^- time.cloudflare.com           3   8   377    63  +6297us[+6297us] +/-   74ms
  ^+ ben.openx.com.br              2   8   377    59  -3286us[-3286us] +/- 9938us
  ^* 138-36-164-35.openx.com.>     2   8   237   120   +272us[ +148us] +/-   11ms
Tip 3: Red Hat Insights
Enable Red Hat Insights support in Satellite. You can do this using the following commands:
# satellite-maintain packages install insights-client
# satellite-installer --register-with-insights
# foreman-maintain packages install insights-client
Tip 4: OpenSCAP
OpenSCAP is an essential resource for anyone looking to increase the security and reliability levels of their Linux servers.
With OpenSCAP, you can perform security and compliance checks of your environments in an automated way.
To enable OpenSCAP on Satellite, run the following commands:
# satellite-installer --enable-foreman-plugin-openscap
# foreman-maintain packages install puppet-foreman_scap_client
# foreman-rake foreman_openscap:bulk_upload:default
# foreman-maintain packages install scap-security-guide
Tip 5: Old tasks cleanup
All executed tasks are registered in Satellite, and can be viewed in the monitoring dashboard. Over time, the number of registrations can become overwhelming, especially in environments with many hosts.
To keep the amount of data at a reasonable level, it is possible to enable the automatic cleanup of this type of record.
To remove old tasks, you can use commands like these:
# foreman-rake foreman_tasks:cleanup TASK_SEARCH='label ~ *' AFTER='7d' STATES='stopped,paused' VERBOSE=true TASK_BACKUP=false
# foreman-rake foreman_tasks:cleanup TASK_SEARCH='label ~ *' AFTER='30d' TASK_BACKUP=false
To enable the automatic cleanup feature of old tasks, run this command:
# satellite-installer --foreman-plugin-tasks-automatic-cleanup true
Tip 6: Remote execution
One of the most useful features of Satellite is remote command execution, which can work for a single host or for a group of hosts as a bulk action.
To enable this feature, run the following commands on your Satellite server:
# satellite-installer --enable-foreman-plugin-remote-execution
# satellite-installer --foreman-proxy-plugin-remote-execution-ssh-install-key
It may be interesting to configure Satellite to connect to managed hosts by IP, bearing in mind that not all environments have their hosts registered in DNS.
Go to Administer > Settings > Remote Execution and activate the option Connect by IP.
You should also enable remote execution as the default method for performing management of the registered hosts in the following path:
Administer > Settings > Content and enable the option Use remote execution by default.
Note: sudo is fully supported for remote command executions.
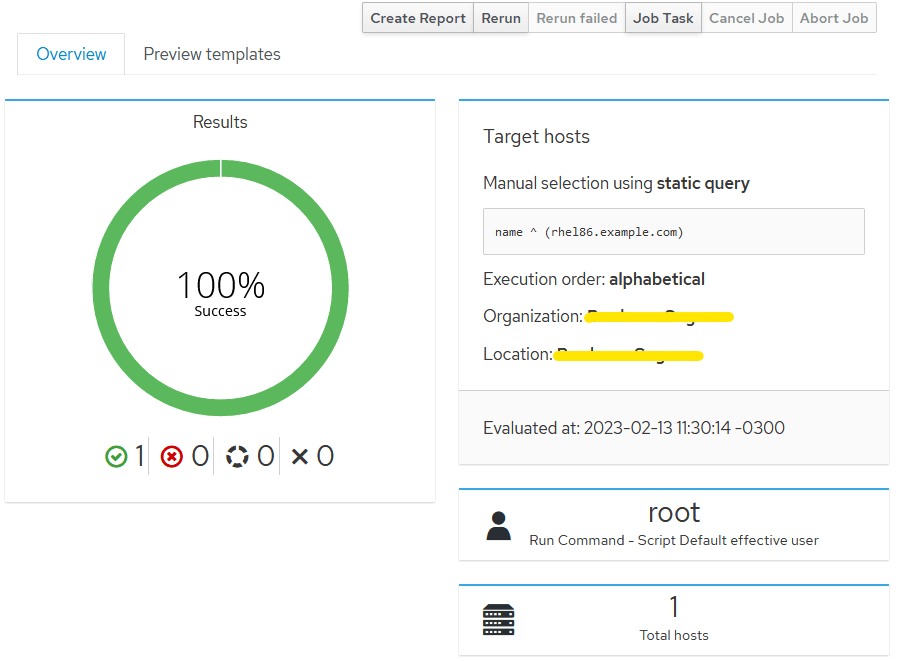
To test a remote command that needs sudo on a single host, go to Hosts > All Hosts and click on a host. Afterwards, press the button Schedule a job.
Specify the command you want to run on the target host in the command field.

Note: If you have already configured remote execution and defined it should use sudo by default, it is not necessary to include the "sudo" command in the command form.
A successfully executed command should display a screen similar to this:
To do the same for a group of hosts, go to Hosts > Host Collections and click on the collection link of the group on which you want to run a bulk action.
Now click on the Package Installation, Removal, and Update link.
From the Install menu dropdown, select the via remote execution - customize first option.

On the next screen, you will see that the Search Query field is populated with the list of all hosts contained in the selected collection.
Then change the Job category for Commands and enter the command you want to run.
Tip 7: Audit logs
Operating system
The operating system audit log consumes large amounts of disk space. To keep this under control, you can configure a weekly cron schedule to rotate the operating system audit log.
# crontab -e
0 1 * * 0 /sbin/service auditd rotate > /dev/null 2>&1
Red Hat Satellite
Satellite also has audit logging, which also consumes large amounts of disk space. There are a few ways to perform maintenance on these records.
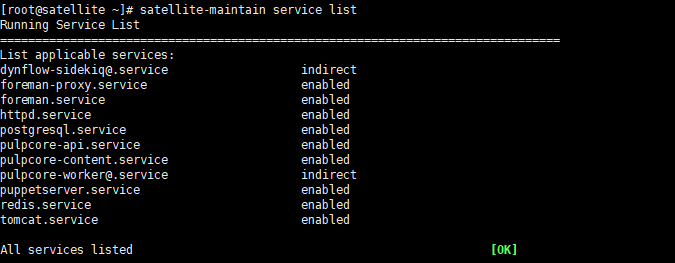
Tip 8: Basic health check
Satellite has many components that interact with each other. You can verify their status with the following commands:
# foreman-maintain service status --brief
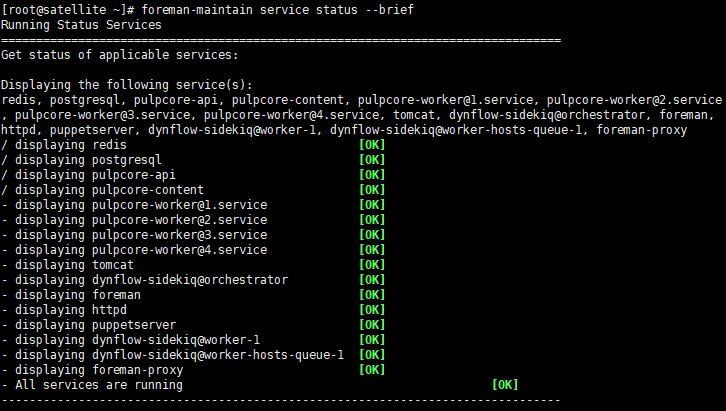
# hammer ping
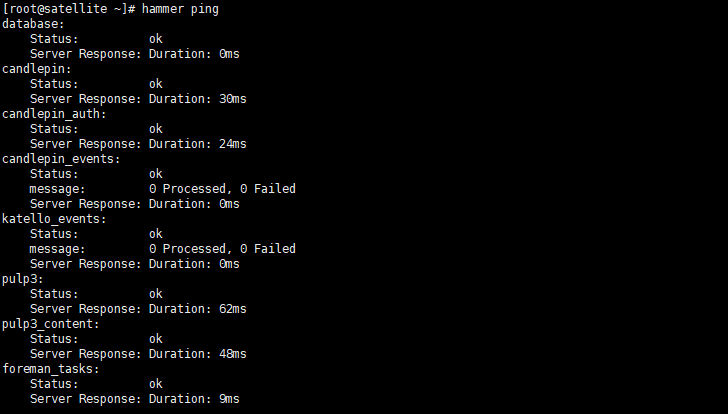
# satellite-maintain service list
Tip 9: Simple Content Access for subscriptions
Simple Content Access (SCA) is part of Red Hat's subscription tools that helps simplify the behavior of the entitlement tooling, making it easier to consume the content provided by your Red Hat subscriptions without the complexity of configuring the subscription tooling.
SCA is an optional feature of Red Hat Subscription Management (RHSM) and Red Hat Satellite 6, and can be enabled on a per-subscription allocation basis by an organization administrator.
SCA removes processes that are:
- Time consuming
- Overly complex, especially for systems administration teams
- Business impacting (the cost of adjusting the number of subscriptions consumed versus purchased can be high)
SCA simplifies the entitlement experience so that the Linux administrator does not have a complex workflow to complete when adding, removing and renewing subscriptions.
This gives the administrator more time to spend doing things other than subscription management. It does this by removing the need to attach subscriptions at a per-system level.
To enable SCA, go to Content > Subscriptions > Manage Manifest and check the Simple Content Access toggle:
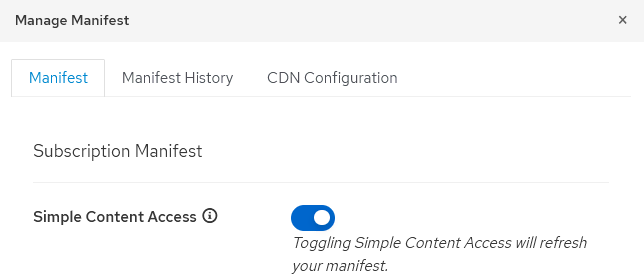
Note: SCA should also be enabled on the customer portal.

Tip 10: Inventory auto upload
Satellite inventory can be automatically uploaded to the Red Hat customer portal, where detailed AI-powered analysis can provide critical information about the health of registered products.
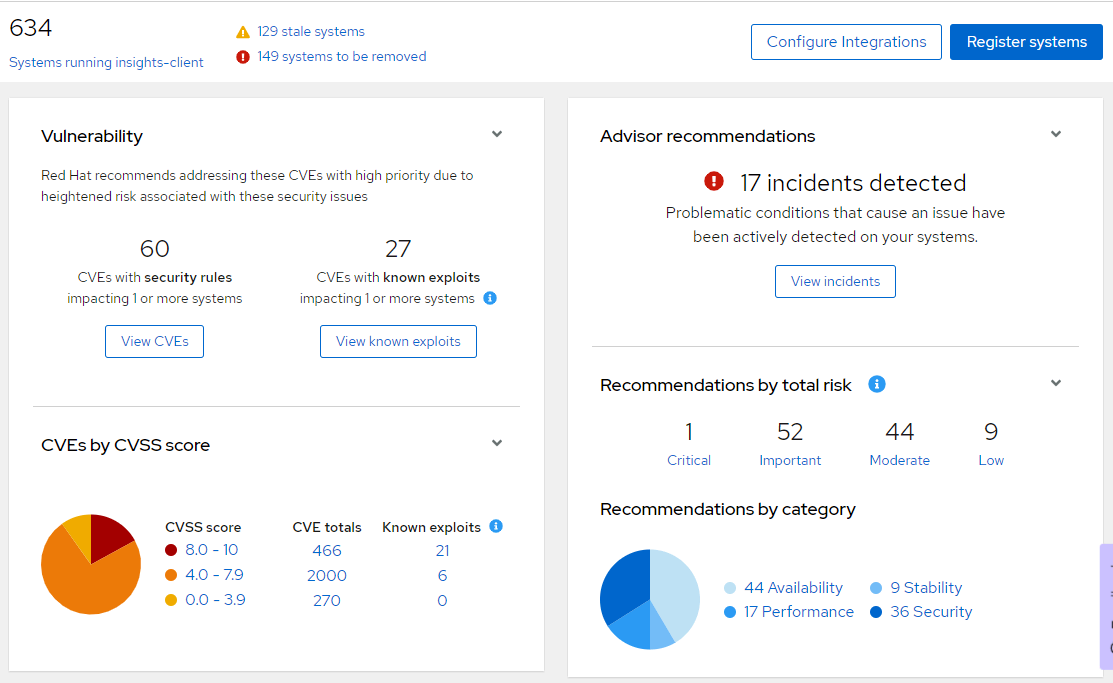
Due to the sensitive nature of the data that is stored in the customer portal, some data should be obfuscated. This is especially important for organizations that have stricter regulations regarding data handling.
To obfuscate the data, go to Content > Subscriptions > Manage Manifest and in the Inventory Auto Upload option, click the Show Advanced Settings button.

Obfuscated data will appear in the Red Hat Hybrid Cloud Console in a form similar to what is shown here:

Note: your domain replaces example.com where it is shown in this screenshot.
Tip 11: Sync Plans
Sync Plans are designed to automatically update subscribed Red Hat software within Satellite, saving bandwidth and accelerating the deployment of the latest software releases for Red Hat products.
Go to Content > Sync Plans and create one or more plans for the software that will be distributed through Satellite.
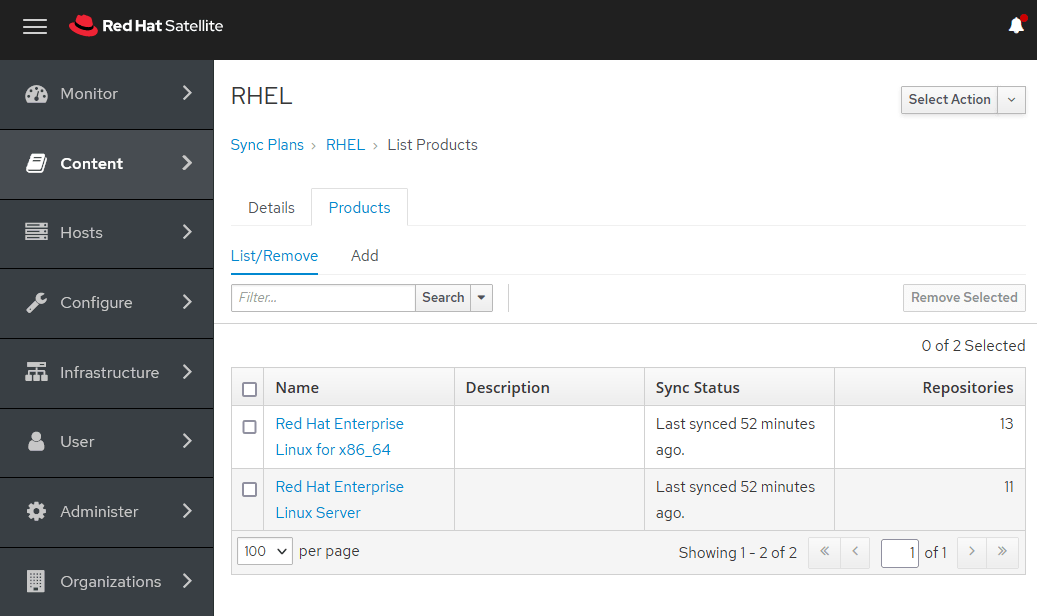
To manually sync the latest released Red Hat software, go to Content > Sync Status and select the software you want to download.

Tip 12: Life cycle environments
The application life cycle is a concept central to Satellite content management functions. It defines how a particular system and its software look at a particular stage:

For example, for a simple application life cycle, you might only have a development stage and a production stage. In this case, the application life cycle might look like this:
Development >> Production
However, a more complex application life cycle might have additional stages, such as a phase for testing or a beta release. This adds extra stages to the application life cycle:
Development >> Testing >> Beta Release >> Production
Tip 13: Host collections
A host collection is a group of content hosts, letting you perform the same action on multiple hosts at the same time. You can create host collections to suit your requirements, such as, grouping hosts by OS, function, department or business unit.
We recommend that you create collections for each of your operating systems:
- RHEL7_Collection
- RHEL8_Collection
- RHEL9_Collection
Tip 14: Content views
Satellite uses content views to create customized repositories. To do this, you must define which repositories to use and then apply certain filters to the content. You can use content views to define which software versions a particular environment uses.
For example, a production environment might use a content view containing older package versions, while a development environment might use a content view containing newer package versions.
Each content view creates a set of repositories across each environment, which the Satellite server stores and manages. When you promote a content view from one environment to the next in the application life cycle, the respective repository on the Satellite server updates and publishes the packages.
We recommend that you create content views for your operating systems main release:
- RHEL7_Content_View
- RHEL8_Content_View
- RHEL9_Content_View
Tip 15: Ansible Roles
Import the Ansible Roles installed on Satellite so you can use them.
Go to Configure > Roles > Import from and select the roles you want to use.
Learn more:
Tip 16: Host groups
Apart from the physical topology of capsule servers, Satellite provides several logical units for grouping hosts. Hosts in a group inherit the group's configuration. For example, the parameters that define the provisioning environment can be applied at the following levels:
Global >> Organization >> Location >> Domain >> Host group >> Host
You can create host groups to accommodate your operating systems stage. For example:
- RHEL9_DSV
- RHEL9_HMG
- RHEL9_PRD
If necessary, a more complex group hierarchy can be used. For example:
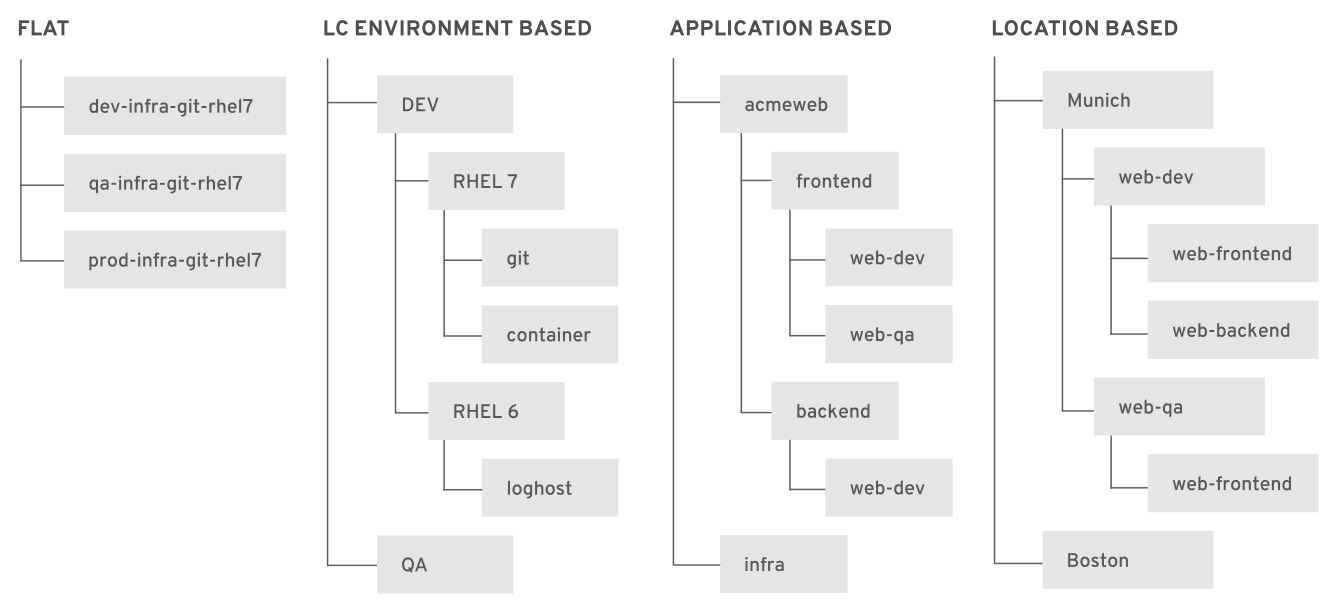
For each host group created, be sure to:
- Enable Insights Client and OpenSCAP Client Ansible Roles
- Associate a content view related to the operating system
- Inform the Satellite or capsule that will be the software content source
- Select the corresponding capsules (use the Satellite server if there are no additional capsules)
- Select the proper network domain
- Leave the operating system field blank
It is not necessary to fill in anything else.
Tip 17: Activation keys
Activation keys (AKs) provide a method to automate system registration and subscription attachment. You can create multiple keys and associate them with different environments and content views.
For example, you might create a basic activation key with a subscription for RHEL workstations and associate it with content views from a particular environment. It is also possible to create AKs for specific versions of an OS (RHEL 8.3, RHEL 9.1, etc). You can use AKs during content host registration to improve the speed, simplicity and consistency of the process.
AKs are used only when hosts are registered. If changes are made to an AK, it is applicable only to the hosts that are registered with the amended AK in the future. The changes are not replicated to existing registered hosts.
AKs can define the following properties for content hosts:
- Associated subscriptions and subscription attachment behavior
- Available products and repositories
- A life cycle environment and a content view
- Host collection membership
- System purpose
Additional tips:
- When creating a new AK, always associate it with the host collection
- Also associate the AK with the content view
Such associations will facilitate the advanced host registration process on Satellite.
Tip 18: Compliance reports
Use OpenSCAP to generate reports that provide input to improve the health and reliability of your Linux servers.
When running multiple RHEL systems, it is important to keep all your systems compliant with your security policy and to perform security scans and evaluations remotely from one location.
To create a policy:
- Go to Hosts > Compliance > Policies
- Click on the New Compliance Policy button
- Configure your policy:
- Deployment Options: Ansible
- Name: Compliance_Policy_RHEL8
- SCAP Content: Red Hat rhel8 default content
- XCCDF Profile: CIS Red Hat Enterprise Linux 8 Benchmark for Level 1 - Server
- Schedule: Monthly
- Host Group: RHEL8 (a report for the selected group will run automatically at the selected schedule)
You are free to select other security policies, as each one contains a specific set of rules that may or may not apply.
Now that the policy configuration is in place, issue your first OpenSCAP report:
Go to Hosts > All Hosts and click on a host. From the Schedule a job drop down menu, select Run OpenSCAP scan.

Generated reports can be found under Hosts > Reports. To read a report, click on the Full Report button.
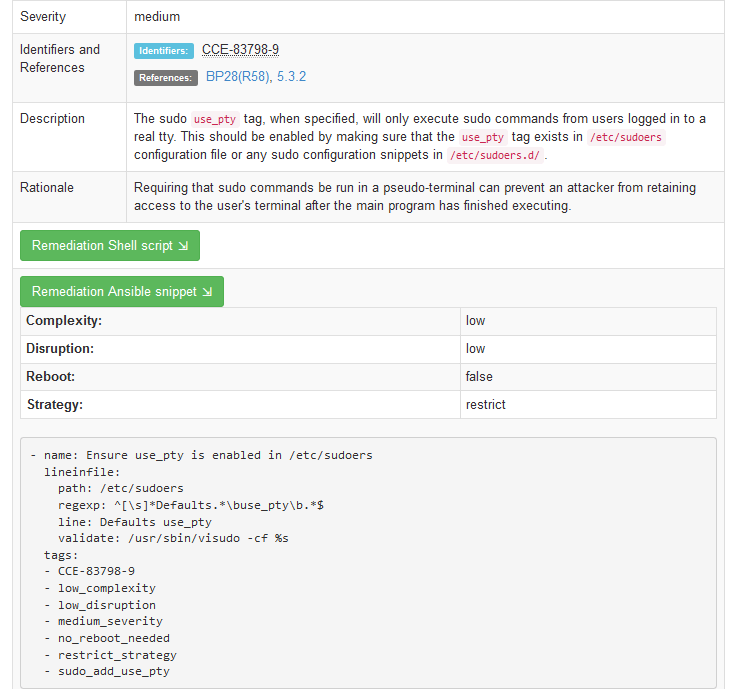
The report will contain several analyses, referring to best practices, security and vulnerabilities.
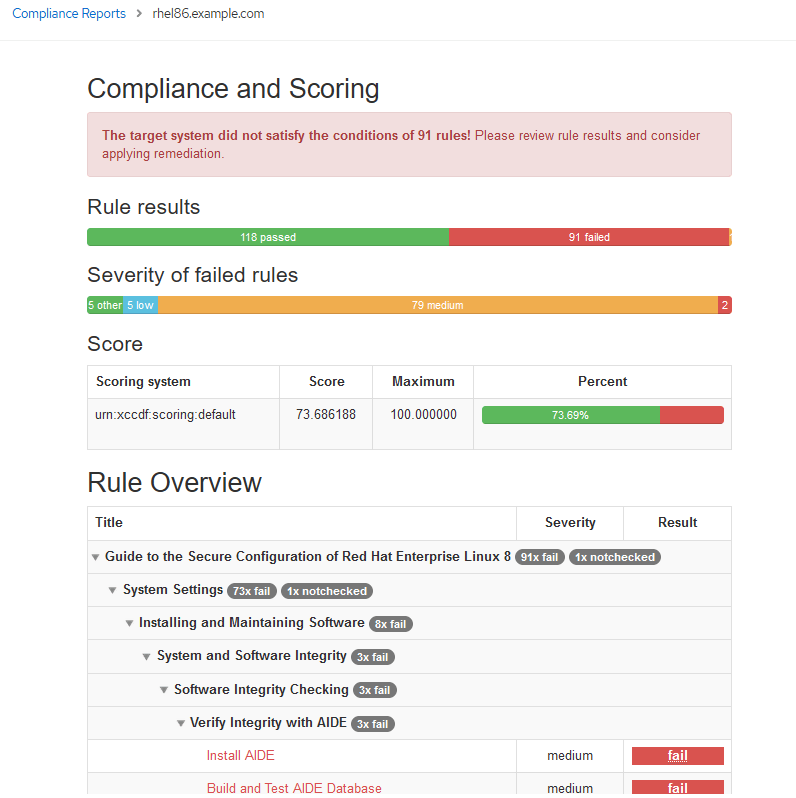
For each problem that’s detected, you will be provided with the scripts, playbooks and other pertinent information to help remedy the problems.
Tip 19: Advanced host registration
This registration method replaces the classic approach (with the subscription-manager command). With this method, it is possible to automatically perform a variety of actions at the time of host registration:
- Associate the host with an organization and location
- Add the host to a group
- Configure remote access
- Enable Insights
- Install packages
- Associate an activation key
- Put the host under a life cycle environment
This makes the host registration process faster, and makes the Satellite environment more organized.
To configure the advanced host registration:
- Go to Hosts > Register Hosts.
- In the General tab, enter:
- Organization
- Location
- Hostgroup
- Check "Insecure" if you use self signed certificates
- In the Advanced tab, enter:
- Setup REX: Yes
- Setup Insights: Yes
- Install Packages: katello-agent gofer katello-host-tools
- Enable Update packages if you want
- Token Lifetime: Unlimited
- Activation key: select the AK corresponding to the operating system you are registering
- Lifecycle Environment: Select the one that best suits your need
- Check: Ignore errors
- Check: Force
Now click on the Generate button and copy the activation URL. Save it to a file.
To register a host using the advanced registration method, paste the activation command to the host and hit enter.

Registering hosts on Satellite is now easier and more practical.
Note: If you already have hosts registered with Satellite using the classic method and you want to re-register those hosts, the following steps may help
# subscription-manager unregister
# subscription-manager clean
# rpm -e $(rpm -qa|grep -i katello-ca-consumer)
# [ -e katello-ca-consumer-latest.noarch.rpm ] && rm -f katello-ca-consumer-latest.noarch.rpm
# curl -skO https://satellite.example.com/pub/katello-ca-consumer-latest.noarch.rpm
# yum localinstall -y katello-ca-consumer-latest.noarch.rpm
# curl -sS --insecure 'https://satellite.example.com/register?activation_keys=xxxxxxxx
Note: Be sure to replace the Satellite hostname and the "curl" line with your environment information.
Tip 20: Hypervisor integration
Modern IT infrastructure is a mix of physical and virtual hardware, with virtualization providing a level of flexibility and scalability not easily achieved with physical hardware.
Did you know you can integrate your Satellite with industry-leading hypervisors?
Integrating Satellite with the hypervisor allows the creation of virtual machines (VMs) and full management of their software life cycle directly from Satellite.
The supported virtualization platforms to which a virtual data center (VDC) subscription can be applied are:
- Red Hat OpenStack Platform
- VMware vSphere
- Microsoft Hyper-V
Click here to learn more about how to set up Satellite hypervisor integration.
Tip 21: Registry troubleshooting
Registering new hosts within Satellite is usually not a problem when all requirements are met, but legacy environments with multiple servers may have customizations that can cause problems. Here are some of the most common registry problems and what to do to investigate their causes:
- If you’re getting 401 errors, check that katello-ca was installed on the host.
- If you’re getting 403 errors, and you have an HTTP Proxy, edit the file /etc/rhsm/rhsm.conf and add your Satellite URL to the no_proxy list.
- If the registration process is presenting random errors, check whether the file /etc/rhsm/rhsm.conf was customized. If so, replace its contents with the original code stored at the /etc/rhsm/rhsm.conf.kat-backup file.
- For 404 errors, check if your Satellite hostname can be resolved by your hosts.
- If you managed to register your host but you are unable to install any packages due to errors, check the /etc/yum.repos.d directory and the /etc/yum.conf file for any repositories configured that are not official Red Hat repositories.
- If the host data is not obfuscated on Red Hat Console, there could be several causes. Check that the file /etc/rhsm/facts/insights-client.facts contains the correct information about your "obfuscate" setup. To solve this quickly, run the following commands on the affected host:
# sed -i s/'#obfuscate=False'/'obfuscate=True'/g /etc/insights-client/insights-client.conf
# sed -i s/'#obfuscate_hostname=False'/'obfuscate_hostname=True'/g /etc/insights-client/insights-client.conf
# insights-client
I hope these tips help you understand how powerful and flexible Red Hat Satellite can be. See you in the next article!
About the author

Andre Rocha is a Consultant at Red Hat focused on OpenStack, OpenShift, RHEL and other Red Hat products. He has been at Red Hat since 2019, previously working as DevOps and SysAdmin for private companies.
Browse by channel

Automation
The latest on IT automation for tech, teams, and environments

Artificial intelligence
Updates on the platforms that free customers to run AI workloads anywhere

Open hybrid cloud
Explore how we build a more flexible future with hybrid cloud

Security
The latest on how we reduce risks across environments and technologies

Edge computing
Updates on the platforms that simplify operations at the edge

Infrastructure
The latest on the world’s leading enterprise Linux platform

Applications
Inside our solutions to the toughest application challenges

Original shows
Entertaining stories from the makers and leaders in enterprise tech
Products
- Red Hat Enterprise Linux
- Red Hat OpenShift
- Red Hat Ansible Automation Platform
- Cloud services
- See all products
Tools
- Training and certification
- My account
- Customer support
- Developer resources
- Find a partner
- Red Hat Ecosystem Catalog
- Red Hat value calculator
- Documentation
Try, buy, & sell
Communicate
About Red Hat
We’re the world’s leading provider of enterprise open source solutions—including Linux, cloud, container, and Kubernetes. We deliver hardened solutions that make it easier for enterprises to work across platforms and environments, from the core datacenter to the network edge.
Select a language
Red Hat legal and privacy links
- About Red Hat
- Jobs
- Events
- Locations
- Contact Red Hat
- Red Hat Blog
- Diversity, equity, and inclusion
- Cool Stuff Store
- Red Hat Summit