Editor's note: The article introduces Kubespray, a tool for deploying Kubernetes, which is the upstream container orchestration tool behind Red Hat's OpenShift container platform. For other ways to try Kubernetes and OpenShift, click here.
In this article, I introduce you to a new tool named Kubespray that deploys Kubernetes clusters. Before discussing kubespray, however, I will give a little introduction to Kubernetes, including its function and features.
Introduction to Kubernetes
Kubernetes is an orchestration tool used to manage containers on different hosts at the same time. Docker can only manage containers on a single host. To manage containers on multiple hosts, we have docker-swarm, but Kubernetes provides some additional features. We have this new orchestration tool named kubespray to manage containers on several hosts. Kubernetes also has some key features that make it special compared to other orchestration tools. Those features include horizontal autoscalability, a Kubernetes GUI, self-monitoring, storage orchestration, automated rollout and rollback, etc.
There are lots of ways to install Kubernetes clusters. Here is a look at one.
Kubespray - a new way to install Kubernetes clusters
Kubernetes clusters can be created using various automation tools. Kubespray is a combination of Kubernetes and Ansible. That means we can install Kubernetes using Ansible. We can also deploy clusters using kubespray on cloud compute services like EC2 (AWS).
What are the benefits of using kubespray?
- Kubespray provides deployment flexibility. It allows you to deploy a cluster quickly and customize all aspects of the implementation.
- Kubespray strikes a balance between flexibility and ease of use.
- You only need to run one Ansible playbook and your cluster ready to serve.
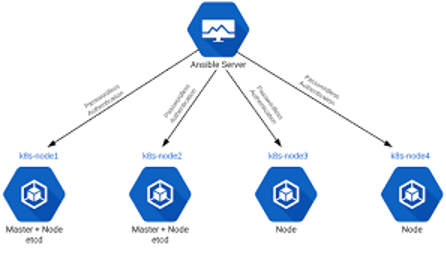
The above diagram shows the deployment architecture of kubespray.
Kubeadm vs. Kubespray
According to Kubespray's docs, Kubeadm provides knowledge of the life-cycle management of Kubernetes clusters, including self-hosted layouts, dynamic discovery services, etc. Had it belonged to the new operators world, it may have been named a "Kubernetes cluster operator." kubespray, however, does generic configuration management tasks from the "OS operators" Ansible world, with some initial K8s clustering (with networking plugins included) and control plane bootstrapping. kubespray has supported kubeadm for cluster creation since v2.3 (and deprecated non-kubeadm deployment starting from v2.8) to consume life-cycle management domain knowledge and offload generic OS configuration tasks from it, which hopefully benefits both sides.
Let's start the demo
Before beginning the demonstration, I want to remind you that kubespray is under active development, so make sure to use a stable release version. In this demo, I created three VMs consisting of one master and two nodes on AWS compute instances. The steps I did in the demonstration are run on AWS instances.
Let's start the demo now.
Create three virtual instances on AWS, one for the master and two for nodes. As we already discussed, kubespray uses Ansible to install Kubernetes clusters, so we start with the Ansible installation. I chose CentOS 7 Linux VMs to install Ansible by using the yum package manager.
$ yum install epel-release -y
$ yum install ansible -y
After installing Ansible, we need to install some of the packages that may be required in the next steps. They are:
$ yum install python36 -y
$ yum install python-pip -y
$ pip2 install jinja2
After installing these prerequisite packages, we set up Ansible. We know Ansible works with SSH connectivity, so we need to run ssh-keygen on the master node and then copy the keys on all machines, including the master node (for passwordless, key-based authentication).
Next, clone the official repository of kubespray from GitHub:
$ git clone https://github.com/kubernetes-incubator/kubespray.gitNow go inside the kubespray directory and install the dependencies from requirement.txt file using pip:
$ pip install -r requirement.txtIt installs all dependencies.
If you face an issue with the request package, try the following steps:
- Download the latest "requests" package (.tar.gz file)
- Untar the tar file, go inside that directory and run the
python setup.py installcommand
In this way, we install all the requirements packages.
Now, copy the inventory/sample as inventory/my-cluster:
$ cp -rfp inventory/sample inventory/my-clusterAfter that, declare a variable which includes the private IP of your VMs and calls that variable:
$ declare -a IPS=(10.0.0.210 10.0.0.12 10.0.0.213)You also need to install some requirements that are helpful for the next steps:
$ pip3 install -r contrib/inventory_builder/requirements.txt/requirements.txtIf you don't complete the installation of the required packages above, the next command displays an error.
Run the following command:
$ CONFIG_FILE=inventory/mycluster/hosts.yml python3 contrib/inventory_builder/inventory.py ${IPS[@]}Now it should generate the inventory/mycluster/hosts.yml file with the following hosts mapping. You can change it as per your need (just change the node names according to your hostnames):
all:
hosts:
  master:
     ansible_host: 10.0.0.210
     ip: 10.0.0.210
     access_ip: 10.0.0.210
   node1:
     ansible_host: 10.0.0.12
     ip: 10.0.0.12
     access_ip: 10.0.0.12
   node2:
     ansible_host: 10.0.0.213
     ip: 10.0.0.213
     access_ip: 10.0.0.213
 children:
   kube-master:
     hosts:
       master:
   kube-node:
     hosts:
       master:
       node1:
       node2:
   etcd:
     hosts:
       master:
       node1:
       node2:
   k8s-cluster:
     children:
       kube-master:
       kube-node:
   calico-rr:
     hosts: {}
After setting the hosts.yml file according to your configuration, we need to change some variables files which are at the following locations:
$ inventory/my-cluster/group_vars/all.yml
$ inventory/my-cluster/group_vars/k8s-cluster.yml
First, open the inventory/mycluster/group_vars/all.yml file and uncomment the line which includes following text:
# The read-only port for the kubelet to serve on with no authentication/authorizationUncomment this line to enable:
Kube_read_only_port: 10255Open the inventory/my-cluster/group_vars/k8s-cluster.yml file and edit it with the following information:
# Choose network plugin (cilium, calico, contiv, weave or flannel)
# Can also be set to 'cloud', which lets the cloud provider setup appropriate routing
kube_network_plugin: weave
We are all set. Run ansible-playbook -i inventory/my-cluster/hosts.yml reset.yml to execute the playbook for the cluster and deploy kubespray with the Ansible playbook. The command looks like this:
$ ansible-playbook -i inventory/my-cluster/hosts.yml cluster.ymlThe playbook takes five to seven minutes to run, depending on the configurations of your VMs. Once the playbook is complete, you can check whether your cluster is ready.
# kubectl get nodes
NAME STATUS ROLES AGE VERSION
master Ready  master 4m v1.18.5
node1 Ready   node 4m v1.18.5
node2 Ready   node 4m v1.18.5
Here are some additional steps to add or remove a node in your Kubernetes cluster. You do that by updating your hosts.yml file.
Here we add node3 to our Kubernetes cluster. For that we need to edit the inventory/my-cluster/hosts.yml file.
In the [all] section add your node3:
  [all]
master ansible_host=10.0.0.210
node1 ansible_host=10.0.0.12
node2 ansible_host=10.0.0.213
node3 ansible_host=10.0.0.252
And in the [kube-node] section:
  [kube-node]
master
node1
node2
node3
Next, run following command to add a node in your cluster:
$ ansible-playbook -i inventory/my-cluster/hosts.yml scale.ymlAfter completing this playbook, you can check that node3 is successfully added to your cluster:
$ kubectl get nodes

NAME STATUS ROLES AGE VERSION
master Ready   master 4m v1.18.5
node1 Ready    node 4m v1.18.5
node2 Ready    node 4m v1.18.5
node3 Ready    node 4m v1.18.5
To remove node3, we reverse the above process. That means we remove all references to node3 from the hosts.yml file, i.e., from the [all] and [kube-node] sections.
Then we run the playbook to remove the node3 from the cluster:
$ ansible-playbook -i inventory/my-cluster/hosts.yml remove-node.ymlAfter completing this playbook, check that node3 is gone from your Kubernetes cluster.
You can also reset the cluster i.e., flush the cluster for fresh installation. For that, just run the playbook as below mentioned:
$ ansible-playbook -i inventory/my-cluster/hosts.yml reset.ymlWrap up
Kubernetes is one of the latest container orchestration tools in the industry for containers. Creating a Kubernetes multi-node cluster is a very hectic and lengthy process for multiple clusters. So to save time you can automate the installation of Kubernetes using Kubespray. Kubespray is a combination of Kubernetes and Ansible and it uses Ansible automation to create multi-node clusters within minutes.
[ Are you a current RHCSA looking to learn more about Kubernetes? RHCSAs are eligible for 50% off online containers, Kubernetes, and Red Hat OpenShift training through the end of 2020. ]
Editor's note: Added link to Kubespray documentation, 8/6/2021.
About the author

Shiwani Biradar is an Associate Technical support Engineer in Red Hat. She loves contributing to open source projects and communities. Shiwani never stops exploring new technologies. If you don't find her exploring technologies then you will find her exploring food. She is familiar with Linux, Cloud, and DevOps tools and enjoys technical writing, watching TV series, and spending time with family.
Browse by channel

Automation
The latest on IT automation for tech, teams, and environments

Artificial intelligence
Updates on the platforms that free customers to run AI workloads anywhere

Open hybrid cloud
Explore how we build a more flexible future with hybrid cloud

Security
The latest on how we reduce risks across environments and technologies

Edge computing
Updates on the platforms that simplify operations at the edge

Infrastructure
The latest on the world’s leading enterprise Linux platform

Applications
Inside our solutions to the toughest application challenges

Original shows
Entertaining stories from the makers and leaders in enterprise tech