Veeam Backup and Replication is a backup, recovery and data management platform that modernizes data protection for cloud, physical and virtual environments. In this post we're going to look at using Veeam as part of a strategy to guard against ransomware attacks.
Ransomware attacks continue to be damaging and costly events for all sizes of companies. Immutable backups are just one component in an overall business continuity strategy to protect against these types of revenue and reputation draining catastrophes.
Linux is key to this strategy, and specifically Red Hat Enterprise Linux, can act as that immutable backup repository—whether on-premise, or in the cloud as part of your hybrid-cloud implementation.
Background
Veeam recently released Veeam Backup and Replication V11 which is part of the Veeam Availability Suite. I was intrigued by the new feature called Immutable Repository which is using Linux as the backup target. This was a perfect opportunity to take Veeam and test with Red Hat Enterprise Linux (RHEL) version 8.4 to validate this setup.
You could always set up a RHEL repository and add a Veeam repository so I wanted to see what was different about this, and how it could help my customers have a robust backup target that not only helps defeat ransomware attacks.
POC Prerequisites and environment background
Many infrastructures use either cloud or hypervisors to support their environment whether it is Microsoft Hyper-V or vSphere it does not matter. We used vSphere for convenience because many operations teams utilize that platform already. Some working knowledge of vSphere and Veeam is assumed so certain steps are not covered in detail or skipped.
For Linux system administrators some of the activities in this post are standard everyday activities. For the Windows admins the SSH key setup might be new, but it's a good skill to have in your back pocket.
Many teams already use Windows Server as a storage depot for backups. This POC is demonstrating that Veeam customers can easily augment storage depots with backup targets deployed in their primary, disaster recovery (DR) and cloud environments following the backup 3-2-1 rules. Note that using the no-cost Red Hat Developer subscription should only be used for validation of the setup and non-production use.
Here's what you need:
Red Hat Enterprise Linux Developers Subscription or RHEL subscription
DNS Forward and Reverse lookup entries (STATIC IP addresses recommended)
Windows 2019 for Veeam B&R v11 server
Windows 2019 Server that will be client for backup testing
RHEL 8.4 repository(s) with backup storage mounted
Step 1: Set up the RHEL repository server
Sign into your Red Hat Customer Portal account using your standard subscription or developers subscription. Download the RHEL 8.4 boot ISO.

Upload the RHEL ISO to one of your datastores. I typically create an “isos” directory on shared storage or local storage that I used for building my images.
Create a new virtual machine “repo20” which will become the Linux Immutable Veeam repository. Pick your datastore storage
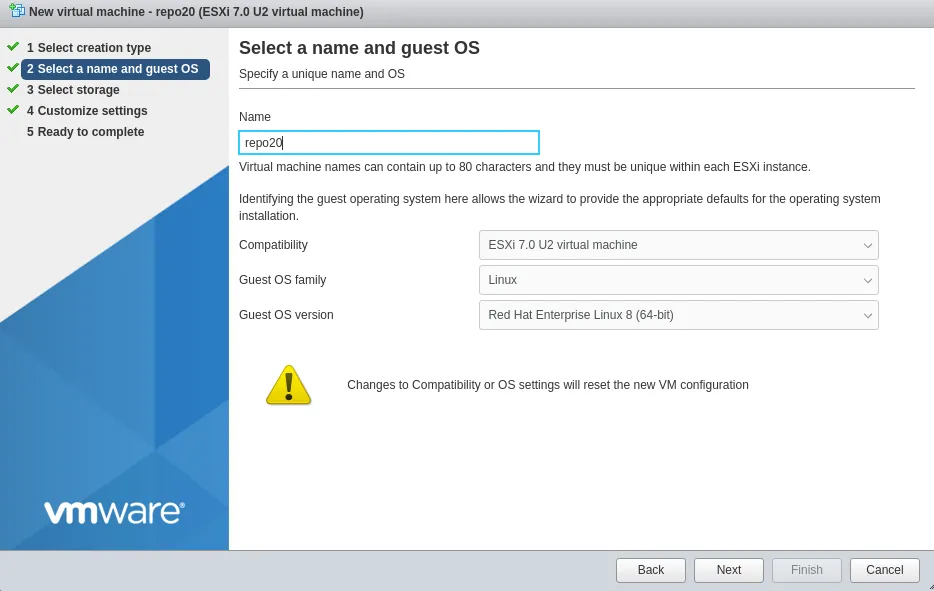
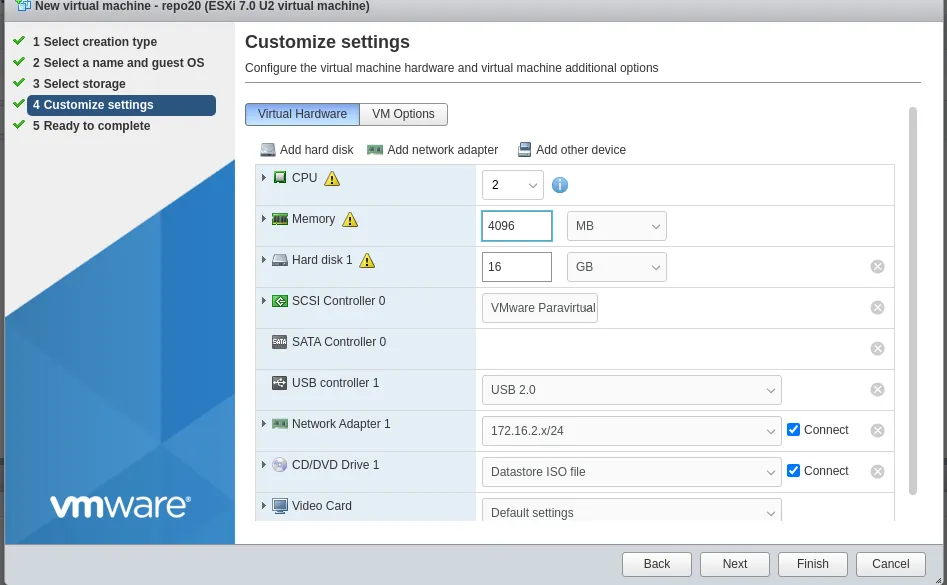
For now, give the VM: 2 vCPUs, 16GB disk and 4GB of memory. Note we will add disk space later that will be a dedicated mount point for the backups. Although this could be done during creation we are going to cover the setup of that using the CLI as a learning exercise for future reference.
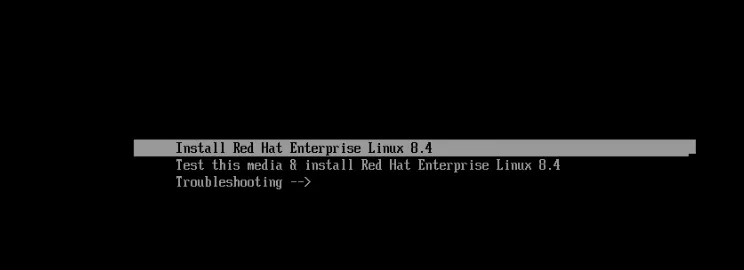
Launch the vSphere Web Console boot up the newly created virtual machine.
After a few moments the Installation Summary and Installation screen will come up.
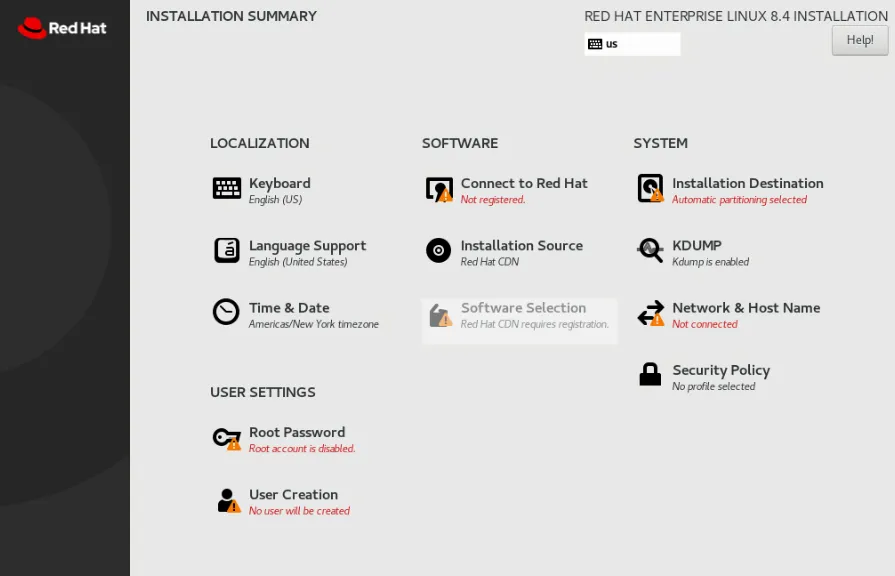
Set a complex root password
Create a new user set a complex password and check the Make this user administrator
Add the static IP and fully qualified DNS name in the Network & Host option (make sure registered in your DNS server) add your DNS settings.
Set your Time & Date
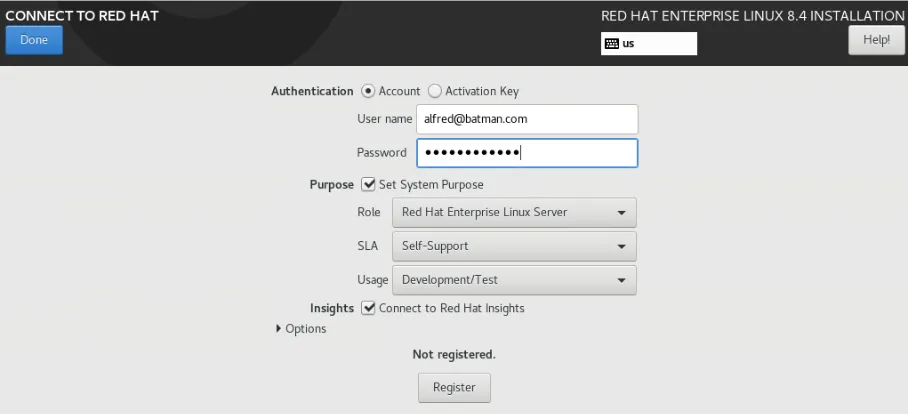
On Connect to Red Hat use either your account you set up under your developer account or paid subscription if using a company paid subscription or Activation Key Org ID setup under the subscription owner. Make sure to set system purpose to Development/Test if using developer subscription since this is self support for the RHEL Role.
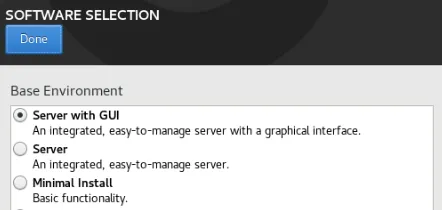
After registration you can then choose the software selection. Note if this was for a production environment minimal install or server might be best from a security perspective.
After the server installation is complete, reboot and accept the license. Your server is almost ready. But first let’s add a couple of security features.
For Windows users from the workstation use either Putty or OpenSSH to generate a new RSA key pair. The command will generate a public and private key pair in $home/user/.ssh/ Below is a good example for a Windows workstation.
From the Remote RHEL server recommend to use an elliptic curve key for the user created during setup. In my case I made a user called “rheladmin”
[danlineback@rhel8 .ssh]$ssh-keygen -f id_ecdsa_rheladmin -t ecdsa -b 521 -C ''
Comments on above step the name id_ecdsa_rheladmin tells me this is an elliptic curve and after the -C those are two single quotes with no spaces (important not a double quote).
The last and final step is to copy the contents of key of the id_ecdsa_rheladmin.pub to the new repo server under the user: /home/rheladmin/.ssh/authorized_keys
Since I am using rheladmin as a username the command would be from my Linux box:
$ sudo ssh-copy-id -i ~/.ssh/id_ecdsa_rheladmin rheladmin@172.16.5.100
If you are using Windows workstation you can always just ssh into the repo server using >ssh rheladmin@172.16.5.100 then under the rheladmin directory run the command: vi ~/.ssh/authorized_keys and paste the contents of the id_ecdsa_rheladmin.pub after saving the file :wq! then exit the remote workstation and now test the login.
$ sudo ssh -i ~/.ssh/id_ecdsa_rheladmin rheladmin@172.16.5.100
You should successfully log on without your password to the new repo server.
Step 2: Create Veeam repo local Linux user account and storage to be used for the Veeam backups
Now that you are logged into the RHEL repo server. In my case “rheladmin” account lets create the standard or non privileged user to be used with Veeam.
so I am going to use “vadmin”
[rheladmin@repo10 ~]$ sudo su -
[sudo] password for rheladmin:
[root@repo10 ~]# useradd -m vadmin
[root@repo10 ~]# passwd vadmin
Changing password for user vadmin.
New password:
Retype new password:
passwd: all authentication tokens updated successfully.
generate ssh key non elliptic veeam has trouble with elliptic keys at this time for backup users.
[danlineback@rhel8 .ssh]$ ssh-keygen
Generating public/private rsa key pair.
Enter file in which to save the key (/home/danlineback/.ssh/id_rsa): id_vadmin
Now lets copy that SSH key to the repo server:
[danlineback@rhel8 .ssh]$sudo ssh-copy-id -i ~/.ssh/id_vadmin vadmin@172.16.5.100
Note if you get prompted for password after login [vadmin@repo10 ~]$chmod 700 .ssh this will set the permission correctly.
Exit, then retry your ssh command. You should not see a password prompt.
Now let’s explore what we have for disk, remember we only used a 16GB OS disk at virtual machine creation but in order to do that lets become root. I am walking you through this exercise so that you are familiar with adding more disks in the future.
[root@repo10 ~]# exit
logout
$sudo -ssh -i ~/.ssh/id_vadmin vadmin@172.16.5.100

[vadmin@repo10 ~]$ su -
Password:
[root@repo10 ~]# df -H
Filesystem             Size  Used Avail Use% Mounted on
devtmpfs               2.0G     0  2.0G   0% /dev
tmpfs                  2.0G     0  2.0G   0% /dev/shm
tmpfs                  2.0G  9.9M  2.0G   1% /run
tmpfs                  2.0G     0  2.0G   0% /sys/fs/cgroup
/dev/mapper/rhel-root   14G  5.1G  8.8G  37% /
/dev/sda2              1.1G  250M  814M  24% /boot
/dev/sda1              628M  6.1M  622M   1% /boot/efi
tmpfs                  392M  3.7M  389M   1% /run/user/1000
[root@repo10 ~]#

[root@repo10 ~]# lsblk
NAME          MAJ:MIN RM  SIZE RO TYPE MOUNTPOINT
sda             8:0    0   16G  0 disk
├─sda1         8:1    0  600M  0 part /boot/efi
├─sda2          8:2    0    1G  0 part /boot
└─sda3          8:3    0 14.4G  0 part
  ├─rhel-root 253:0    0 12.8G  0 lvm  /
  └─rhel-swap 253:1    0  1.6G  0 lvm  [SWAP]
sr0            11:0    1  721M  0 rom
Now let’s go to vmware on the repo10 host and add a 100GB standard disk to the virtual machine. Note below we see sdb 100G disk now:
[root@repo10 ~]# lsblk
NAME          MAJ:MIN RM  SIZE RO TYPE MOUNTPOINT
sda             8:0    0   16G  0 disk
├─sda1          8:1    0  600M  0 part /boot/efi
├─sda2          8:2    0    1G  0 part /boot
└─sda3          8:3    0 14.4G  0 part
  ├─rhel-root 253:0    0 12.8G  0 lvm  /
  └─rhel-swap 253:1    0  1.6G  0 lvm  [SWAP]
sdb             8:16   0  100G  0 disk
sr0            11:0    1  1024M  0 rom
Create a new directory under /mnt called `backup` and notice the permissions. Create new local group called backupadmins and add vadmin to that group:
[root@repo10 ~]# cd /mnt
[root@repo10 mnt]# mkdir backup
[root@repo10 mnt]# ls -al
total 0
drwxr-xr-x.  3 root root  20 Sep 27 21:43 .
dr-xr-xr-x. 17 root root 224 Sep 27 16:43 ..
drwxr-xr-x.  2 root root   6 Sep 27 21:43 backup
[root@repo10 mnt]# groupadd backupadmins
[root@repo10 mnt]# id vadmin
uid=1000(vadmin) gid=1000(vadmin) groups=1000(vadmin)
[root@repo10 mnt]# usermod -aG backupadmins vadmin
[root@repo10 mnt]# id vadmin
uid=1000(vadmin) gid=1000(vadmin) groups=1000(vadmin),1004(backupadmins)
Set up the 100GB disk, add file system and mount that disk. Note for some of the fdisk entries hitting `Enter` will take the default answer.
[root@repo10 mnt]# fdisk /dev/sdb

Welcome to fdisk (util-linux 2.32.1).
Changes will remain in memory only, until you decide to write them.
Be careful before using the write command.

Device does not contain a recognized partition table.
Created a new DOS disklabel with disk identifier 0xfd942014.

Command (m for help): m
Verbose output abbreviated from command above
Command (m for help): p
Disk /dev/sdb: 100 GiB, 107374182400 bytes, 209715200 sectors
Units: sectors of 1 * 512 = 512 bytes
Sector size (logical/physical): 512 bytes / 512 bytes
I/O size (minimum/optimal): 512 bytes / 512 bytes
Disklabel type: dos
Disk identifier: 0xfd942014

Command (m for help): n

Command (m for help): p
Partition type
   p   primary (0 primary, 0 extended, 4 free)
   e   extended (container for logical partitions)
Select (default p): p
Partition number (1-4, default 1): 1
First sector (2048-209715199, default 2048):

Created a new partition 1 of type 'Linux' and of size 100 GiB.

Command (m for help): w
The partition table has been altered.
Calling ioctl() to re-read partition table.
Syncing disks.
Notice now there is a partition called sdb1
[root@repo10 mnt]# lsblk
NAME          MAJ:MIN RM  SIZE RO TYPE MOUNTPOINT
sda             8:0    0   16G  0 disk
├─sda1          8:1    0  600M  0 part /boot/efi
├─sda2          8:2    0    1G  0 part /boot
└─sda3          8:3    0 14.4G  0 part
  ├─rhel-root 253:0    0 12.8G  0 lvm  /
  └─rhel-swap 253:1    0  1.6G  0 lvm  [SWAP]
sdb             8:16   0  100G  0 disk
└─sdb1          8:17   0  100G  0 part
sr0            11:0    1 1024M  0 rom
Create an xfs file system on sdb1.
[root@repo10 mnt]# mkfs.xfs /dev/sdb1
Verbose output abbreviated on command above
Mount the file system.
[root@repo10 /]# mount /dev/sdb1 /mnt/backup
Before the next step let's get the UUID of the sdb1 partition created in previous step
[root@repo10 /]# lsblk -f

NAME          FSTYPE      LABEL                    UUID                                   MOUNTPOINT
sda
├─sda1        vfat                                 76DA-61BA                              /boot/efi
├─sda2        xfs                                  56859958-7984-45a1-85bf-15bfb1212d41   /boot
└─sda3        LVM2_member                          darVfz-4hz6-pVTl-j2BF-D1Uf-K9l9-uDvCD5
  ├─rhel-root xfs                                  8193a49e-aa4b-4540-878d-b89103dcdaf0   /
  └─rhel-swap swap                                 1050efe1-8cbb-4d51-963f-9db6395abf83   [SWAP]
sdb
└─sdb1        xfs                                  7423d39b-2c45-4f35-9b0b-5bf00e206ced   /mnt/backup
sr0           iso9660     RHEL-8-4-0-BaseOS-x86_64 2021-05-03-14-30-49-00                 /run/media/rheladmin/RHEL-8-4-0-BaseOS-x86_64
Note that UUID for sdb1 and it will be unique for your system
Go ahead and cat the fstab file to see the before view of the file
[root@repo10 /]# cat /etc/fstab

#
# /etc/fstab
# Created by anaconda on Fri Aug 20 01:37:56 2021
#
# Accessible filesystems, by reference, are maintained under '/dev/disk/'.
# See man pages fstab(5), findfs(8), mount(8) and/or blkid(8) for more info.
#
# After editing this file, run 'systemctl daemon-reload' to update systemd
# units generated from this file.
#
/dev/mapper/rhel-root   /                       xfs     defaults        0 0
UUID=56859958-7984-45a1-85bf-15bfb1212d41 /boot                   xfs     defaults        0 0
UUID=76DA-61BA          /boot/efi               vfat    umask=0077,shortname=winnt 0 2
/dev/mapper/rhel-swap   none                    swap    defaults        0 0
Make a backup of the fstab file in case you fat finger something
[root@repo10 /]# cp /etc/fstab fstab11152021.bak
Now make the mount permanent by adding in the line below with UUID for the sdb1 so that after reboots it stays permanent.
Edit the fstab
[root@repo10 /]# vi /etc/fstab


#
# /etc/fstab
# Created by anaconda on Mon Sep 27 23:26:32 2021
#
# Accessible filesystems, by reference, are maintained under '/dev/disk/'.
# See man pages fstab(5), findfs(8), mount(8) and/or blkid(8) for more info.
#
# After editing this file, run 'systemctl daemon-reload' to update systemd
# units generated from this file.
#
/dev/mapper/rhel-root   /                       xfs     defaults        0 0
UUID=2acfc890-6024-494a-a833-2201514e304d /boot                   xfs     defaults        0 0
UUID=321E-701D          /boot/efi               vfat    umask=0077,shortname=winnt 0 2
/dev/mapper/rhel-swap   none                    swap    defaults        0 0
/dev/7423d39b-2c45-4f35-9b0b-5bf00e206ced /mnt/backup xfs defaults 0 0
Note that the UUID is going to be unique to your system, so you can get the UUID for the disk with `lsblk -o UUID /dev/sdb1` (or whatever the proper device name is).
Give vadmin:backupadmins group rw access to /mnt/backup.[root@repo10 /]# chown vadmin:backupadmins /mnt/backup[root@repo10 mnt]# chmod 700 backup[root@repo10 mnt]# ls -altotal 0drwxr-xr-x. 3 root root 20 Sep 27 22:10 .dr-xr-xr-x. 17 root root 224 Sep 27 16:43 ..drwxrwsr-x. 2Validate that vadmin can read write and delete a file in /mnt/backup:[vadmin@repo10 backup]$ mkdir test[vadmin@repo10 backup]$ ls -altotal 0drwxrwsr-x. 3 vadmin backupadmins 18 Sep 27 22:27 .drwxr-xr-x. 3 root root 20 Sep 27 22:10 ..drwxrwsr-x. 2 vadmin backupadmins 6 Sep 27 22:27 test[vadmin@repo10 backup]$ rm -R test
Success.
Step 3: Add new Repo10 Server to Veeam (Linux)
Make sure you can do a nslookup forward/reverse on the new repo server before starting on the Veeam Server. Log into the Veeam B&R v11 backup server.
Add Server repository under Backup Infrastructure in the Veeam Console:
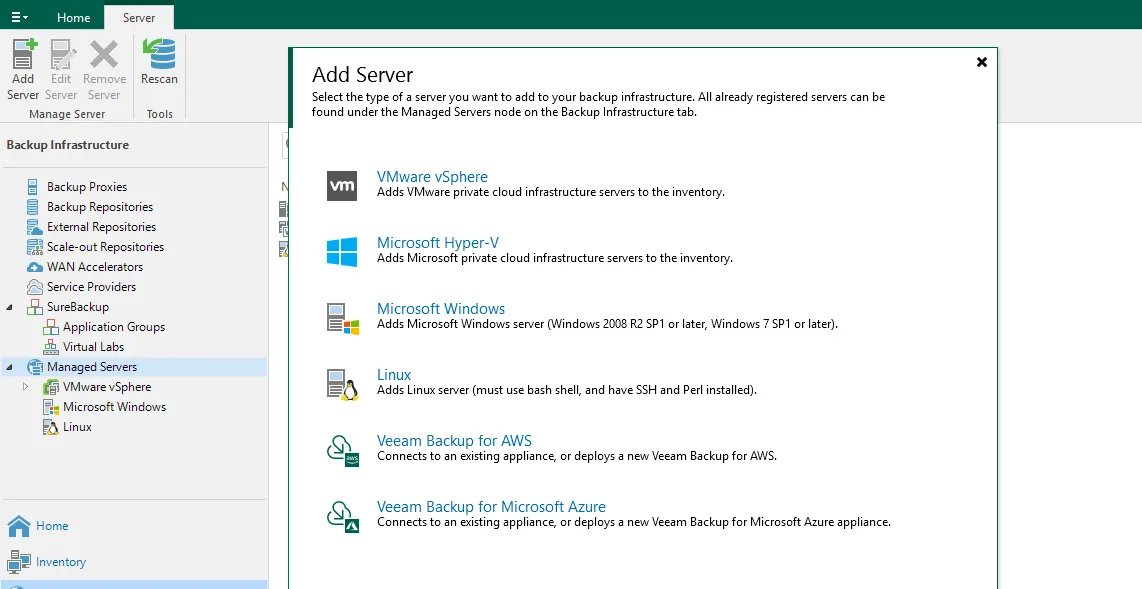
Select Linux then put in the fully qualified DNS name of the repo server.
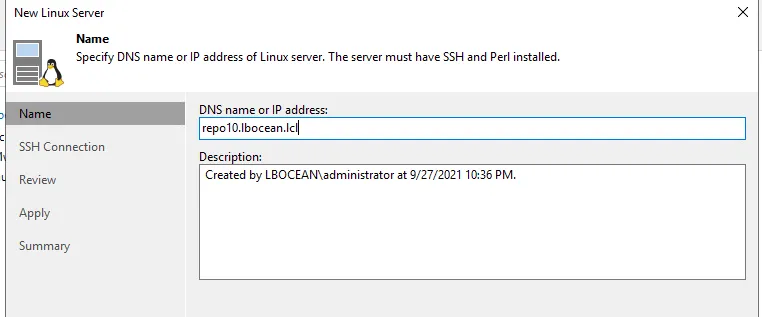
Select Add and then Single-use Credentials for hardened repository.
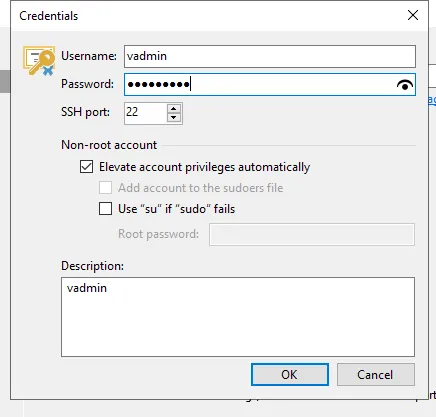
Click advanced and validate the SSH key.

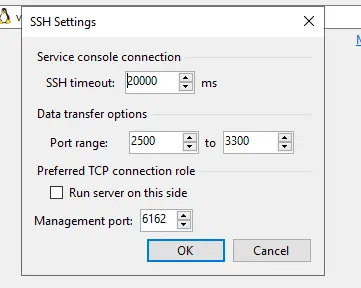
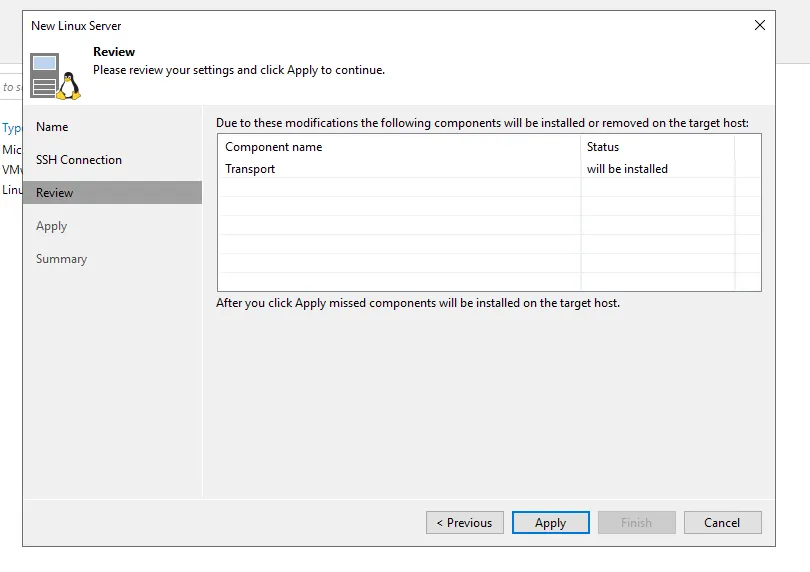
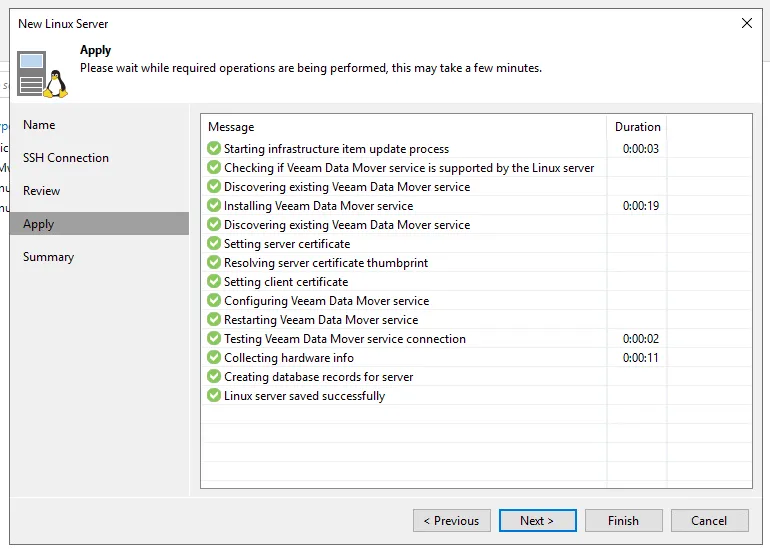
Under Backup Infrastructure you should see repo10.lbocean.lcl
Step 4: Add New Backup Repository
Select Direct attached Storage:
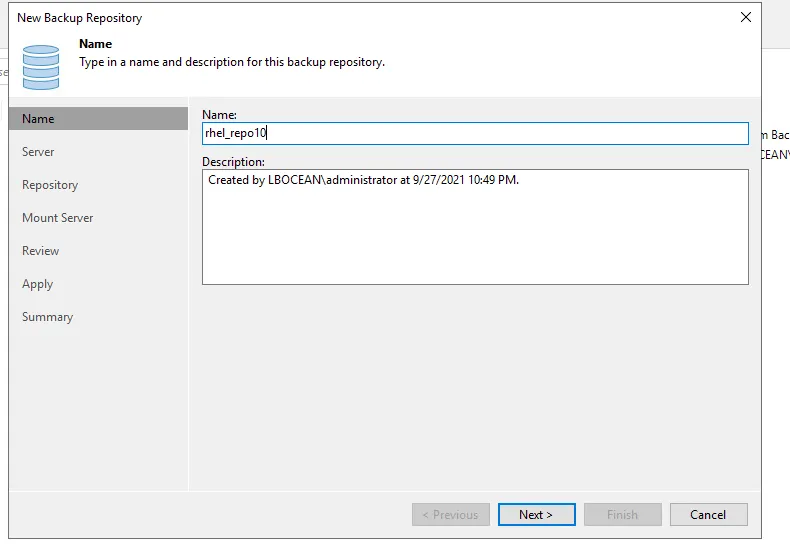
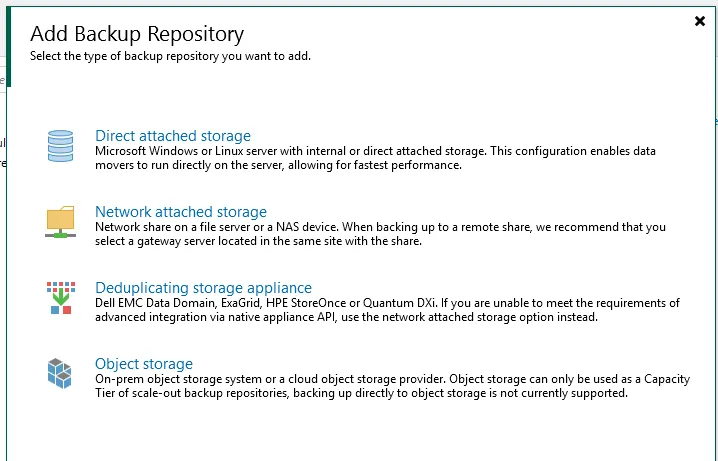
Select Linux
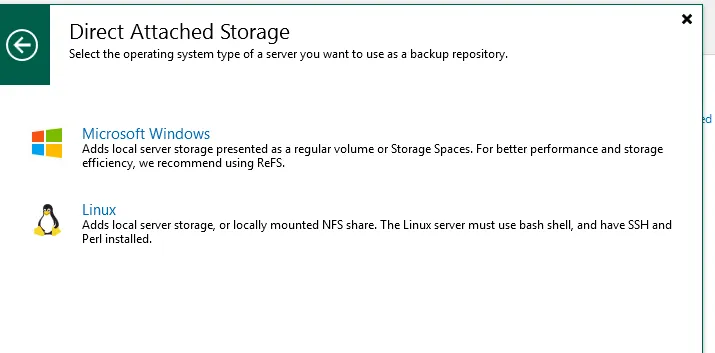
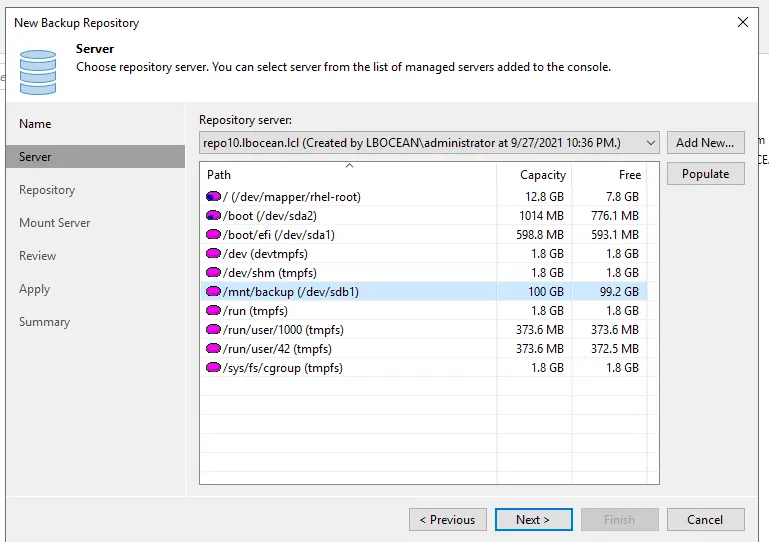
Make sure to pick the new server REPO10 from the drop down, and then hit populate.
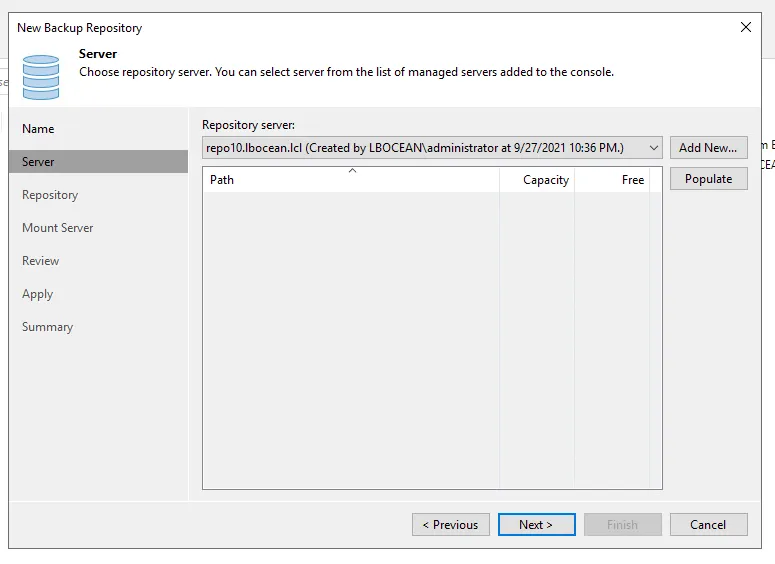
Be Sure to highlight the 100GB disk you created and mounted previously.
On the next screen make sure to check the Make recent backups immutable for 7 days. If you want to remove the backups directory so you only have /mount/backup that is completely fine as each time a backup job is created it will start at that directory location.
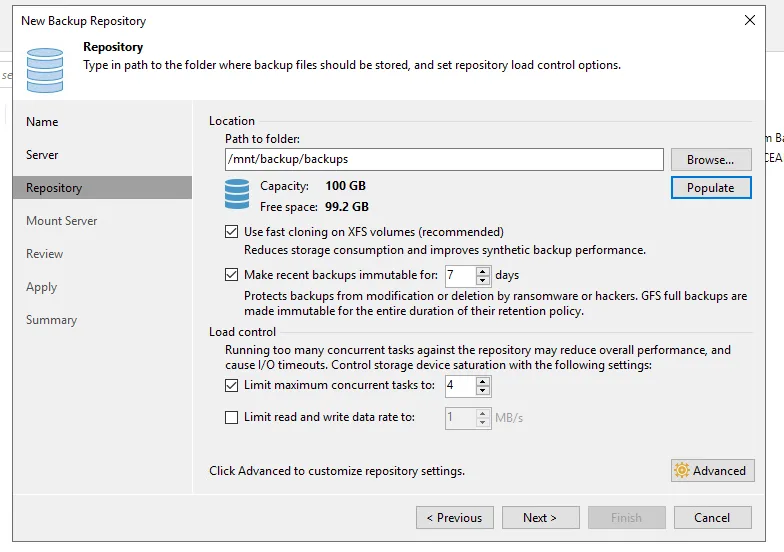
On Advanced check Use per-machine backup files. Recommended if you are backing up many servers, if this is NOT checked it will roll the backup into one large file for each job increasing job times.
Customize any other settings or take defaults on the next screen.
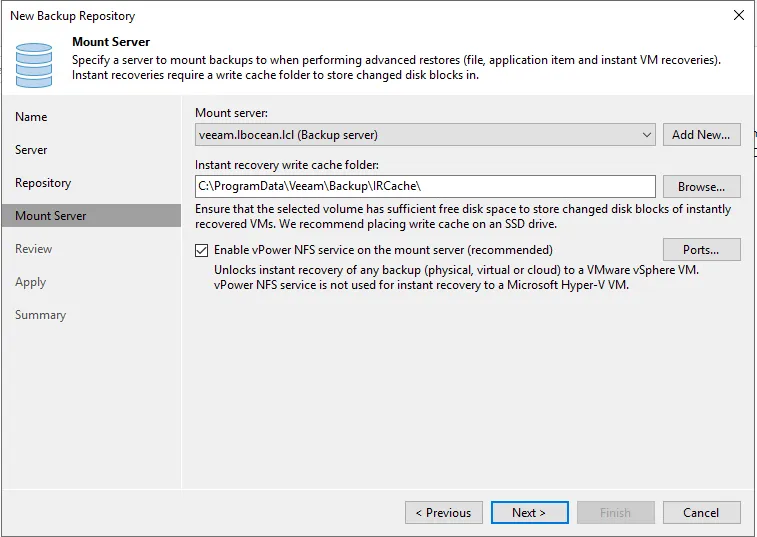
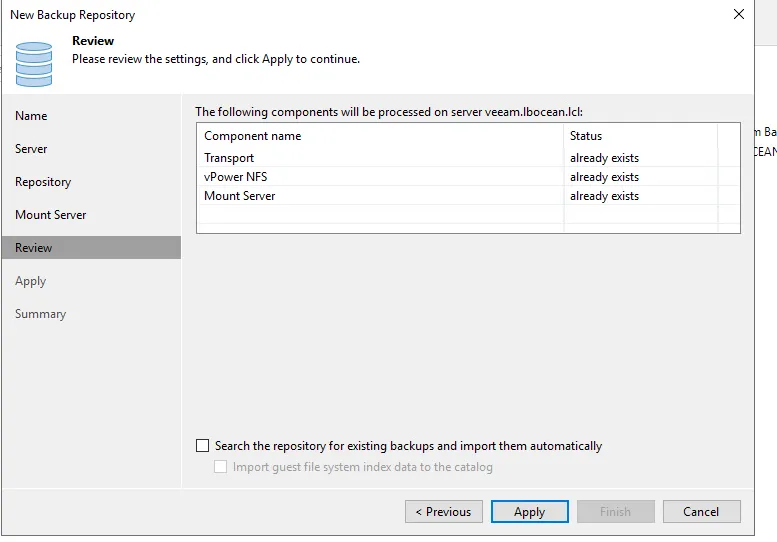
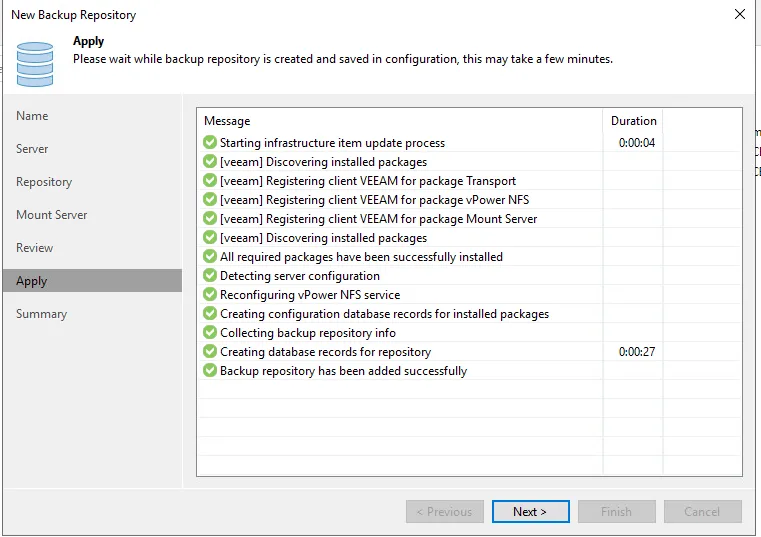
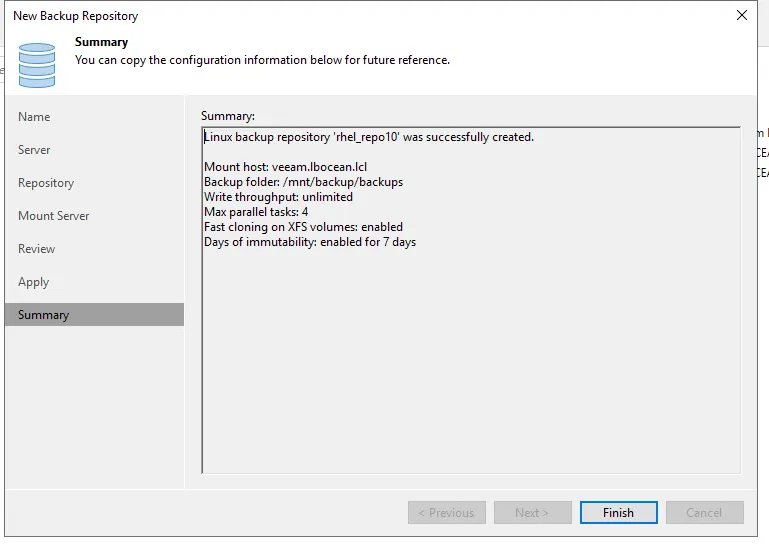
Step 5: Creating backup job using new Repository
There are many best practices from Veeam on how to customize a backup job. At this point the Veeam Backup Job is just standard Veeam backup administration.
For this POC demo I choose the job defaults except for the RHEL_REPO10 server as the backup repository.
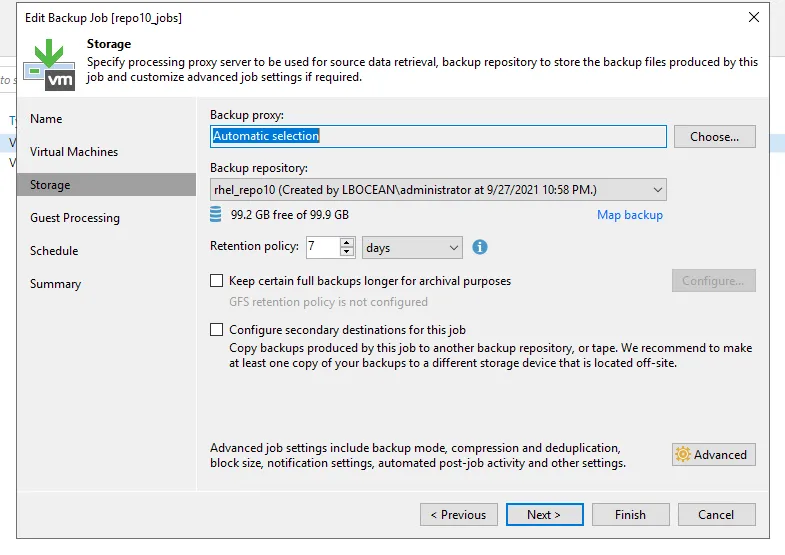
The new Backup job called repo10_jobs was launched backing up a Windows 2019 server called vadar.
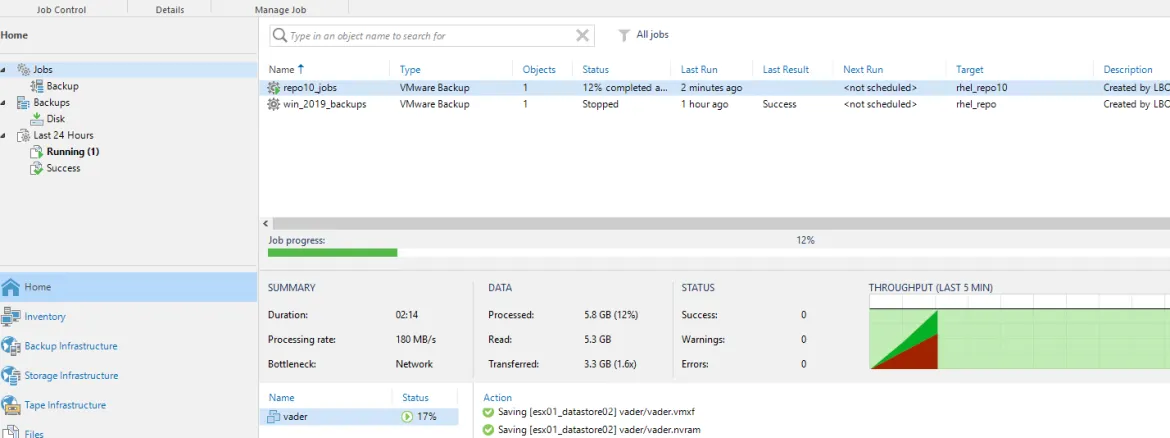
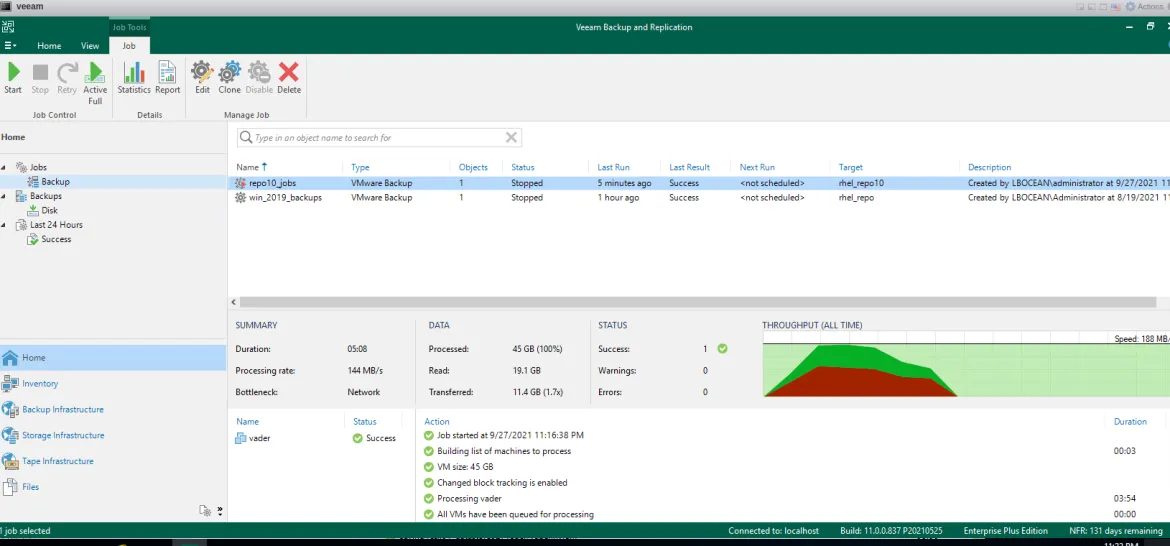
Now that the job has successfully completed Let’s go look at the backend of the Repo10 Linux Host to review the backup.
We see the new job was created in a directory called repo10_jobs
[vadmin@repo10 backups]$ pwd
/mnt/backup/backups
[vadmin@repo10 backups]$ ls -al
total 0
drwxr-sr-x. 3 vadmin backupadmins 25 Sep 27 23:16 .
drwxrwsr-x. 3 vadmin backupadmins 21 Sep 27 23:06 ..
drwxr-sr-x. 2 vadmin backupadmins 98 Sep 27 23:21 repo10_jobs


[vadmin@repo10 repo10_jobs]$ ls -al
total 12023584
drwxr-sr-x. 2 vadmin backupadmins          98 Sep 27 23:21 .
drwxr-sr-x. 3 vadmin backupadmins          25 Sep 27 23:16 ..
-rw-r--r--. 1 vadmin backupadmins        8838 Sep 27 23:21 repo10_jobs.vbm
-rw-r--r--. 1 vadmin backupadmins 12312133632 Sep 27 23:20 vader.vm-3002D2021-09-27T231708_81C6.vbk
-rw-r--r--. 1 root   backupadmins         133 Sep 27 23:21 .veeam.1.lock
Next to try and delete the backups I first deleted the repo10_jobs
Next I deleted the Linux Repo10 Server and the Repo10 repository in the Veeam Console.
Using SSH I connected to the repo10 server as vadmin. I tried deleting the Veeam backup file manually using the vadmin account: Operation not permitted.
Then as su - root I tried to delete but was unsuccessful as Operation not permitted.
Finally I tried to change ownership of the directory and files using root again and got "Operation not Permitted."
[vadmin@repo10 backups]$ su -
Password:
[root@repo10 ~]# cd /mnt/backup/
[root@repo10 backup]# ls
backups
[root@repo10 backup]# rm -R backups
rm: descend into directory 'backups'? y
rm: descend into directory 'backups/repo10_jobs'? y
rm: remove regular file 'backups/repo10_jobs/vader.vm-3002D2021-09-27T231708_81C6.vbk'? y
rm: cannot remove 'backups/repo10_jobs/vader.vm-3002D2021-09-27T231708_81C6.vbk': Operation not permitted
rm: remove regular file 'backups/repo10_jobs/.veeam.1.lock'? y
rm: cannot remove 'backups/repo10_jobs/.veeam.1.lock': Operation not permitted
[root@repo10 backup]# ls
backups
[root@repo10 backup]# cd backups
[root@repo10 backups]# cd repo10_jobs/
[root@repo10 repo10_jobs]# ls
vader.vm-3002D2021-09-27T231708_81C6.vbk
[root@repo10 repo10_jobs]# clear

[root@repo10 repo10_jobs]# ls -al
total 12023572
drwxr-sr-x. 2 vadmin backupadmins          75 Sep 27 23:55 .
drwxr-sr-x. 3 vadmin backupadmins          25 Sep 27 23:16 ..
-rw-r--r--. 1 vadmin backupadmins 12312133632 Sep 27 23:20 vader.vm-3002D2021-09-27T231708_81C6.vbk
-rw-r--r--. 1 root   backupadmins         133 Sep 27 23:21 .veeam.1.lock
[root@repo10 repo10_jobs]# cd ..
[root@repo10 backups]# ls
repo10_jobs
[root@repo10 backups]# chmod -R a+rwx
chmod: missing operand after ‘a+rwx’
Try 'chmod --help' for more information.
[root@repo10 backups]# chmod -R a+rwx repo10_jobs/
chmod: changing permissions of 'repo10_jobs/vader.vm-3002D2021-09-27T231708_81C6.vbk': Operation not permitted
chmod: changing permissions of 'repo10_jobs/.veeam.1.lock': Operation not permitted
[root@repo10 backups]# ls -al repo10_jobs/
total 12023572
drwxrwsrwx. 2 vadmin backupadmins          75 Sep 27 23:55 .
drwxr-sr-x. 3 vadmin backupadmins          25 Sep 27 23:16 ..
-rw-r--r--. 1 vadmin backupadmins 12312133632 Sep 27 23:20 vader.vm-3002D2021-09-27T231708_81C6.vbk
-rw-r--r--. 1 root   backupadmins         133 Sep 27 23:21 .veeam.1.lock
[root@repo10 backups]# ls -al
total 0
drwxr-sr-x. 3 vadmin backupadmins 25 Sep 27 23:16 .
drwxrwsr-x. 3 vadmin backupadmins 21 Sep 27 23:06 ..
drwxrwsrwx. 2 vadmin backupadmins 75 Sep 27 23:55 repo10_jobs
Conclusion
As demonstrated, Veeam and Red Hat Enterprise Linux make a great alternative solution for a backup repository. Whether using datacenter infrastructure, hypervisors or your favorite cloud, RHEL repositories add another dimension of data protection from ransomware.
There are further isolation and hardening options that sysadmins can take such as disabling root login, applying SELinux policies or applying OpenSCAP policies to the backup repositories.
About the author
Browse by channel
Automation
The latest on IT automation for tech, teams, and environments
Artificial intelligence
Updates on the platforms that free customers to run AI workloads anywhere
Open hybrid cloud
Explore how we build a more flexible future with hybrid cloud
Security
The latest on how we reduce risks across environments and technologies
Edge computing
Updates on the platforms that simplify operations at the edge
Infrastructure
The latest on the world’s leading enterprise Linux platform
Applications
Inside our solutions to the toughest application challenges
Original shows
Entertaining stories from the makers and leaders in enterprise tech
