Get started with Red Hat OpenShift Virtualization
Introduction
Migrate and manage your virtual machines and containers on a single, unified platform.
Virtualization platforms are core components of modern IT environments. By abstracting hardware resources, virtualization technologies can increase scalability and flexibility across hybrid, multicloud and edge environments. With capabilities that speed and simplify virtual machine (VM) provisioning and management, virtualization platforms can help you optimize infrastructure, streamline operations, and adopt new technologies and services.
With Red Hat® OpenShift® Virtualization, you can deploy and manage virtual machines at scale and with hardened security across hybrid, multicloud, and edge environments. As the foundation for OpenShift Virtualization, Red Hat OpenShift lets you run both virtual machines and containers on a single, unified, enterprise-ready application platform. At the core of OpenShift Virtualization is the Kernel-based Virtual Machine (KVM), a security-focused, high-performance, open source hypervisor that enables the virtualization capabilities to run virtual machines. For organizations needing a dedicated virtualization solution focused solely on virtual machines, Red Hat OpenShift Virtualization Engine provides the same core virtualization capabilities as Red Hat OpenShift, allowing you to deploy, manage, and scale your virtual machines.
OpenShift Virtualization provides the capabilities needed to manage complete virtual machines lifecycles.
- Create and manage both Linux® and Microsoft Windows virtual machines from a single interface.
- Import and clone existing virtual machines from other virtualization platforms.
- Live migrate virtual machines using configurable policies, metrics, and traffic encryption.
- Manage attached network interface controllers and storage disks.
- Back up virtual machines on demand or on fixed schedules, manage saved images, and restore workloads quickly.
- Administer virtual machines on physical servers in private datacenters and public cloud environments.
- Provision and manage virtual machines with graphical web consoles or command line interfaces (CLIs).
- Automate many common virtualization tasks with advanced capabilities in Red Hat Ansible® Automation Platform and modern practices like GitOps and infrastructure-as-code (IaC).
What you will learn in this e-book
This e-book describes many of the common tasks that you can perform with OpenShift Virtualization. We provide step-by-step guidance for using OpenShift Virtualization to provision, configure, manage, and migrate virtual machines and related resources.
Maximize existing investments while adopting cloud-native innovation
OpenShift Virtualization can help you maximize your existing virtualization investments while taking advantage of cloud-native architectures, streamlined operations, and new development approaches.
Red Hat OpenShift key concepts
This e-book provides guidance on using OpenShift Virtualization. It’s important to understand a few key concepts before getting started:
- Nodes are physical servers in private datacenters or public cloud environments.
- Clusters are sets of nodes that are managed together through a control plane.
- Namespaces provide a mechanism for isolating groups of resources within a cluster, allowing you to divide resources between multiple users.
Get started with common use cases
The following sections describe how to accomplish common tasks using OpenShift Virtualization. Each section includes step-by-step instructions and screenshots of the unified interface to help you get started quickly.
Streamline tasks and workflows with automation
You can automate the uses cases described in this e-book with Ansible Automation Platform. Start common virtualization tasks as part of scheduled activities, initiate them via events or IT service management (ITSM) requests, or include them as part of larger orchestrated service delivery workflows. And with precomposed automation content available in Red Hat Ansible Certified Content collections, you can start automating your virtualization tasks and workflows in less time.
Task 1: Provision virtual machines by instance type
In some cases, users need more customization options when provisioning virtual machines. With instance types, you can offer a predefined selection of operating system images, workload types, and hardware requirements. Users can self-provision virtual machines from this selection based on their workload requirements, including processor, memory, and operating system. Follow these steps to provision virtual machines using instance types in the web console.
1. Navigate to Virtualization > Catalog in the left menu bar.
2. Select the InstanceTypes tab and then select the virtual machine operating system image.

3. Click an InstanceType tile and select the appropriate resource size for your workload, then click Create VirtualMachine at the bottom of the frame.
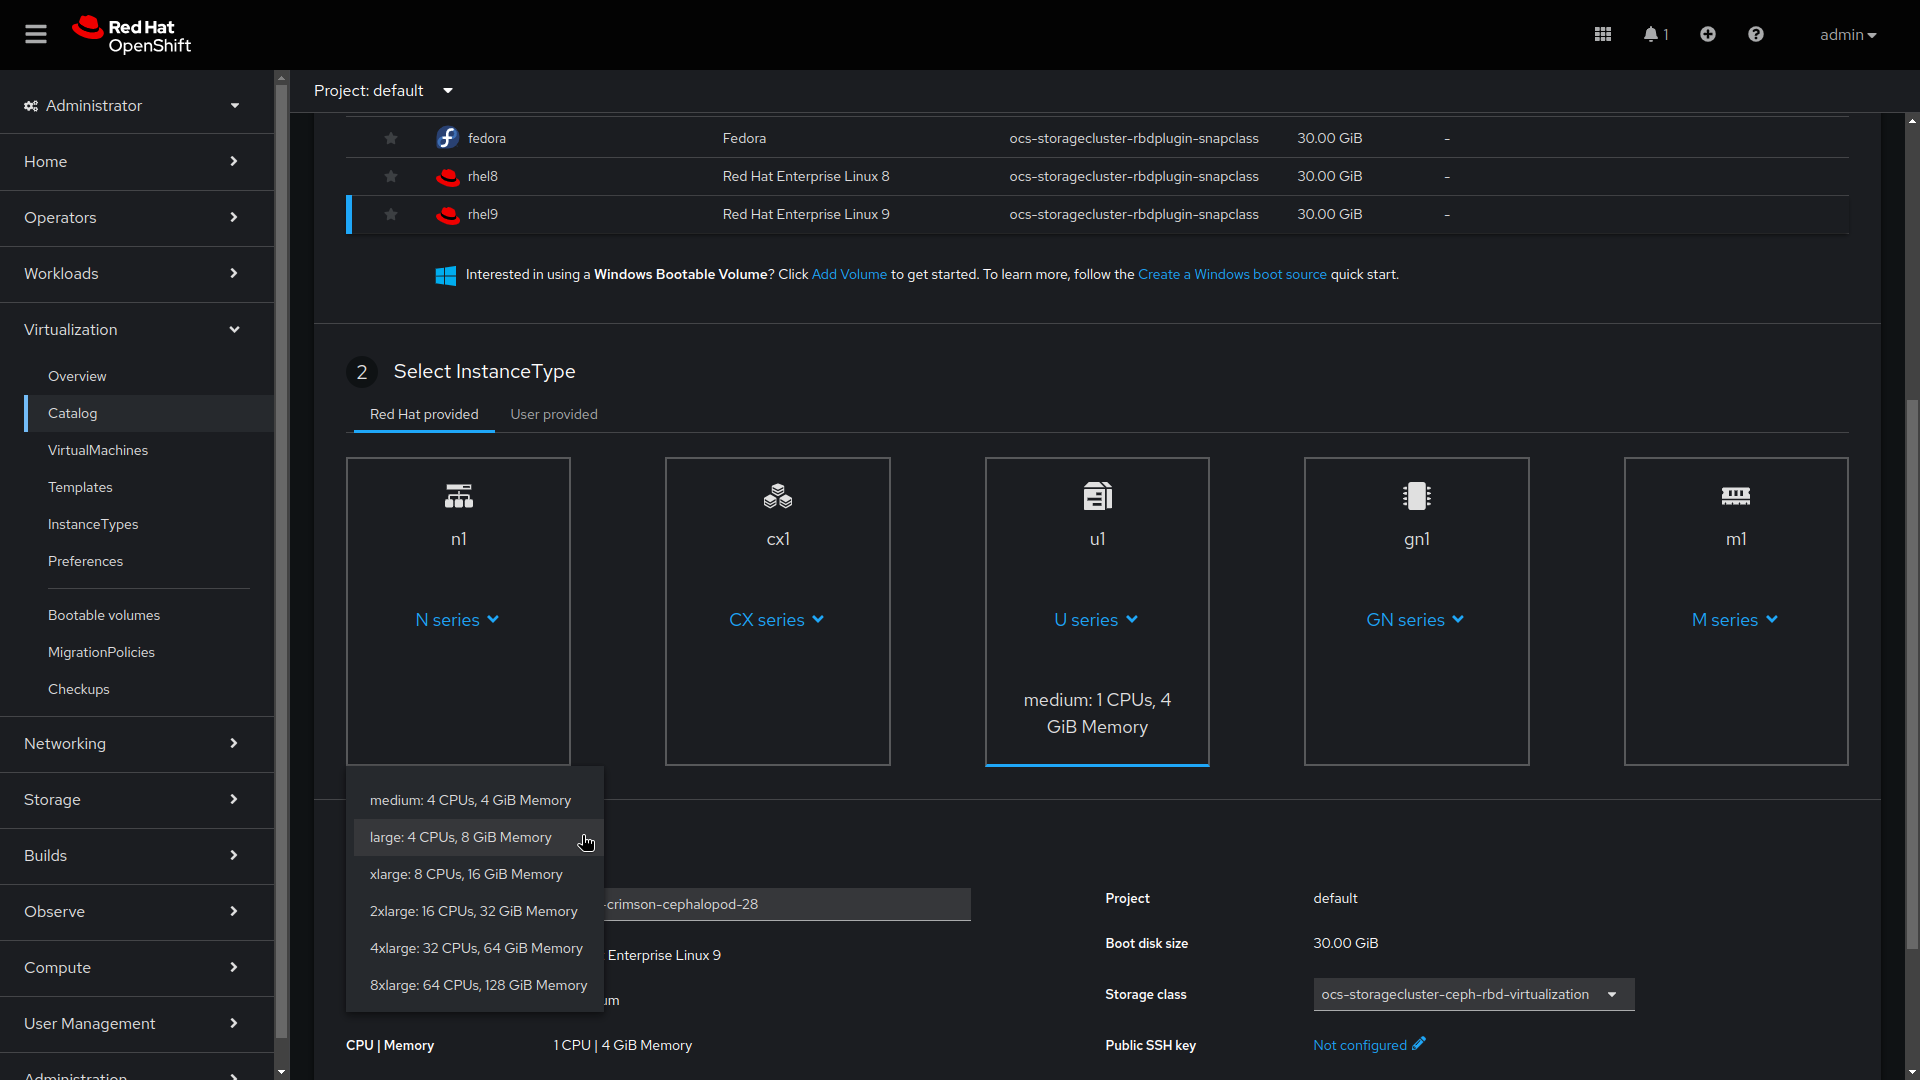
4. Navigate to Virtualization > VirtualMachines in the left menu bar to view the status of the newly provisioned virtual machine.
Task 2: Provision virtual machines using templates
Templates are a fast, simple way to provision virtual machines. OpenShift Virtualization includes predefined templates for many common operating systems and hardware configurations. For example, templates are included for both Linux and Microsoft Windows virtual machines. You can also define and customize templates based on your organization’s workloads and infrastructure. And in internet-connected clusters, you can automatically download default base images for virtual machines to simplify template management.
OpenShift Virtualization includes capabilities to help you manage provisioning across your organization. Role-based access control (RBAC) mechanisms regulate access to templates, allowing users to self-provision virtual machines from curated catalogs and in compliance with corporate policies. By defining validation rules in templates, you can allow users to customize virtual machines within defined limits. And hooks that connect OpenShift Virtualization to external tools—including Ansible Automation Platform and ServiceNow—let you create advanced workflows to streamline virtual machine provisioning. Follow these steps to provision virtual machines using default or customized templates in the web console.
Provision a virtual machine using default templates
1. Navigate to Virtualization > Catalog in the left menu bar.
2. Click a template tile to view the virtual machine details.
3. Click Quick create VirtualMachine to create a virtual machine based on the default template settings.
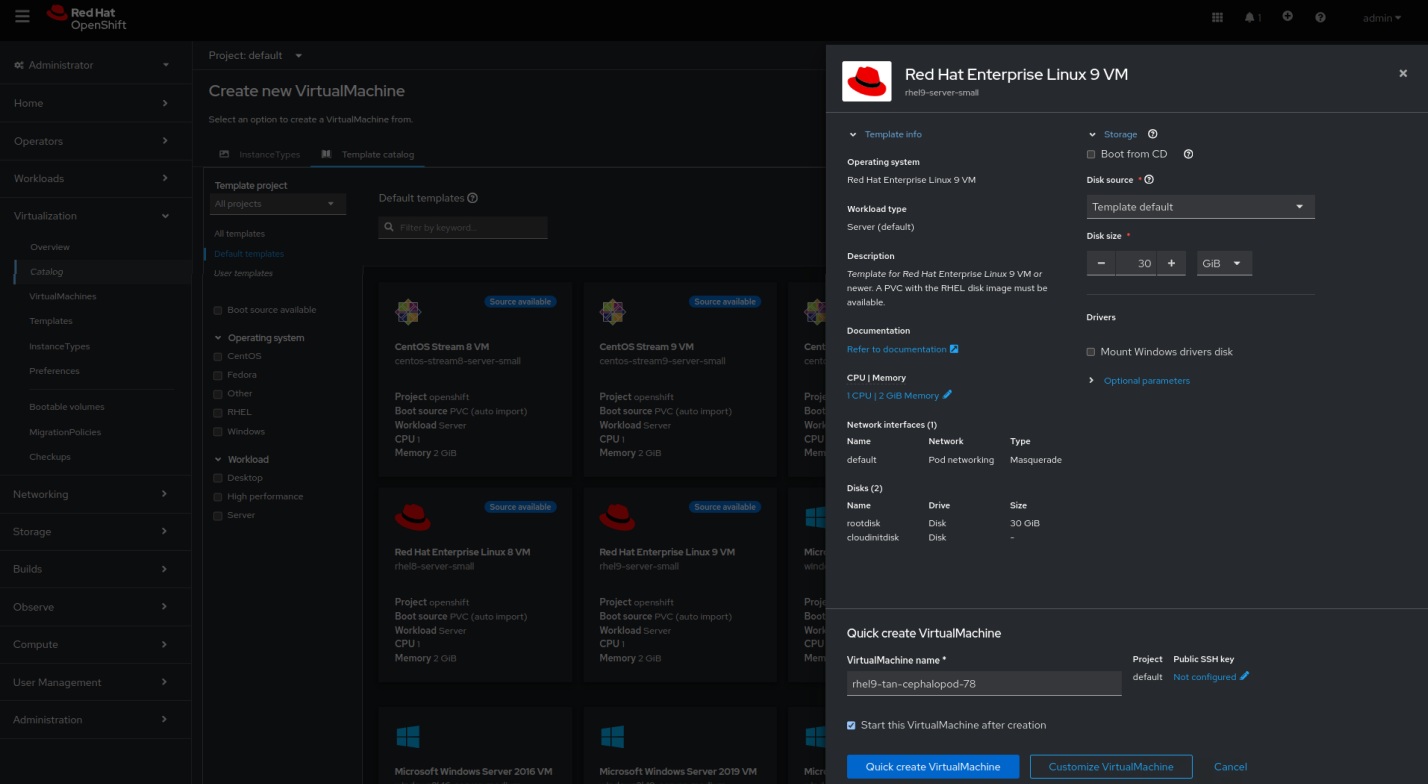
4. Navigate to Virtualization > VirtualMachines in the left menu bar to view the status of the newly provisioned virtual machine.
Provision a virtual machine using customized templates
1. Navigate to Virtualization > Catalog in the left menu bar.
2. Click a template tile to view the virtual machine details.
3: Click Customize VirtualMachine to edit the virtual machine settings.
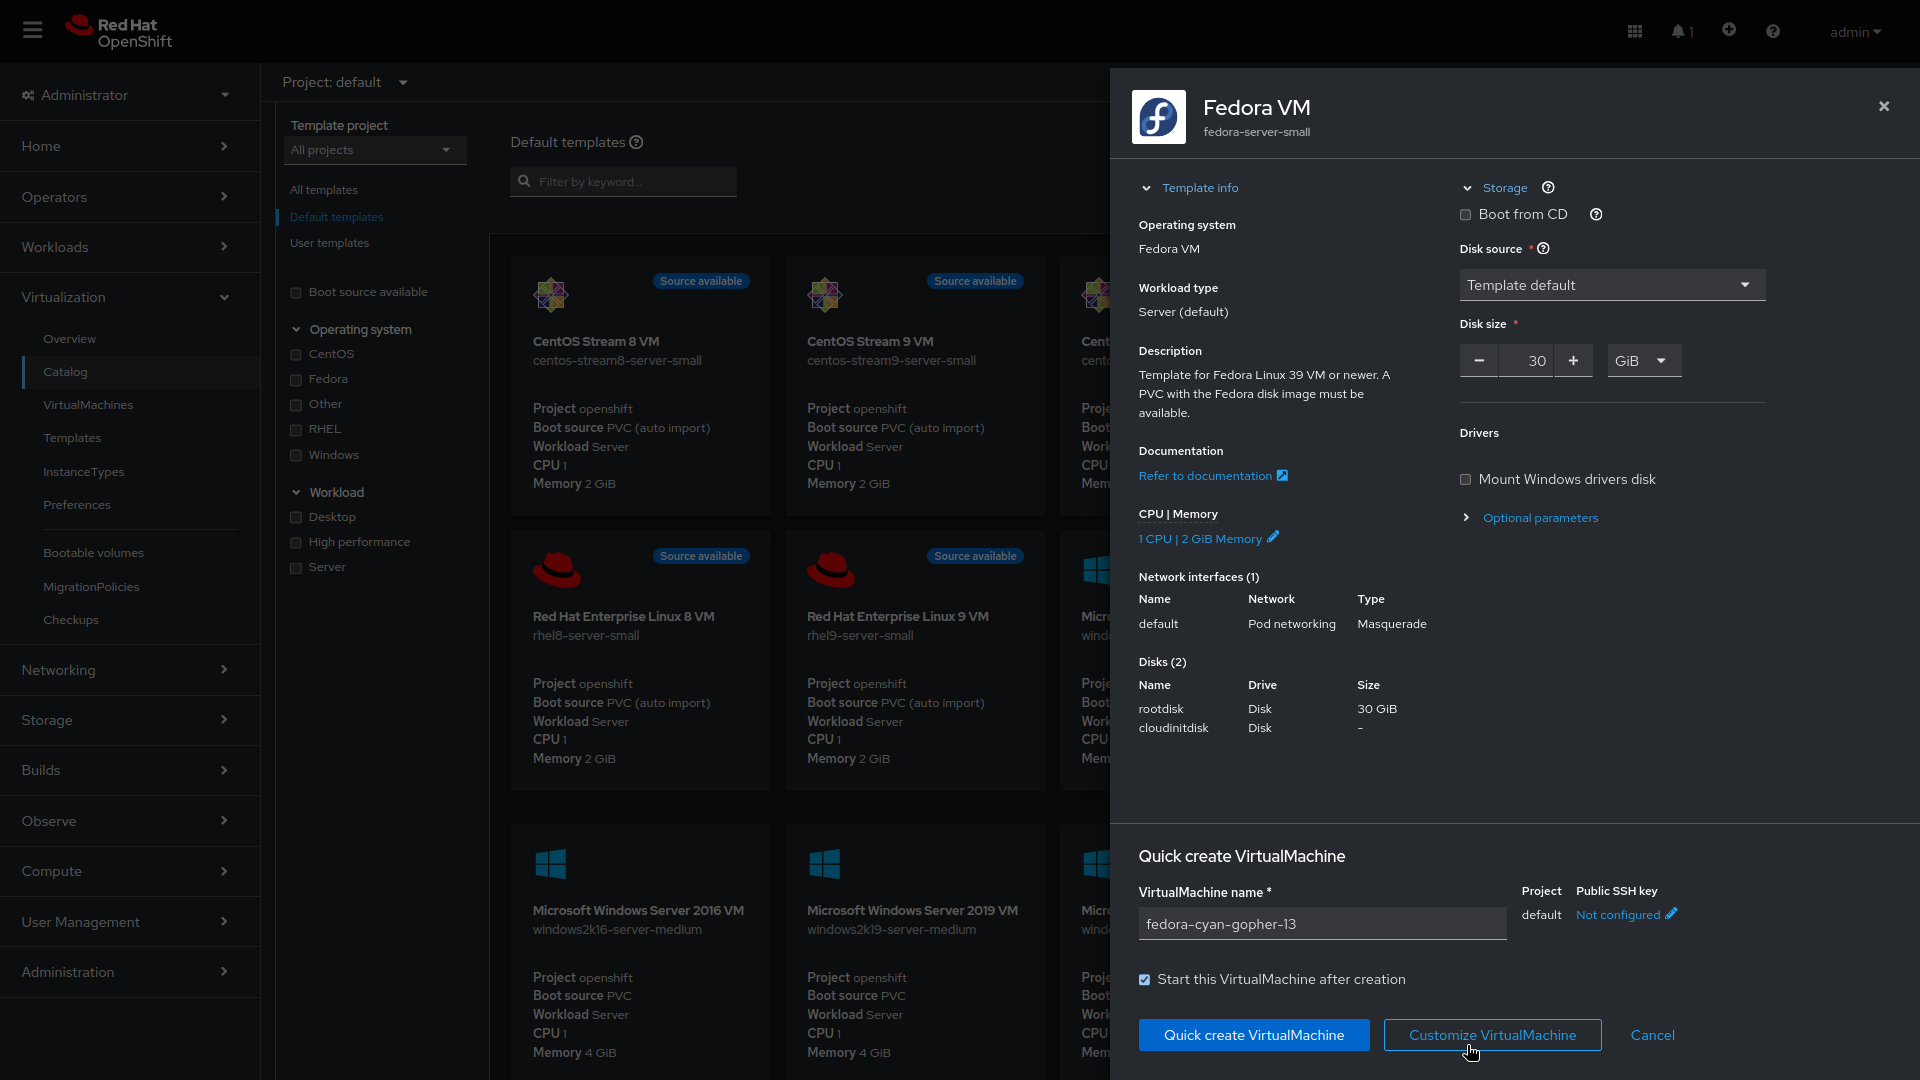
4. Expand the Storage and Optional parameters sections to modify related virtual machine settings, then click Next at the bottom of the frame.

5. Customize virtual machine settings in the Overview, Scheduling, Environment, Network interfaces, Disks, Scripts, and Metadata tabs and click Create VirtualMachine.
For example, you can customize the number of processor cores and amount of memory, change connected networks, add additional disks, and include configuration scripts.

6. Navigate to Virtualization > VirtualMachines in the left menu bar to view the status of the newly provisioned virtual machine.
Task 3: Update virtual machine configurations
As workload demands change, you may need to update the configurations of running virtual machines. You can change a selection of configuration options using the OpenShift Virtualization web console.
Follow these steps to reconfigure existing virtual machines in the web console.
1. Navigate to Virtualization > VirtualMachines in the left menu bar.
2. Select a virtual machine to view the VirtualMachine details page.

3. Click the Configuration tab and edit virtual machine settings in the Scheduling, Environment, Network interfaces, Disks, and Scripts tabs.
Some changes require a restart of the VM. The web console notifies you if a restart is needed.

Task 4: Create and manage snapshots
Snapshots capture virtual machine state and data at a specific point in time. If you encounter an issue when configuring or updating your infrastructure, you can use snapshots to restore virtual machines to a known state. And in the event of a security incident, snapshots let you preserve virtual machines state for further investigation.
OpenShift Virtualization contains features that simplify snapshot management across your environment:
- Create new snapshots.
- Create copies of virtual machines from snapshots.
- List all snapshots attached to a specific virtual machine.
- Restore virtual machines from snapshots.
- Delete existing snapshots.
OpenShift Virtualization lets you create snapshots of both running and stopped virtual machines. If a virtual machine is running, OpenShift Virtualization waits for data to be written to disk before taking the snapshot. The platform uses mechanisms in the backing storage to snapshot virtual machine data for efficient operation.
Follow these steps to create and restore virtual machine snapshots in the web console.
Create a virtual machine snapshot
1. Navigate to Virtualization > VirtualMachines in the left menu bar.
2. Select a virtual machine to view the VirtualMachine details page.
3. Select the Snapshots tab and click Take Snapshot.

4. Enter the snapshot name in the Name field and click Save at the bottom of the frame.

Restore a virtual machine snapshot
1. Navigate to Virtualization > VirtualMachines in the left menu bar.
2. Select a virtual machine to view the VirtualMachine details page.
3. If the virtual machine is running, click the Actions menu and select Stop.

4: Select the Snapshots tab to view a list of snapshots for this virtual machine.

5. Select Restore from the options menu for the desired snapshot, then click Restore in the pop-up menu.

6. Select the Snapshots tab to view the snapshot status.
7. Click the Actions menu and select Start to restart the virtual machine.

Task 5: Live migrate virtual machines
Live migration lets you move virtual machines to different nodes in the cluster without interrupting running workloads. OpenShift Virtualization contains features that speed and simplify virtual machine migrations across your environment:
- Initiate and cancel live migrations.
- Configure live migration settings, including limits and timeouts.
- Customize migration configurations with live migration policies.
- Monitor the progress of all live migrations.
- View and analyze virtual machine migration metrics.
Follow these steps to live migrate running virtual machines in the web console.
1. Navigate to Virtualization > VirtualMachines in the left menu bar.
2. Select Migrate from the options menu for the desired virtual machine.
Migrate virtual machines between clusters
Included with Red Hat OpenShift, the migration toolkit for virtualization lets you migrate virtual machines between clusters—and to OpenShift Virtualization from other platforms—at scale. Define a migration plan through the web console or CLI, and the toolkit manages the entire migration, including data copy and virtual machine management tasks. Warm migration capabilities help minimize potential downtime when migrating virtual machines between clusters.
Learn more about this toolkit.

Task 6: Administer storage resources
OpenShift Virtualization uses Kubernetes objects—including storage classes, persistent volume claims (PVCs), and persistent volumes (PVs)—to manage storage resources for virtual machines. Storage classes describe and classify available storage resources. Cluster and storage administrators create StorageClass objects and include information like quality-of-service levels, backup policies, and organization-specific guidelines. Users can request resources without detailed knowledge of underlying storage volumes via StorageClass object names.
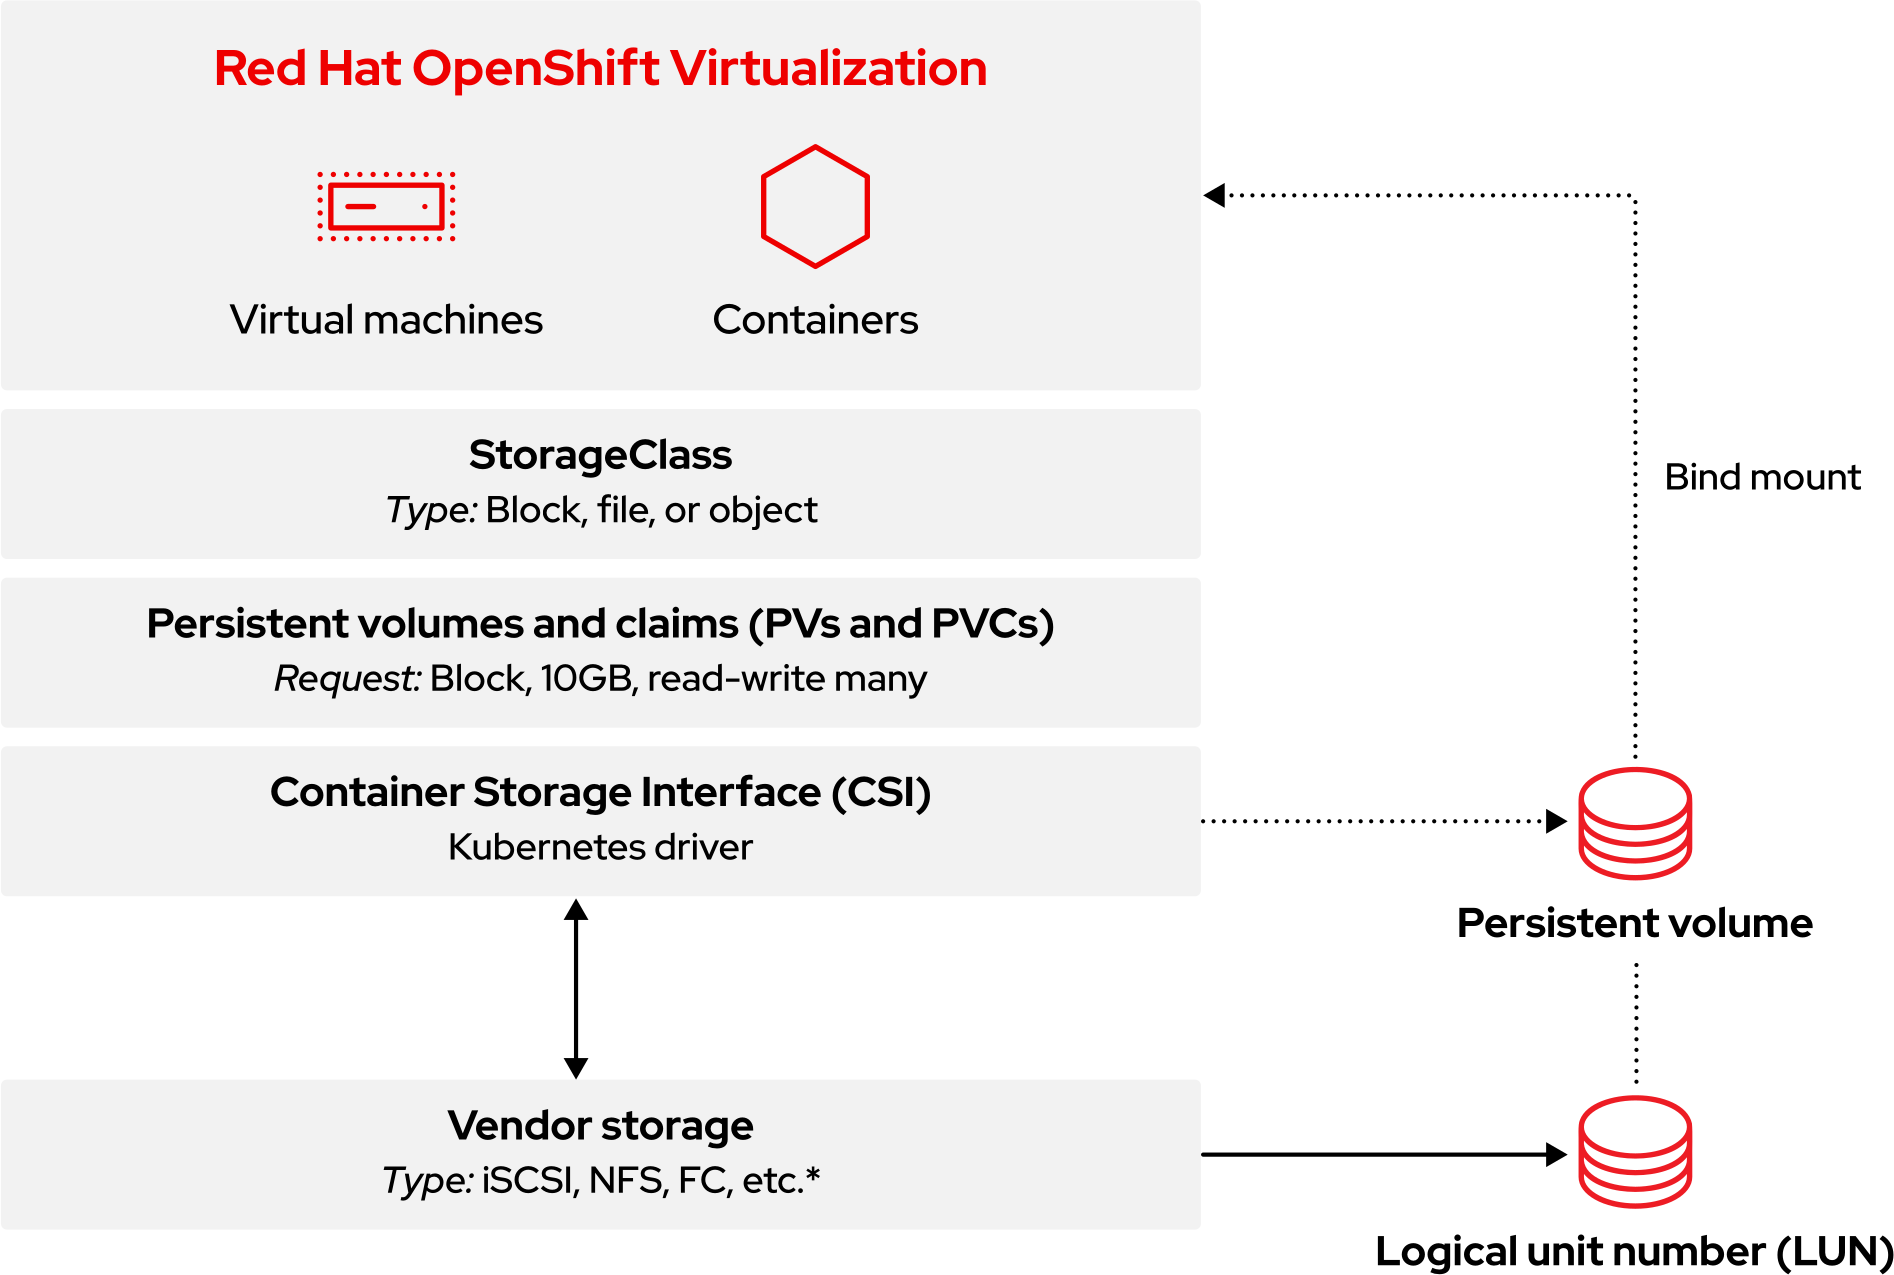
Navigate to Storage > StorageClasses in the left menu bar to view all available StorageClasses for your cluster.

PVCs are requests for storage resources of specific classes, capacities, and access modes. Using the Container Storage Interface (CSI), storage devices receive PVCs, allocate storage as PVs, and bind the PVs to the PVCs. Virtual machines are assigned PVCs, providing access to PVs and underlying storage devices. With OpenShift Virtualization, storage layers manage capacity and migrate data between storage pools. Storage administrators do not need to perform live storage migration activities within storage classes.
Follow these steps to create a persistent volume claim in the web console.
1. Navigate to Storage > PersistentVolumeClaims in the left menu bar.
2. Click Create PersistentVolumeClaim and select With Form.

3. Customize the PVC settings and click Create to provision the PVC.

4. Navigate to Storage > PersistentVolumeClaims in the left menu bar to view the status of all PVCs and bound PVs.
Task 7: Configure network nodes
OpenShift Virtualization lets you define state-driven network configurations across entire clusters. Describe the requested network configuration—including interface types, domain name system (DNS), and routing—for nodes in the cluster using a node network configuration policy. Using the Kubernetes NMState Operator, OpenShift Virtualization monitors and updates each node’s network configuration to ensure compliance with the policy.
Follow these steps to create a node network configuration policy in the web console.
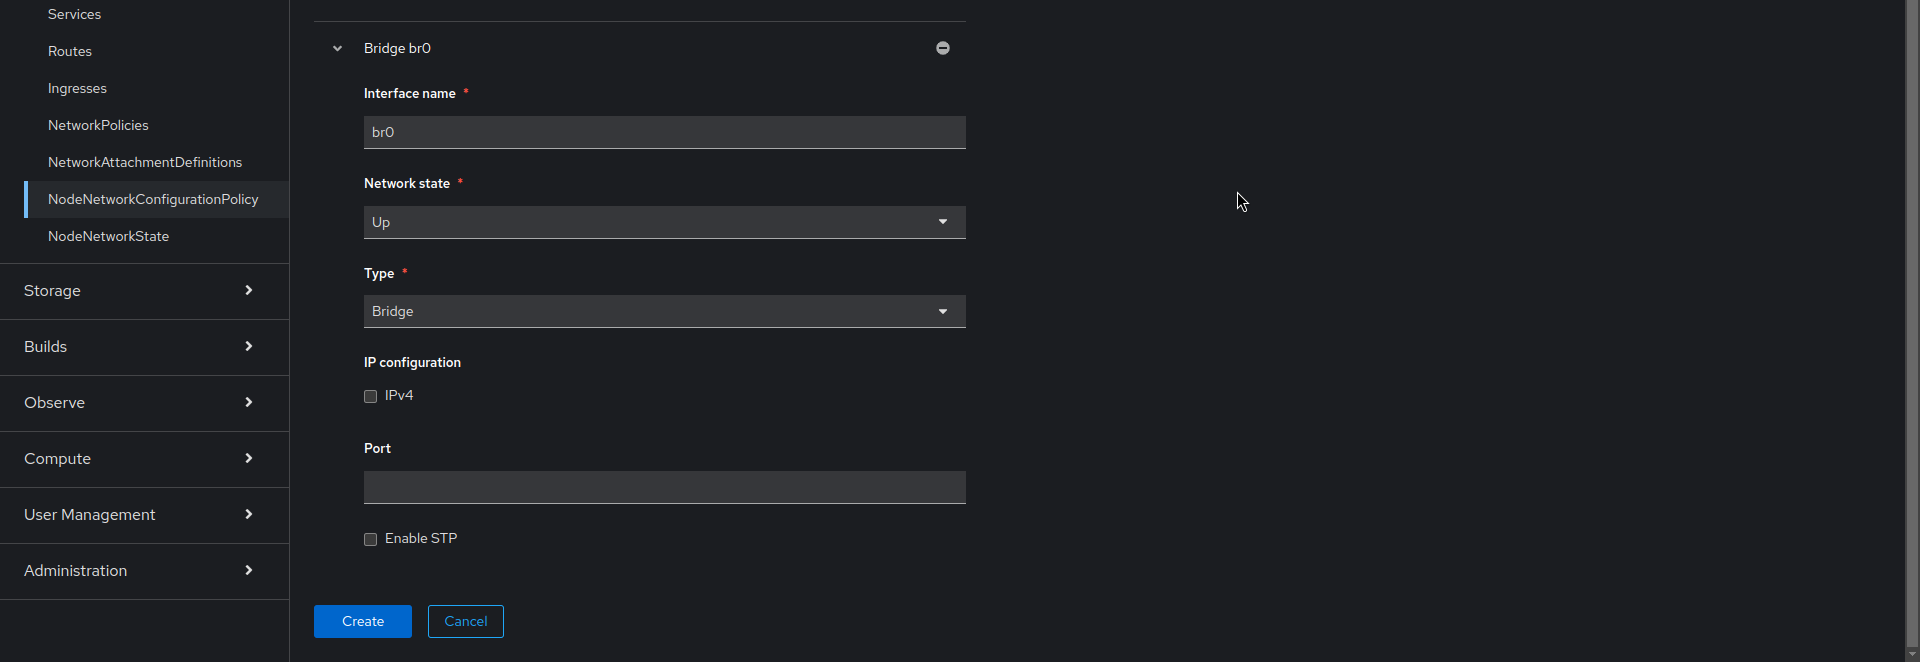
1. Navigate to Networking > NodeNetworkConfigurationPolicy in the left menu bar.
2. Click Create and select From Form.
Migrate data between storage classes
Included with Red Hat OpenShift, the migration toolkit for containers lets you migrate data between storage classes. Define a migration plan and the toolkit performs a warm migration, including copying data and managing persistent volume claims.
Learn more about this toolkit.

3. Enter the policy name in the Policy name field, and optionally add a description in the Description field.

By default, configurations are applied to all nodes. Use the Node Selector check box at the top of the form to apply policies to a subset of nodes.

4. Define policy interfaces, including the required Interface name, Network state, and Type fields. Set optional fields as necessary. Click Create to complete policy creation.
Task 8: Connect virtual machines to networks
Network attachment definitions let you connect virtual machines to virtual local area networks (VLANs) across your cluster. Because network attachment definitions are managed namespaces, you can easily control the virtual machines connected to any VLAN. Using namespaces, you can create a common network that all users can access and prohibit users from placing virtual machines on unauthorized networks. Follow these steps to connect a virtual machine to a VLAN in the web console.
1. Navigate to Networking > NetworkAttachmentDefinitions in the left menu bar.
2. Click Create Network Attachment Definition.
3. Enter a unique name and optional description for the network attachment definition. Select CNV Linux bridge from the Network Type list and enter the bridge name in the Bridge name field. Set optional fields as necessary and click Create at the bottom of the frame to create the network attachment definition.

5. Provision a virtual machine (Task 1). Under the Network interfaces tab, select the newly created network attachment definition.
Task 9: Set up secondary networks
OpenShift Virtualization also lets you connect virtual machines to Open Virtual Network (OVN)-Kubernetes secondary networks. Support for layer 2 topologies allows you to connect virtual machines on different nodes via a cluster-wide logical switch, without configuring any additional physical networking infrastructure. Using a localnet topology, you can connect secondary networks to physical underlays to support east-west cluster traffic and access to services outside the cluster.
The process for setting up and connecting virtual machines to a secondary network largely follows the same steps as configuring a VLAN (Task 8). Follow these steps to set up and connect virtual machines to a secondary network in the web console.
1. Navigate to Networking > NetworkAttachmentDefinitions in the left menu bar.
2. Click Create Network Attachment Definition.
3. Enter a unique name and optional description for the network attachment definition.
4. Select OVN Kubernetes L2 overlay network from the Network Type list and click Create to create the network attachment definition.
5. Connect virtual machines to the newly created network by updating their configurations (Task 3). Under the Network interfaces tab, select the newly created network attachment definition.
Task 10: Back up and recover virtual machines
OpenShift Virtualization supports data protection operations—including on-demand backup, scheduled backup, and restore. With these operations, you can save virtual machine state and data to storage resources in a private datacenter or public cloud environment outside of your cluster. In the event of a failure or scheduled maintenance, you can quickly restore your entire cluster.
Follow these steps to back up and restore virtual machines in the web console.
Configure OpenShift APIs for Data Protection
As part of Red Hat OpenShift, OpenShift APIs for Data Protection (OADP) is an operator that offers comprehensive disaster recovery protection. Created and supported by Red Hat, OADP backs up and restores virtual machines, including any persistent volume claims and metadata objects like virtual machine definitions, and Kubernetes ConfigMaps and Secrets. DataProtectionApplication custom resources define OADP configurations, allowing you to specify backup and snapshot locations along with their secrets using YAML.
Here is an example OADP configuration.
spec:
  backupLocations:
    - velero:
        config:
          profile: default
          region: localstorage
          s3ForcePathStyle: ‘true’
          s3Url: ‘http://s3.openshift-storage.svc’
        credential:
          key: cloud
          name: cloud-credentials
        default: true
        objectStorage:
          bucket: backups-0bc357d1-31db-4453-b54e-9c4bde5a98c8
          prefix: velero
        provider: aws
  configuration:
    velero:
      defaultPlugins:
        - csi
        - openshift
        - aws
        - kubevirt
      featureFlags:
        - EnableCSI
Explore an ecosystem of solutions
Our certified partner ecosystem includes many third-party products for data storage, backup, and restoration. Using the Red Hat OpenShift Operator Framework, OpenShift Virtualization lets you perform backup and recovery operations using many of these products directly from the web console.
Find the right partner solutions in our Red Hat Ecosystem Catalog.
Create a virtual machine backup
1. Create a backup custom resource using YAML that defines the namespaces and virtual machines included in the back up.
apiVersion: velero.io/v1
kind: Backup
metadata:
  name: backup-fedora02
  labels:
    velero.io/storage-location: default
  namespace: openshift-adp
spec:
  hooks: {}
  orLabelSelectors:
  - matchLabels:
      app: fedora02
  - matchLabels:
      vm.kubevirt.io/name: fedora02
  includedNamespaces:
  - vmexamples
  storageLocation: oadp-dpa-1
  ttl: 720h0m0s
2. Navigate to Operators > Installed Operators in the left menu bar.
3. Select OADP Operator from the list.
4. Select the Backup tab and click Create Backup.

5. Select YAML view, copy the backup custom resource into the window, and click Create.

6. Select the Backup tab of the OADP Operator to view the status of the backup operation.
Restore a virtual machine from a backup
1. Create a backup custom resource using YAML that defines the backup and resources to restore.
apiVersion: velero.io/v1
kind: Restore
metadata:
  name: restore-fedora02
  namespace: openshift-adp
spec:
  backupName: backup-fedora02
  includedResources: []
  excludedResources:
  - nodes
  - events
  - events.events.k8s.io
  - backups.velero.io
  - restores.velero.io
  restorePVs: true
2. Navigate to Operators > Installed Operators in the left menu bar.
3. Select OADP Operator from the list.
4. Select the Restore tab and click Create Restore.
5. Select YAML view, copy the backup custom resource into the window, and click Create.
6. Select the Restore tab of the OADP Operator to view the status of the restore operation.
Task 11: Update and upgrade a cluster
With OpenShift Virtualization, you can update an entire Red Hat OpenShift cluster with a single operation. Follow these steps to perform an upgrade of your cluster in the web console.
1. Navigate to Administration > Cluster Settings in the left menu bar.
2. Select the Details tab, and then click Select a version.

3. Choose a Red Hat OpenShift version in the Select new version menu, and click Update.

Task 12: Add new physical hosts
OpenShift Virtualization uses the Bare Metal Operator to perform cluster level capacity management. With this operator, you can manage physical hosts directly in the web console:
- Provision bare-metal hosts to clusters with specific images.
- Format host disk contents before provisioning or after deprovisioning.
- Turn a host on or off.
- Change firmware settings.
- View host hardware details.
Follow these steps to provision new physical hosts. Sample YAML code for steps 1 and 2 can be found in the Red Hat OpenShift documentation.
1. Create a BareMetalHost custom resource using YAML that defines the new host.
2. Create a Secret custom resource using YAML that defines the username and password of the new host.
3. Create the bare-metal host object.
$ oc create -f bmh.yaml
4. Verify that the provisioning state of the host is provisioned.
$ oc get bmh -A
5. Get the list of pending certificate signing requests (CSRs).
$ oc get csr
6. Approve the CSR.
$ oc adm certificate approve <csr_name>
Task 13: Observe and manage virtual machines
OpenShift Virtualization lets you observe and manage your virtual machines from a single console:
- Get a comprehensive overview of your entire virtualization footprint.
- Analyze virtual machine resource use graphically over time.
- Monitor streaming alerts.
- Access the virtual machine console directly.
- Review snapshot history.
- Check the status and condition of various resources, including virtual machines, DataVolumes, and snapshots.
- Access the Guest log system.
- View virtual machine configurations as a web form or in YAML format.
Follow these steps to observe and manage virtual machines in the web console.
1. In the top left corner, click the Administrator menu and select Virtualization.

2. View the complete virtualization footprint in the main window.


3. Select the Top consumers tab to view the 5 virtual machines using the most resources across types—including central processing units (CPU), memory, and storage throughput.

4. Navigate to VirtualMachines in the left menu bar to view details of individual virtual machines. Use the Filter menu to narrow the list by name, label, IP address, or virtual machine status—including migrating, paused, provisioning, running, started, or stopped.

5. Select a virtual machine to view details including status, creation time, operating system, and CPU, memory, storage, and network transfer utilization.


6. Click the Actions menu to manage the virtual machine. You can stop, restart, pause, clone, migrate, and take a snapshot of the selected virtual machine.

Resources and information
Red Hat offers many resources to help you progress more on your virtualization and migration journey.
Explore OpenShift Virtualization demonstrations
Explore Red Hat OpenShift Virtualization's interactive experiences for step-by-step guidance on the fundamentals of using the virtualization solution.
Participate in a workshop
Learn about OpenShift Virtualization from Red Hat experts in a half-day, in-person workshop and tailored, hands-on lab.
Explore our disaster recovery solutions
See how your environment can recover after a site outage with OpenShift Virtualization.
Read product documentation
Find documentation for OpenShift Virtualization, including release notes, installation guides, and operational information.
Watch a demonstration video
Check out a demo of some of the capabilities of OpenShift Virtualization and how it can work with your modernization strategy.
Deploy virtual machines yourself
Try Red Hat OpenShift Virtualization Engine yourself with a 60 day trial to see how to deploy, manage, and migrate virtual machines on a platform that grows with you.
See success in action
Learn how B2 Impact modernizes IT with a unified approach through OpenShift Virtualization