In our previous multi-part Red Hat Satellite tutorial — How to provision a RHEL VM from Red Hat Satellite — we covered an end-to-end scenario for provisioning Red Hat Enterprise Linux (RHEL) VMs from Satellite to a VMWare cluster. In that series we had the Satellite installer install and configure both DNS and DHCP services on our Satellite server. Often you will need to integrate Satellite with an existing "external" DNS and DHCP services in your organization.
In this tutorial, we extend the work of the previous tutorial by providing step-by-step instructions to integrate external DNS and DHCP services to a Satellite server. Steps used for installing and configuring the base DNS and DHCP services on a separate server for use with this tutorial are covered in the appendix section of this article.
Satellite DNS integration
First we will want to test DNS updates from the server hosting Satellite. To test DNS updates with nsupdate, you will need the bind utility installed on the Satellite server. Install or update bind-utils on the client server as needed.
# yum list installed | grep bind-utils
# yum install bind-utils
From the server running named, copy the rndc.key to the Satellite server and set it up for use with Satellite.
# scp root@ns02.example.com:/etc/rndc.key /etc/rndc.key
# restorecon -v /etc/rndc.key
# chown -v root:named /etc/rndc.key
# chmod -v 640 /etc/rndc.key
From the Satellite server, test an update to the forward zone (add -d to nsupdate command for debug: nsupdate -d -k ...).
# echo -e "zone example.com.\n server 10.1.10.253\n update add atest.example.com 3600 IN A 10.1.10.10\n send\n" | nsupdate -k /etc/rndc.key
# nslookup atest.example.com
# echo -e "zone example.com.\n server 10.1.10.253\n update delete atest.example.com 3600 IN A 10.1.10.10\n send\n" | nsupdate -k /etc/rndc.key
From the Satellite server, test an update to the reverse zone (add -d to nsupdate command for debug: nsupdate -d -k ...).
# echo -e "zone 10.1.10.in-addr.arpa.\n server 10.1.10.253\n update add 10.10.1.10.in-addr.arpa. 300 PTR atest.example.com\n send\n" | nsupdate -k /etc/rndc.key
# nslookup 10.1.10.10
# dig +short -x 10.1.10.10
# echo -e "zone 10.1.10.in-addr.arpa.\n server 10.1.10.253\n update delete 10.10.1.10.in-addr.arpa. 300 PTR atest.example.com\n send\n" | nsupdate -k /etc/rndc.key
Note: Typically the forward and reverse zone files are permanently updated around 15 minutes after the DNS update is issued from the client machine.
Assign the foreman-proxy user to the named group manually.
# usermod -a -G named foreman-proxy
Finally, run the following satellite-installer command to make the changes persistent to the /etc/foreman-proxy/settings.d/dns.yml file.
# satellite-installer --foreman-proxy-dns=true \
--foreman-proxy-dns-managed=false \
--foreman-proxy-dns-provider=nsupdate \
--foreman-proxy-dns-server="10.1.10.253" \
--foreman-proxy-keyfile=/etc/rndc.key \
--foreman-proxy-dns-ttl=86400
Restart the foreman-proxy service.
# systemctl restart foreman-proxy
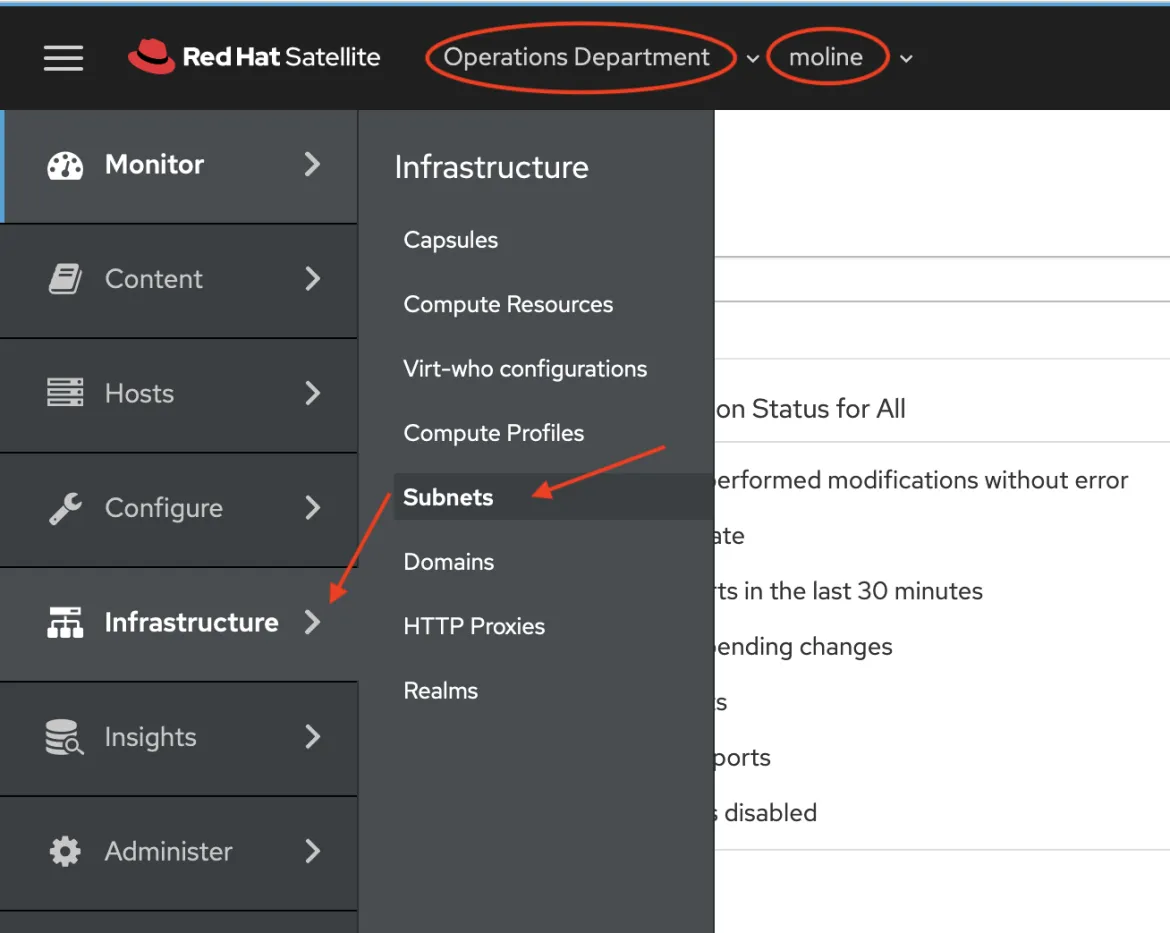
Next, login into the Satellite console and make sure that you have the Operations Department chosen for the Organization and moline chosen for the location. Now choose Infrastructure -> Subnets from the side menu.

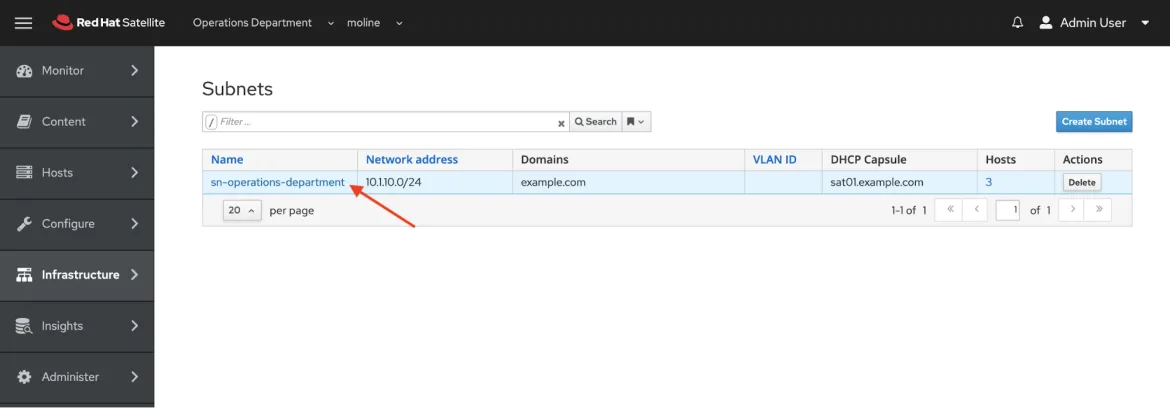
On the Subnets page click on the link for the sn-operations-department subnet.

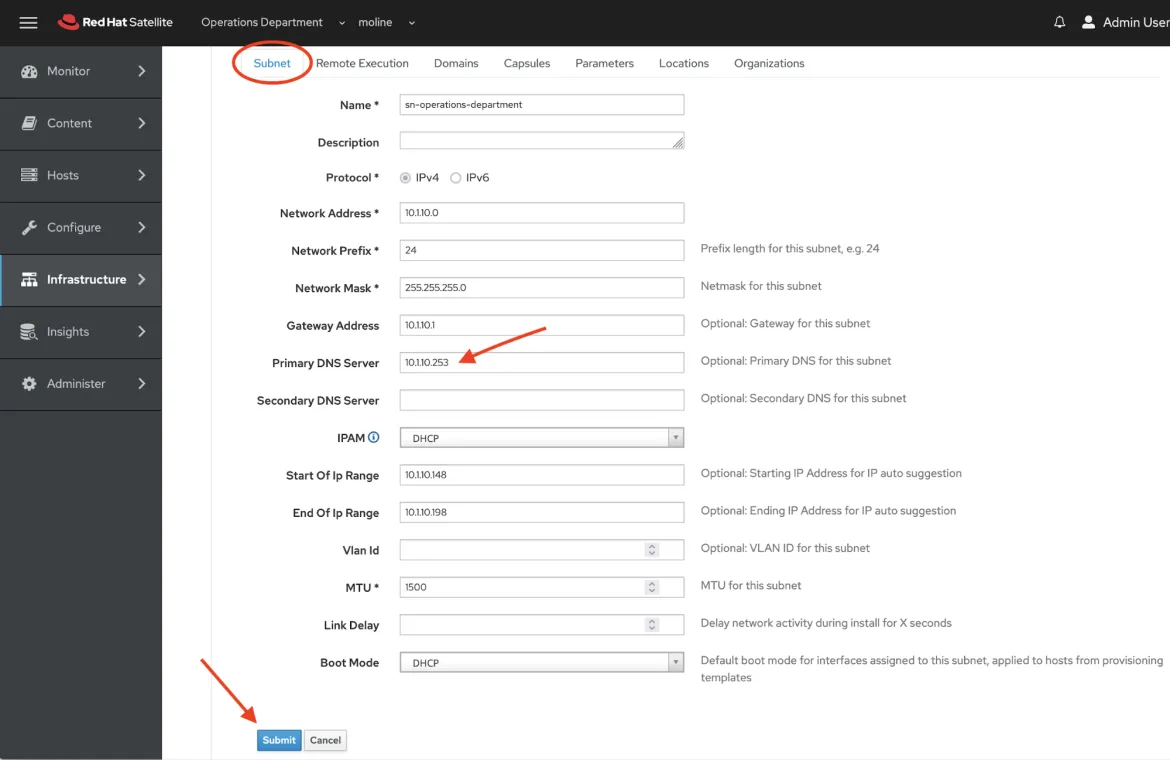
On the Subnets > sn-operations-department (10.1.10.0/24) update the Primary DNS Server field to match the IP address of the external DNS server, and click the “Submit” button.

Satellite DHCP integration
For Satellite to interact with an external DHCP service you will need to share the DHCP configuration and lease files with the Satellite server. In this example, we are using NFS to share the configuration and lease files, and I have provided step-by-step instructions for enabling NFS services on both the server hosting DHCP and the Satellite server.
First, we need to generate a security token on the server hosting DHCP.
# dnssec-keygen -a HMAC-MD5 -b 512 -n HOST omapi_key
Komapi_key.+157+56839
Copy the secret from the key.
# cat Komapi_key.+*.private |grep ^Key|cut -d ' ' -f2
jNSE5YI3H1A8Oj/tkV4...A2ZOHb6zv315CkNAY7DMYYCj48Umw==
Add the following information to the /etc/dhcp/dhcpd.conf file.
omapi-port 7911;
key omapi_key {
        algorithm HMAC-MD5;
        secret "jNSE5YI3H1A8Oj/tkV4...A2ZOHb6zv315CkNAY7DMYYCj48Umw==";
};
omapi-key omapi_key;
On the Satellite server, gather foreman user UID and GID.
# id -u foreman
987
# id -g foreman
981
On the server hosting DNS and DHCP services, create the foreman userid and group.
# groupadd -g 981 foreman
# useradd -u 987 -g 981 -s /sbin/nologin foreman
Restore the read and execute flags.
# chmod o+rx /etc/dhcp/
# chmod o+r /etc/dhcp/dhcpd.conf
# chattr +i /etc/dhcp/ /etc/dhcp/dhcpd.conf
On the server hosting the DHCP service, export the DHCP configuration and lease files using NFS.
# yum install nfs-utils
...
complete!
# systemctl enable rpcbind nfs-server
# systemctl enable rpcbind nfs-server
# systemctl start rpcbind nfs-server nfs-idmapd
Create directories for the DHCP configuration and lease files that you want to export using NFS.
# mkdir -p /exports/var/lib/dhcpd /exports/etc/dhcp
To create mount points for the created directories, add the following line to the /etc/fstab file.
/var/lib/dhcpd /exports/var/lib/dhcpd none bind,auto 0 0
/etc/dhcp /exports/etc/dhcp none bind,auto 0 0
Mount the file systems in /etc/fstab.
# mount -a
Add these lines to the /etc/exports file. The IP address is from your Satellite server.
/exports 10.1.10.254(rw,async,no_root_squash,fsid=0,no_subtree_check)

/exports/etc/dhcp 10.1.10.254(ro,async,no_root_squash,no_subtree_check,nohide)

/exports/var/lib/dhcpd 10.1.10.254(ro,async,no_root_squash,no_subtree_check,nohide)
Reload the NFS server.
# exportfs -rva
Configure the firewall for the DHCP omapi port 7911.
# firewall-cmd --add-port="7911/tcp" \
&& firewall-cmd --runtime-to-permanent
success
success
Configure the firewall for external access to NFS. Clients are configured using NFSv3.
# firewall-cmd --zone public --add-service mountd \
&& firewall-cmd --zone public --add-service rpc-bind \
&& firewall-cmd --zone public --add-service nfs \
&& firewall-cmd --runtime-to-permanent
success
success
success
success
Preparing the Satellite Server
Install the nfs-utils utility.
# foreman-maintain packages install nfs-utils
Create the DHCP directories for NFS.
# mkdir -p /mnt/nfs/etc/dhcp /mnt/nfs/var/lib/dhcpd
Change the file owner.
# chown -R foreman-proxy /mnt/nfs
Verify communication with the NFS server and the Remote Procedure Call (RPC) communication paths.
# showmount -e ns02.example.com
Export list for ns02.example.com:
/exports/var/lib/dhcpd 10.1.10.254
/exports/etc/dhcp      10.1.10.254
/exports               10.1.10.254
rpcinfo -p 10.1.10.254
   program vers proto   port  service
    100000    4   tcp    111  portmapper
    100000    3   tcp    111  portmapper
    100000    2   tcp    111  portmapper
    100000    4   udp    111  portmapper
    100000    3   udp    111  portmapper
    100000    2   udp    111  portmapper
Add the following lines to the /etc/fstab file.
ns02.example.com:/exports/etc/dhcp /mnt/nfs/etc/dhcp nfs
ro,vers=3,auto,nosharecache,context="system_u:object_r:dhcp_etc_t:s0" 0 0

ns02.example.com:/exports/var/lib/dhcpd /mnt/nfs/var/lib/dhcpd nfs
ro,vers=3,auto,nosharecache,context="system_u:object_r:dhcpd_state_t:s0" 0 0
Mount the file systems on /etc/fstab.
# mount -a
To verify that the foreman-proxy user can access the files that are shared over the network, display the DHCP configuration and lease files.
# su foreman-proxy -s /bin/bash
bash-4.2$ cat /mnt/nfs/etc/dhcp/dhcpd.conf
bash-4.2$ cat /mnt/nfs/var/lib/dhcpd/dhcpd.leases
bash-4.2$ exit
Enter the satellite-installer command to make the following persistent changes to the /etc/foreman-proxy/settings.d/dhcp.yml file.
# satellite-installer --foreman-proxy-dhcp=true \
--foreman-proxy-dhcp-provider=remote_isc \
--foreman-proxy-plugin-dhcp-remote-isc-dhcp-config /mnt/nfs/etc/dhcp/dhcpd.conf \
--foreman-proxy-plugin-dhcp-remote-isc-dhcp-leases /mnt/nfs/var/lib/dhcpd/dhcpd.leases \
--foreman-proxy-plugin-dhcp-remote-isc-key-name=omapi_key \
--foreman-proxy-plugin-dhcp-remote-isc-key-secret=jNSE5YI3H1A8Oj/tkV4...A2ZOHb6zv315CkNAY7DMYYCj48Umw=== \
--foreman-proxy-plugin-dhcp-remote-isc-omapi-port=7911 \
--enable-foreman-proxy-plugin-dhcp-remote-isc \
--foreman-proxy-dhcp-server=ns02.example.com
Restart the foreman-proxy service.
# systemctl restart foreman-proxy
Satellite will now use external DNS and DHCP services when provisioning and managing the RHEL VM lifecycle with our VMWare cluster.
Conclusion
Red Hat Satellite provides you with all the components you need to easily and efficiently provision, patch and manage the lifecycle of your RHEL environment. While everything you need is provided with Satellite for managing your RHEL lifecycle, Satellite also easily integrates with other services. In this tutorial we showed you how to integrate your Satellite RHEL lifecycle management with existing DNS and DHCP services that you may have already deployed in your organization.
Appendix
Note: For this example tutorial, the DNS and DHCP services are running on a RHEL 8.5 server VM. For this example the subnet is 10.1.10.0/24 and domain is example.com which are derived from the previous Satellite tutorial.
Install named and dhcpd
We will install named, the bind utilities, the dns caching server and dhcpd.
# sudo yum -y install bind* caching* dhcp*
...
Complete!
Update firewall settings.
# firewall-cmd \
--add-service dns \
--add-service dhcp
Make the firewall changes permanent.
# sudo firewall-cmd --runtime-to-permanent
Verify the firewall changes
# sudo firewall-cmd --list-all
Setup system clock with chrony. I have a local time server that my systems use for synching time. Type the following command to check the time sync status.
# chronyc sources -v
Configuring named
In my example setup I externalize the options and zones information for easier maintenance and readability. Example files are listed after the following table.
| File name | Location | Info |
|---|---|---|
| named.conf | /etc | named configuration file |
| options.conf | /etc/named | named.conf options information |
| zones.conf | /etc/named | named.conf zone information |
| db.10.1.10.in-addr.arpa | /var/named/dynamic | reverse zone file |
| db.example.com | /var/named/dynamic | forward zone file |
| named.rfc1912.zones | /etc | genrated by the installation |
| mdc.key | /etc | generated the first time named is started |
named.conf example
// named.conf

include "/etc/rndc.key";

controls  {
        inet 127.0.0.1 port 953 allow { 127.0.0.1; } keys { "rndc-key"; };
};

options  {
        include "/etc/named/options.conf";
};

include "/etc/named.rfc1912.zones";


// Public view read by Server Admin
include "/etc/named/zones.conf";
options.conf example
directory "/var/named";
forwarders { 10.1.1.254; };

recursion yes;
allow-query { any; };
dnssec-enable yes;
dnssec-validation yes;

empty-zones-enable yes;

listen-on-v6 { any; };

allow-recursion { localnets; localhost; };
zones.conf example
zone "10.1.10.in-addr.arpa" {
    type master;
    file "/var/named/dynamic/db.10.1.10.in-addr.arpa";
    update-policy {
            grant rndc-key zonesub ANY;
    };
};
zone "example.com" {
    type master;
    file "/var/named/dynamic/db.example.com";
    update-policy {
            grant rndc-key zonesub ANY;
    };
};
Forward zone file - db.example.com
$ORIGIN .
$TTL 10800 ; 3 hours
example.com IN SOA ns02.example.com. root.example.com. (
12         ; serial
86400      ; refresh (1 day)
3600       ; retry (1 hour)
604800     ; expire (1 week)
3600       ; minimum (1 hour)
)
NS ns02.example.com.
$ORIGIN example.com.
ns02 A 10.1.10.253
sat01 A 10.1.10.254
Reverse zone file - db.10.1.10.in-addr.arpa
$ORIGIN .
$TTL 10800 ; 3 hours
10.1.10.in-addr.arpa IN SOA ns02.example.com. root.10.1.10.in-addr.arpa. (
12         ; serial
86400      ; refresh (1 day)
3600       ; retry (1 hour)
604800     ; expire (1 week)
3600       ; minimum (1 hour)
)
NS ns02.example.com.
$ORIGIN 10.1.10.in-addr.arpa.
254 PTR sat01.example.com.
253 PTR ns02.example.com.
ns02 A 10.1.10.253
sat01 A 10.1.10.254
References
Sull'autore
Paul Lucas is a Chicagoland-based Red Hat Solutions Architect working with a variety of enterprise businesses. A 21 year technical sales veteran, Paul was previously a customer working at a benefits consulting firm, where he advised development teams on the use of Java and the then-emerging Java EE.
Altri risultati simili a questo
Ricerca per canale
Automazione
Novità sull'automazione IT di tecnologie, team e ambienti
Intelligenza artificiale
Aggiornamenti sulle piattaforme che consentono alle aziende di eseguire carichi di lavoro IA ovunque
Hybrid cloud open source
Scopri come affrontare il futuro in modo più agile grazie al cloud ibrido
Sicurezza
Le ultime novità sulle nostre soluzioni per ridurre i rischi nelle tecnologie e negli ambienti
Edge computing
Aggiornamenti sulle piattaforme che semplificano l'operatività edge
Infrastruttura
Le ultime novità sulla piattaforma Linux aziendale leader a livello mondiale
Applicazioni
Approfondimenti sulle nostre soluzioni alle sfide applicative più difficili
Serie originali
Raccontiamo le interessanti storie di leader e creatori di tecnologie pensate per le aziende
Prodotti
- Red Hat Enterprise Linux
- Red Hat OpenShift
- Red Hat Ansible Automation Platform
- Servizi cloud
- Scopri tutti i prodotti
Strumenti
- Formazione e certificazioni
- Il mio account
- Supporto clienti
- Risorse per sviluppatori
- Trova un partner
- Red Hat Ecosystem Catalog
- Calcola il valore delle soluzioni Red Hat
- Documentazione
Prova, acquista, vendi
Comunica
- Contatta l'ufficio vendite
- Contatta l'assistenza clienti
- Contatta un esperto della formazione
- Social media
Informazioni su Red Hat
Red Hat è leader mondiale nella fornitura di soluzioni open source per le aziende, tra cui Linux, Kubernetes, container e soluzioni cloud. Le nostre soluzioni open source, rese sicure per un uso aziendale, consentono di operare su più piattaforme e ambienti, dal datacenter centrale all'edge della rete.
Seleziona la tua lingua
Red Hat legal and privacy links
- Informazioni su Red Hat
- Opportunità di lavoro
- Eventi
- Sedi
- Contattaci
- Blog di Red Hat
- Diversità, equità e inclusione
- Cool Stuff Store
- Red Hat Summit

