
Use Network Policy Objects to restrict traffic flow between application components or microservices with a demonstration from this video and post. Network Policy Objects allow you to define a policy to determine when traffic is allowed to flow to specific services and prevent traffic to other services.
As of the writing of this article, this feature is in "Technology Preview" in OpenShift 3.6.
Prerequisites
To test this concept, you have to install an OpenShift cluster with redhat/openshift-ovs-networkpolicy using os_sdn_network_plugin_name in the Ansible hosts file or enable network policy in an existing cluster as explained in https://docs.openshift.com/container-platform/3.6/admin_guide/managing_networking.html#admin-guide-networking-networkpolicy
Understanding the Sample Application
To look at a practical example that showcases Network Policy Objects, we'll use a sample application that is made up of a group of microservices from this Git repository: https://github.com/VeerMuchandi/microservices-on-openshift.
Deploying these microservices will provide you a use case for understanding how Network Policy Objects are useful.
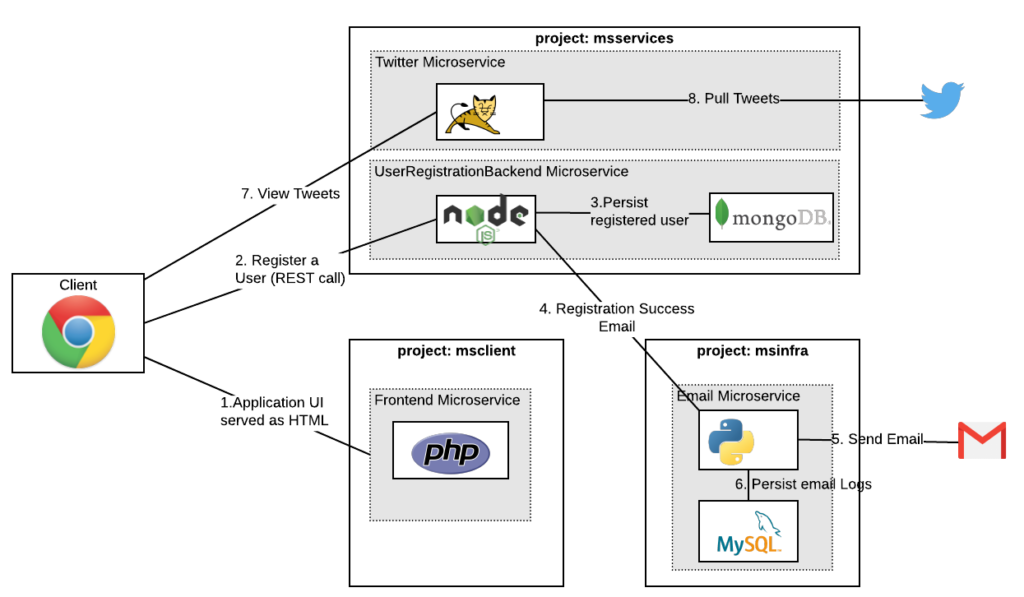
This application has four microservices written using different technologies just to showcase how polyglot microservices talk to each other. Some of these microservices have application logic and a database. All the components run as containers on OpenShift.
- Front-end Service that provides a UI to register users, allows you to login, and displays the tweets for all the registered users, written in PHP.
- Email Service that can send emails to a registered user, written in Python, that saves data in MySQLdb.
- Twitter Service that pulls tweets for a registered user, written in Java running on Tomcat. This service is called by the Front-end HTML directly.
- User Registration Backend that registers the users, saves the registered user in a MongoDB, and is written in Node.Js. This service is called by the Front-end HTML and does the job of user registration. Once the user is registered, it calls the Email service to send an email confirmation.
This is all explained in this application's Git repository. For our network policy use case, we will deploy these microservices into three different projects:
msclientproject hosts the front-end service.msservicesproject hosts the user-registration back-end service and the Twitter service.msinfraproject hosts the email service.
The deployment model for these microservices and the expected interations (in order) are shown in the figure below. I recommend spending some time on this model to get a better understanding.
Deploy the application
Prerequisites
- For Email Service to work, you will need a Gmail account to send emails. You will also have to turn on access for less secure apps on this Gmail account so that the application can log in and send emails. Caution: Don't use your personal Gmail. Create a new one that you don't use so that you don't care if it is hacked.
- For Twitter Service to work, you will need access to keys and tokens to work with Twitter. Refer to the documentation at https://dev.twitter.com/oauth/overview/application-owner-access-tokens for more information.
Step 1: Clone the repository to your local machine:
git clone https://github.com/VeerMuchandi/microservices-on-openshift
and change to the microservices-on-openshift/installscripts folder:
cd microservices-on-openshift/install-scripts
Step 2: Create three projects (after you have already logged into the OpenShift cluster):
oc new-project msclient

oc new-project msservices

oc new-project msinfra
Step 3: Set environment variables
Edit 1.setVariable.sh script to set the following values:
OSE_DOMAINto your OpenShift domain nameOSE_CLIENT_PROJECTtomsclientOSE_SERVICES_PROJECTtomsservicesOSE_INFRA_PROJECTtomsinfraFROM_GMAILto your Gmail account from where you want to send GmailsFROM_GMAIL_PASSWORDpassword for the above Gmail account- And values for
TWITTER_CONSUMER_KEY,TWITTER_CONSUMER_SECRET<,TWITTER_OAUTH_ACCESS_TOKEN, andTWITTER_OAUTH_ACCESS_TOKEN_SECRET
Run the script as follows
source 1.setVariable.sh
Step 4: Deploy microservices by running the following scripts:
This script will build and deploy Email Service and the MySQLdb in the msinfra project.
source 2.deployEmailSvc-PythonMySQL.sh
This script will build and deploy Twitter Service in the msservices project:
source 3.deployTwitter-Tomcat.sh
This script will build and deploy User Registration Back-end Service in the msservices project
source 4.deployUserRegBackend-NodejsMongo.sh
This script will build and deploy Front-end Service in the msclient project:
source 5.deployFrontend-PHP.sh
In a few minutes, you will notice all the services up and running. You should see the following:
$ oc get pods -n msclient
NAME READY STATUS RESTARTS AGE
userreg-1-build 0/1 Completed 0 1m
userreg-1-tm3x8 1/1 Running 0 1m$ oc get pods -n msservices
NAME READY STATUS RESTARTS AGE
mongodb-1-2zx66 1/1 Running 0 2m
twitter-api-1-build 0/1 Completed 0 2m
twitter-api-1-srvvm 1/1 Running 0 1m
userregsvc-1-b4xq3 1/1 Running 0 1m
userregsvc-1-build 0/1 Completed 0 2m$ oc get pods -n msinfra
NAME READY STATUS RESTARTS AGE
emailsvc-1-build 0/1 Completed 0 3m
emailsvc-1-grb00 1/1 Running 0 2m
mysql-2-ffj05 1/1 Running 0 3m$ oc get route -n msclient
NAME HOST/PORT PATH SERVICES PORT TERMINATION WILDCARD
userreg userreg-msclient.apps.devday.ocpcloud.com userreg 8080-tcp None
Step 5: Test your application
Access the UI for the frontend and register a few users. In my case, the URL is http://userreg-msclient.apps.devday.ocpcloud.com. If email is configured correctly the user that is registered should receive an email. Also, you should be able to pull the tweets for the configured user.
So far, we've deployed a few microservices and used them on OpenShift.
Now we will see why we need Network Policy Objects
We have a hack in the Front-end Service code. If you access your <>/hack.php, it talks to the MySQLdb in the msinfra project and pulls all the data and shows it as below.
$ curl http://userreg-msclient.apps.devday.ocpcloud.com/hack.php

Here is the list of emails sent:

From Address: xxx@gmail.comTo Address: yyy@gmail.comSubject: New registrationWhen: 2017-08-22

From Address: xxx@gmail.comTo Address: zzz@gmail.comSubject: New registrationWhen: 2017-08-22

End of the list
Issue: Ideally UI should not reach a database behind a microservice, but instead should access it via the APIs exposed by the microservice. It is a well-known architecture practice that if you are running an application in a multi-tiered architecture, your UI layer should not be talking to th database directly but go via APIs exposed by business logic. In fact, the database is generally firewalled, and only ports from the services that are supposed to call the database are allowed. If you are using a flat network such as ovs-subnet, these fine-grained network controls between services are not possible.
This post explains what Network Policy Objects are and how they can be used to control network traffic in theory: https://blog.openshift.com/whats-new-in-openshift-3-5-network-policy-tech-preview/.
Step 6: Network Policy Objects to the rescue
Let us now add Network Policy controls to our microservices so that the above kind of hack is not allowed. We'll add policies that allow specific traffic to your services.
Let's protect the MySQLdb behind the Email Service so that it is only accessible from the Email Service. Create a file with the following content:
$ cat allow-3306.yaml

kind: NetworkPolicy

apiVersion: extensions/v1beta1

metadata:

  name: allow-3306

spec:

 podSelector:

   matchLabels:

     app: mysql

 ingress:

 - from:

   - podSelector:

       matchLabels:

         app: emailsvc

   ports:

   - protocol: TCP

     port: 3306
Here we are allowing traffic coming from pods that have labels matching app: emailsvc to reach the MySQL pod that has label app:mysql. Look at the labels assigned to pods and services to understand how this works.
$ oc get svc -n msinfra --show-labels
NAME CLUSTER-IP EXTERNAL-IP PORT(S) AGE LABELS
emailsvc 172.30.42.184 8080/TCP 1h app=emailsvc,microservice=emailsvc
mysql 172.30.43.224 3306/TCP 1h app=mysql,microservice=emailsvc$ oc get pods -n msinfra --show-labels | grep Running
emailsvc-1-grb00 1/1 Running 0 1h app=emailsvc,deployment=emailsvc-1,deploymentconfig=emailsvc,microservice=emailsvc
mysql-2-ffj05 1/1 Running 0 1h app=mysql,deployment=mysql-2,deploymentconfig=mysql,microservice=emailsvc
Now create this policy in the msinfra project as follows:
$ oc create -f allow-3306.yaml -n msinfra

networkpolicy "allow-3306" created
As soon as the policy is added, if you test the hack again, it should fail with 504 Gateway Time-out as shown below:
$ curl http://userreg-msclient.apps.devday.ocpcloud.com/hack.php
504 Gateway Time-out
The server didn't respond in time.
Step 7: Fully protect your microservices
Note You can clone this Git repository to download all these policy files: https://github.com/VeerMuchandi/usingnetworkpolicyobjects
Let's add more policies now.
Completely deny all traffic to msclient project:
$ cat default-deny.yaml

kind: NetworkPolicy

apiVersion: extensions/v1beta1

metadata:

name: default-deny

spec:

podSelector:
Create this policy:
$ oc create -f default-deny.yaml -n msclient

networkpolicy "default-deny" created
Now if you test your UI, it should say Application is not available.
You can see that the route (from loadbalancer) is reaching the service at port 8080:
$ oc get route -n msclient --show-labels

NAME      HOST/PORT                                   PATH      SERVICES   PORT       TERMINATION   WILDCARD   LABELS

userreg   userreg-msclient.apps.devday.ocpcloud.com             userreg    8080-tcp                 None       app=userreg,microservice=userreg
So let's allow port 8080 for the the userreg service to enable communication with UI as below:
$ cat allow-8080-frontend.yaml
kind: NetworkPolicy
apiVersion: extensions/v1beta1
metadata:
name: allow-8080-frontend
spec:
podSelector:
matchLabels:
app: userreg
ingress:
- ports:
- protocol: TCP
port: 8080$ oc create -f allow-8080-frontend.yaml -n msclient
networkpolicy "allow-8080-frontend" created
Now your front-end URL should work again!
Next, Default Deny all traffic to msservices project:
$ oc create -f default-deny.yaml -n msservices

networkpolicy "default-deny" created
Now allow 8080 to User Registration Backend and Twitter Services:
$ cat allow-8080-userregsvc.yaml
kind: NetworkPolicy
apiVersion: extensions/v1beta1
metadata:
name: allow-8080-userregsvc
spec:
podSelector:
matchLabels:
app: userregsvc
ingress:
- ports:
- protocol: TCP
port: 8080$ cat allow-8080-twitter.yaml
kind: NetworkPolicy
apiVersion: extensions/v1beta1
metadata:
name: allow-8080-twitter
spec:
podSelector:
matchLabels:
app: twitter-api
ingress:
- ports:
- protocol: TCP
port: 8080$ oc create -f allow-8080-userregsvc.yaml -n msservices
networkpolicy "allow-8080-userregsvc" created
$ oc create -f allow-8080-twitter.yaml -n msservices
networkpolicy "allow-8080-twitter" created
Allow MongoDB to be accessed only by User Registration Service:
$ cat allow-27017.yaml
kind: NetworkPolicy
apiVersion: extensions/v1beta1
metadata:
name: allow-27107
spec:
podSelector:
matchLabels:
app: mongodb
ingress:
- from:
- podSelector:
matchLabels:
app: userregsvc
ports:
- protocol: TCP
port: 27017$ oc create -f allow-27017.yaml -n msservices
networkpolicy "allow-27107" created
Deny all traffic to msinfra project:
$ oc create -f default-deny.yaml -n msinfra

networkpolicy "default-deny" created
We already have only the Email Service accessing the MySQldb. We will now have to allow connection to the Email Service in the msinfra project from the User Registration Service in a msservices project. While you can select the destination in this case, you cannot select a specific pod on the source side when the namespaces are different. So we will have to open up the namespace msservices to be able to reach the Email Service in msinfra.
First, we will need a label to identify the (traffic) source project msservices. Your cluster-admin may have to do this.
# oc label namespace msservices project=userregservices

namespace "msservices" labeled
Now let's add the policy that allows services in msservices project to talk to the Email Service in the msinfra project. Note the namespaceSelector here, as we are opening traffic flow from msservices namespace here.
$ cat allow-8080-emailsvc.yml
kind: NetworkPolicy
apiVersion: extensions/v1beta1
metadata:
name: allow-8080-emailsvc
spec:
podSelector:
matchLabels:
app: emailsvc
ingress:
- from:
- namespaceSelector:
matchLabels:
project: userregservices
ports:
- protocol: TCP
port: 8080$ oc create -f allow-8080-emailsvc.yml -n msinfra
networkpolicy "allow-8080-emailsvc" created
Now we are all set. We have policies in place that prevent services crossing boundaries. Test the application to make sure the calls between microservices are all going through.
Summary
You should now understand:
- Why Network Policy Objects are important.
-
How to create policies that deny all the traffic.
-
How to open up traffic to specific destinations based on labels.
-
How to open up traffic that crosses across projects.
Acknowledgements
Dan Winship helped me at every stage of this testing Network Policy Objects and got me up to speed on using this feature. Many thanks to Dan.
Sull'autore

Ricerca per canale

Automazione
Novità sull'automazione IT di tecnologie, team e ambienti

Intelligenza artificiale
Aggiornamenti sulle piattaforme che consentono alle aziende di eseguire carichi di lavoro IA ovunque

Hybrid cloud open source
Scopri come affrontare il futuro in modo più agile grazie al cloud ibrido

Sicurezza
Le ultime novità sulle nostre soluzioni per ridurre i rischi nelle tecnologie e negli ambienti

Edge computing
Aggiornamenti sulle piattaforme che semplificano l'operatività edge

Infrastruttura
Le ultime novità sulla piattaforma Linux aziendale leader a livello mondiale

Applicazioni
Approfondimenti sulle nostre soluzioni alle sfide applicative più difficili

Serie originali
Raccontiamo le interessanti storie di leader e creatori di tecnologie pensate per le aziende
Prodotti
- Red Hat Enterprise Linux
- Red Hat OpenShift
- Red Hat Ansible Automation Platform
- Servizi cloud
- Scopri tutti i prodotti
Strumenti
- Formazione e certificazioni
- Il mio account
- Supporto clienti
- Risorse per sviluppatori
- Trova un partner
- Red Hat Ecosystem Catalog
- Calcola il valore delle soluzioni Red Hat
- Documentazione
Prova, acquista, vendi
Comunica
- Contatta l'ufficio vendite
- Contatta l'assistenza clienti
- Contatta un esperto della formazione
- Social media
Informazioni su Red Hat
Red Hat è leader mondiale nella fornitura di soluzioni open source per le aziende, tra cui Linux, Kubernetes, container e soluzioni cloud. Le nostre soluzioni open source, rese sicure per un uso aziendale, consentono di operare su più piattaforme e ambienti, dal datacenter centrale all'edge della rete.
Seleziona la tua lingua
Red Hat legal and privacy links
- Informazioni su Red Hat
- Opportunità di lavoro
- Eventi
- Sedi
- Contattaci
- Blog di Red Hat
- Diversità, equità e inclusione
- Cool Stuff Store
- Red Hat Summit