
![]()
Couchbase Server is an open source, distributed NoSQL document-oriented database. It exposes a fast key-value store with managed cache for submillisecond data operations, purpose-built indexers for fast queries and a query engine for executing SQL queries. For mobile and Internet of Things (IoT) environments, Couchbase Lite runs native on-device and manages sync to Couchbase Server.
Couchbase Server 4.5 was recently announced. Flexible data model, SQL-like query language (N1QL), simple administration, high availability, full-text search, Role Based Access Control (RBAC), Enterprise Backup and Restore are some of the features that makes it an excellent choice for your web, mobile and IoT applications. Read What’s New in Couchbase 4.5.
One of the key features in this release is production certified support for Docker. There are multiple orchestration frameworks for Docker containers, such as Kubernetes, Docker Swarm and Mesos. Red Hat OpenShift provides Enterprise-ready Kubernetes for Devs and Ops. This blog will explain how to get started with Couchbase on OpenShift.
This blog was written using OSX 10.10.5, Vagrant 1.7.4 and VirtualBox 5.0.18 r106667.
Getting Started with OpenShift
OpenShift can be started using a Docker container, All-in-one VM, or binary release. These options are easily described on openshift.org. This blog will use an All-in-one VM and the complete instructions for that are described at openshift.org/vm/.
Create a new directory and in that directory do the following commands:
vagrant init thesteve0/openshift-originvagrant up
It should show output similar to this:
/Users/arungupta/.vagrant.d/boxes/thesteve0-VAGRANTSLASH-openshift-origin/1.2.0/virtualbox/include/_Vagrantfile:5: warning: already initialized constant VAGRANTFILE_API_VERSION
/Users/arungupta/tools/openshift/1.2/Vagrantfile:5: warning: previous definition of VAGRANTFILE_API_VERSION was here
Bringing machine 'default' up with 'virtualbox' provider...
==> default: Importing base box 'thesteve0/openshift-origin'...
==> default: Matching MAC address for NAT networking...
==> default: Setting the name of the VM: origin-1.1.1
==> default: Clearing any previously set network interfaces...
==> default: Preparing network interfaces based on configuration...
default: Adapter 1: nat
default: Adapter 2: hostonly
default: Adapter 3: hostonly
==> default: Forwarding ports...
default: 8443 => 8443 (adapter 1)
default: 22 => 2222 (adapter 1)
==> default: Running 'pre-boot' VM customizations...
==> default: Booting VM...
==> default: Waiting for machine to boot. This may take a few minutes...
default: SSH address: 127.0.0.1:2222
default: SSH username: vagrant
default: SSH auth method: private key
default: Warning: Connection timeout. Retrying...
default:
default: Vagrant insecure key detected. Vagrant will automatically replace
default: this with a newly generated keypair for better security.
default:
default: Inserting generated public key within guest...
default: Removing insecure key from the guest if it's present...
default: Key inserted! Disconnecting and reconnecting using new SSH key...
==> default: Machine booted and ready!
==> default: Checking for guest additions in VM...
default: No guest additions were detected on the base box for this VM! Guest
default: additions are required for forwarded ports, shared folders, host only
default: networking, and more. If SSH fails on this machine, please install
default: the guest additions and repackage the box to continue.
default:
default: This is not an error message; everything may continue to work properly,
default: in which case you may ignore this message.
==> default: Setting hostname...
==> default: Configuring and enabling network interfaces...
The following SSH command responded with a non-zero exit status.
Vagrant assumes that this means the command failed!/sbin/ifup eth2
Stdout from the command:
ERROR : [/etc/sysconfig/network-scripts/ifup-eth] Error, some other host already uses address 10.2.2.2.
Stderr from the command:
This downloads the OpenShift Vagrant box definition, starts and configures the Virtual Machine.
Download and Configure the OpenShift Client
Download Mac 64-bit Client Tools. Clients for other operating systems are available from openshift.org/vm/#downloads.
Create a new directory and extract the downloaded zip file. The directory will have the following contents:
LICENSE

README.md

oc
Verify the client version:
oc version

oc v1.2.0

kubernetes v1.2.0-36-g4a3f9c5
Login to OpenShift:
Use test as login and choose a password that you’ll remember, it can be anything you want.
oc login
Server [https://localhost:8443]:
The server uses a certificate signed by an unknown authority.
You can bypass the certificate check, but any data you send to the server could be intercepted by others.
Use insecure connections? (y/n): yAuthentication required for https://localhost:8443 (openshift)
Username: test
Password:
Login successful.You don't have any projects. You can try to create a new project, by running
$ oc new-project
Welcome! See 'oc help' to get started.
This displays the list of projects for that user. Each OpenShift project is created in a Kubernetes namespace with additional annotations. This allows a community of users to organize and manage their content in isolation from other communities. Learn more about OpenShift Users, Namespaces and Projects.
Create Couchbase Application in OpenShift
Let’s make a project for our Couchbase example:
oc new-project couchbase
Now using project "couchbase" on server "https://localhost:8443".You can add applications to this project with the 'new-app' command. For example, try:
$ oc new-app centos/ruby-22-centos7~https://github.com/openshift/ruby-hello-world.git
to build a new hello-world application in Ruby.
This creates the project and automatically selects it as well.
OpenShift Application allows to create an application in a project using source code from a repository, a Docker image or a previously stored template.
Let’s create an application that will start a Couchbase database using a Docker image. We’ll use arungupta/couchbase Docker image. This image is built from github.com/arun-gupta/docker-images/tree/master/couchbase. It uses Couchbase base image and configures it using the Couchbase REST API. Note that the chosen project is couchbase, and so the application will be created in this project.
Create a new Couchbase application:
oc new-app arungupta/couchbase
--> Found Docker image 69f3ad9 (10 hours old) from Docker Hub for "arungupta/couchbase"* An image stream will be created as "couchbase:latest" that will track this image
* This image will be deployed in deployment config "couchbase"
* Ports 11207/tcp, 11210/tcp, 11211/tcp, 18091/tcp, 18092/tcp, 18093/tcp, 8091/tcp, 8092/tcp, 8093/tcp, 8094/tcp will be load balanced by service "couchbase"
* Other containers can access this service through the hostname "couchbase"
* This image declares volumes and will default to use non-persistent, host-local storage.
You can add persistent volumes later by running 'volume dc/couchbase --add ...'
* WARNING: Image "couchbase" runs as the 'root' user which may not be permitted by your cluster administrator--> Creating resources with label app=couchbase ...
imagestream "couchbase" created
deploymentconfig "couchbase" created
service "couchbase" created
--> Success
Run 'oc status' to view your app.
This will download arungupta/couchbase image in OpenShift and start a Pod, a Service, an Image Stream, and a Deployment Configuration. .
Check status of the application:
oc status
In project couchbase on server https://localhost:8443svc/couchbase - 172.30.75.85 ports 8091, 8092, 8093, 8094, 11207, 11210, 11211, 18091, 18092, 18093
dc/couchbase deploys istag/couchbase:latest
deployment #1 running for 17 seconds - 1 pod1 warning identified, use 'oc status -v' to see details.
Get the list of pods running:
oc get po

NAME                 READY     STATUS              RESTARTS   AGE

couchbase-1-deploy   1/1       Running             0          27s

couchbase-1-rg6zn    0/1       ContainerCreating   0          24s
-w switch can be used to check for change in status of pod creation.
oc get po -w

NAME                 READY     STATUS              RESTARTS   AGE

couchbase-1-deploy   1/1       Running             0          30s

couchbase-1-rg6zn    0/1       ContainerCreating   0          27s

NAME                READY     STATUS    RESTARTS   AGE

couchbase-1-rg6zn   1/1       Running   0          1m

couchbase-1-deploy   0/1       Completed   0         1m

couchbase-1-deploy   0/1       Terminating   0         1m

couchbase-1-deploy   0/1       Terminating   0         1m
It shows that Couchbase image is downloaded and pod created. A container is used to deploy the application and is terminated after the job is accomplished. The time to start the Couchbase pod would vary based upon your network speed, as we are waiting for download of the image from Docker Hub.
More details about the pod can be found as:
c describe po couchbase-1-rg6zn

Name:       couchbase-1-rg6zn

Namespace:  couchbase

Node:       origin/10.0.2.15

Start Time: Thu, 23 Jun 2016 16:52:10 -0700

Labels:     app=couchbase,deployment=couchbase-1,deploymentconfig=couchbase

Status:     Running

IP:     172.17.0.14

Controllers:    ReplicationController/couchbase-1

Containers:

  couchbase:

    Container ID:   docker://648dac7e00fd6234e602ab04c5419c0d0b40089acda4d115125f5d26b2f49a35

    Image:      arungupta/couchbase@sha256:6c909014126d312949bb552f31682fe173749c7e0902305033d7d72511a2907c

    Image ID:       docker://7aa00979751477146b54e33a9ffac804874d88abd7d503355c22b4162d978faa

    Ports:      8091/TCP, 8092/TCP, 8093/TCP, 8094/TCP, 11207/TCP, 11210/TCP, 11211/TCP, 18091/TCP, 18092/TCP, 18093/TCP

    QoS Tier:

      cpu:      BestEffort

      memory:       BestEffort

    State:      Running

      Started:      Thu, 23 Jun 2016 16:53:16 -0700

    Ready:      True

    Restart Count:  0

    Environment Variables:

Conditions:

  Type      Status

  Ready     True

Volumes:

  couchbase-volume-1:

    Type:   EmptyDir (a temporary directory that shares a pod's lifetime)

    Medium:

  default-token-te2o1:

    Type:   Secret (a volume populated by a Secret)

    SecretName: default-token-te2o1

Events:

  FirstSeen LastSeen    Count   From            SubobjectPath           Type        Reason      Message

  --------- --------    -----   ----            -------------           --------    ------      -------

  6m        6m      1   {default-scheduler }                    Normal      Scheduled   Successfully assigned couchbase-1-rg6zn to origin

  5m        5m      1   {kubelet origin}    spec.containers{couchbase}  Normal      Pulling     pulling image "arungupta/couchbase@sha256:6c909014126d312949bb552f31682fe173749c7e0902305033d7d72511a2907c"

  4m        4m      1   {kubelet origin}    spec.containers{couchbase}  Normal      Pulled      Successfully pulled image "arungupta/couchbase@sha256:6c909014126d312949bb552f31682fe173749c7e0902305033d7d72511a2907c"

  4m        4m      1   {kubelet origin}    spec.containers{couchbase}  Normal      Created     Created container with docker id 648dac7e00fd

  4m        4m      1   {kubelet origin}    spec.containers{couchbase}  Normal      Started     Started container with docker id 648dac7e00fd
It shows that the pod is actually created inside a DeploymentConfiguration as shown by the label “deploymentconfig=couchbase”. This Deployment Configuration wraps the Kubernetes Replication Controller, whose job it is to insure your Couchbase pod always has the correct number of replicas running. By default, only one instance is running. A subsequent blog will show how to run a Couchbase cluster.
Couchbase on OpenShift Web Console
OpenShift provides a Web Console that allows developers to visualize, browse, and manage the contents of projects.
Login to OpenShift Web Console at https://localhost:8443:

Your browser may give a warning as this is running on localhost and no verified security certificates are installed. It’s OK to ignore those warnings. This would not be an issue when running OpenShift in production as appropriate certificates will be installed.
Enter the username and password as test and the chosen password. Click on the Log In button to login.
This shows the complete list of projects:

This list shows only a single project that was created earlier.
Click on the project to see the list of deployed applications:
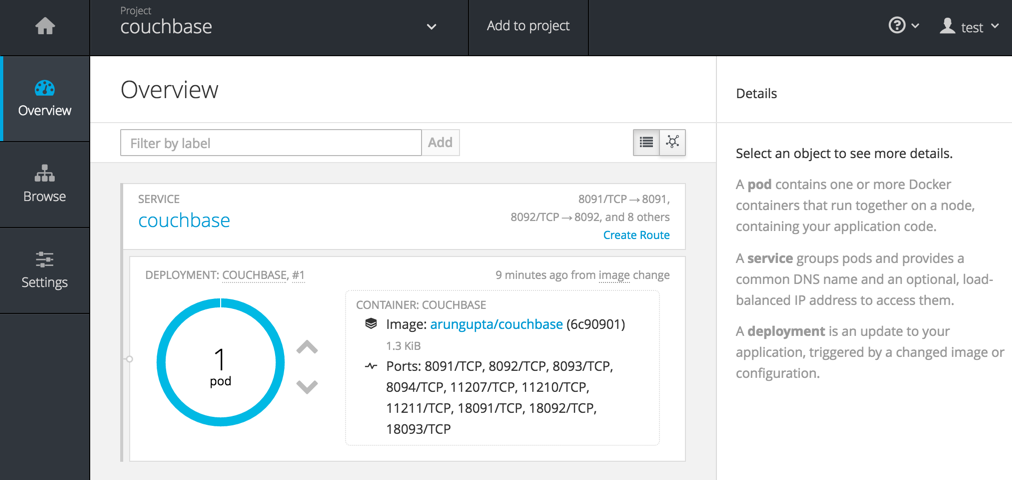
Click on the big pod (big blue circle with the number 1 inside it) to see more details the pod:

Click on the pod name to see more details:

Note down IP address of the pod, 172.17.0.14 in this case. Click on Terminal to open a terminal into the pod. Connect to Couchbase Query Tool to query over the JSON documents stored in Couchbase bucket.
In the terminal, give the command is:
cbq -u Administrator -p password http://172.17.0.14:8093
Note that that the pod’s IP address is specified here.

Now query over the JSON documents by giving the N1QL query:
select * from `travel-sample` limit 1;

You can learn more about N1QL or learn the SQL-like syntax in an interactive tutorial. You can create an index on this bucket and then the query will return accurate results.
Finally, let’s go ahead and make a route to the Couchbase web server so we can access it from our local machine using the web console. Routes in OpenShift provide a way to route traffic from outside the cluster to a service inside the cluster.
Back on the overview page for your project, up in the top right you should see a “create route” link, go ahead and click it.

On the following page you can just accept all the defaults (which basically says to auto-generate the URL to take incoming traffic from port 80 and reroute to 8091 on the service named Couchbase.

Click “create” which will bring you back to the overview page, but now there is a URL under the service.

When you click the link you will be brought to the login for the Couchbase web console.

Use the username and password of Administrator and password as you did above on the command line. These passwords are baked into the arungupta/couchbase Docker image. Once you hit the sign in button you should be looking at the normal Couchbase Web Console.

You could even make another route to expose port 8093 traffic for the CBQ. You can see I made both of these routes and they both work at the same time.

In this blog, you deployed a Couchbase server on OpenShift.
OpenShift and Couchbase References
关于作者


产品
工具
试用购买与出售
沟通
关于红帽
我们是世界领先的企业开源解决方案供应商,提供包括 Linux、云、容器和 Kubernetes。我们致力于提供经过安全强化的解决方案,从核心数据中心到网络边缘,让企业能够更轻松地跨平台和环境运营。