
Part 2: How to Setup Jenkins to build iOS .ipa and run unit tests.
A robust and agile mobile application development environment requires continuous integration and delivery. It also requires an integrated and automated unit testing process that helps bring applications to market successfully. This two-part series details my work done at Red Hat Open Innovation Labs and as a Mobile Technical Account Manager to capture these mobile innovations in a useful, repeatable way. In part one of this two-part series, I broke down the steps to create and unit test a native iOS application using Red Hat’s Mobile Application Platform. In part two, I’ll show how Jenkins can be used to automate continuous integration and unit testing of that Mobile app.
Requirements
- Xcode 7.3
- Jenkins
- Mac OSX El Capitan
// Fix Jenkins user
After installing Jenkins we need to setup the Jenkins user
- In mac, go to system-preferences-Users and Groups-unlock-right click on the empty user you see. Specify Full name, and reset the password. Now we have a valid Jenkins user.

- Run these commands to give Jenkins admin rights and add to developer group
sudo dseditgroup -o edit -a jenkins -t user admin
sudo dscl . append /Groups/_developer GroupMembership jenkins
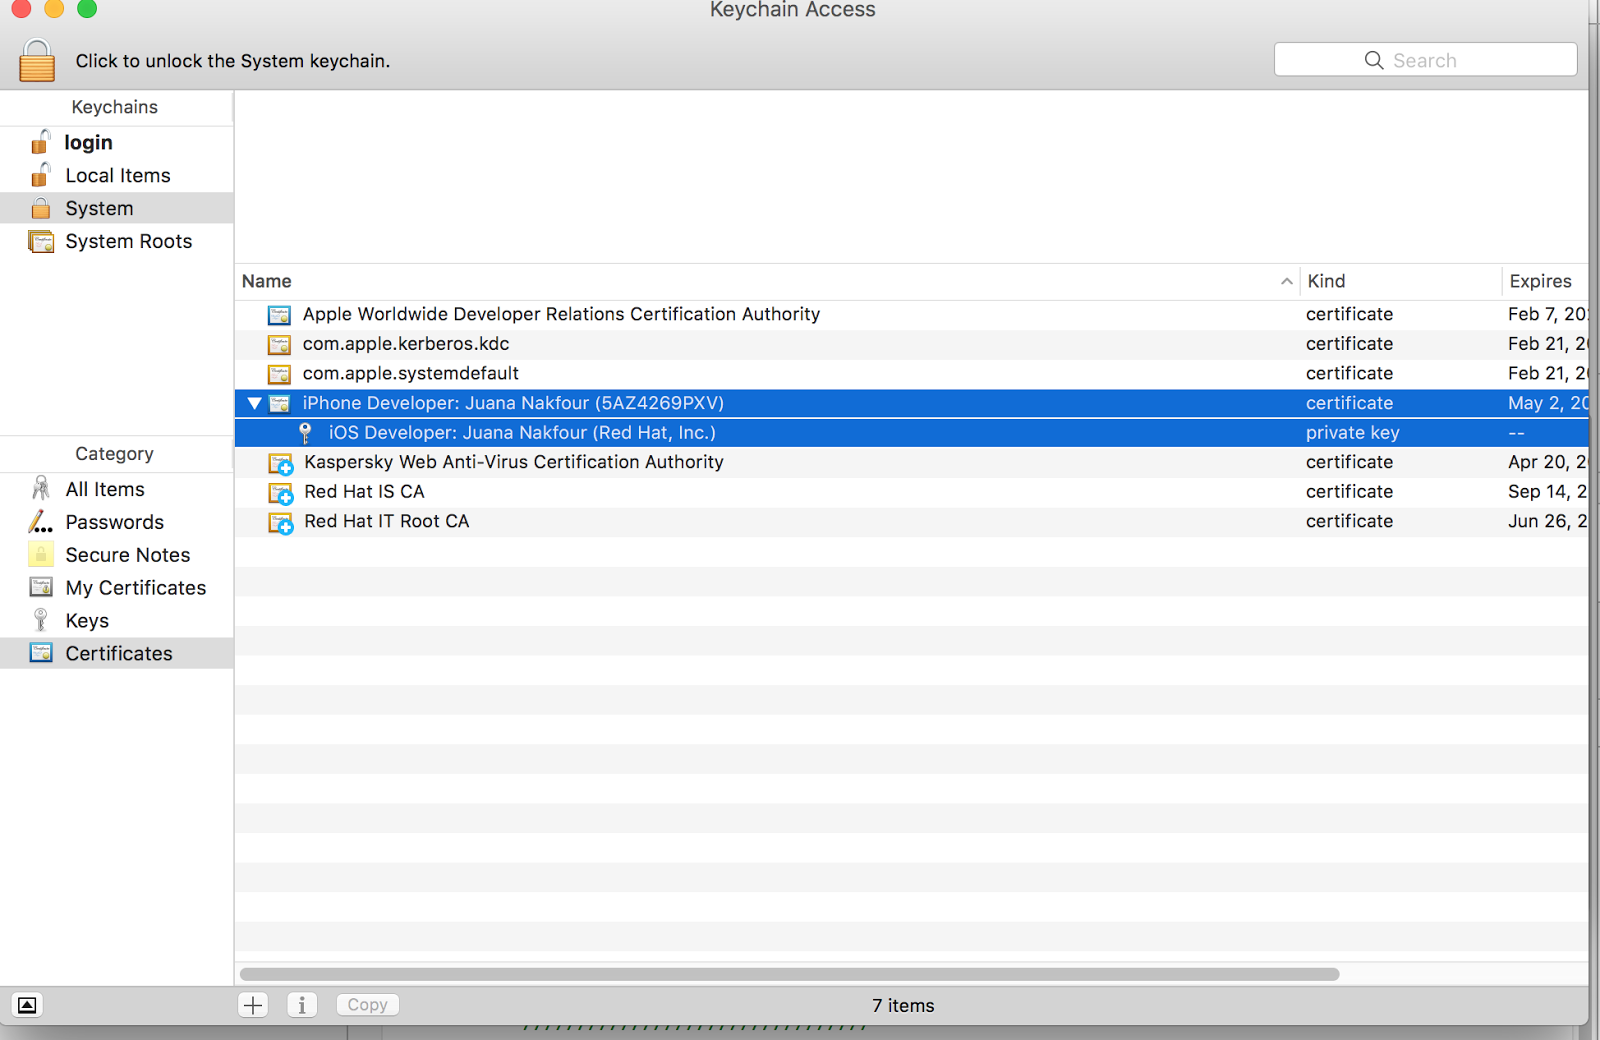
Move your iPhone developer certificates to system.
Since Jenkins will be running as a system process, not as a user application, we need to give it access to the developer certificates.
- Using Keychain application, find your iPhoneDeveloper certificate in login
- Make sure to expand it to see the iOS developer part
- Select both and copy
- Select system and paste those two items
Logout and Login into your mac machine as Jenkins user
Add the following plugins to Jenkins
- Git
- Xcode Integration
- Junit Plugin
Add SSH keys to jenkins
Add Credentials needed to do git clone. Under Credentials create a new system credential. Specify the username (same as in Red Hat Mobile Application Platform portal) and you can either generate new ssh keys or copy paste a key directly. Keep passphrase empty.
Change Xcode build folder
The new Xcode places the builds in a common folder that the Xcode plugin has issues getting to, so we need to make it relative to the workspace.
- Go to Xcode--->Preferences---> Locations
- For Derived Data select as shown below

Run Jenkins as Agent
In order for Jenkins to launch the simulator, it needs to be running as an Agent and not as a daemon. Follow these steps:
- sudo cp /Library/LaunchDaemons/org.jenkins-ci.plist /Library/LaunchAgents/org.jenkins-ci.plist
- sudo launchctl unload /Library/LaunchDaemons/org.jenkins-ci.plist
- sudo launchctl load /Library/LaunchAgents/org.jenkins-ci.plist
Setup a new Jenkins item
Create a new Jenkins project using freestyle option and the following settings. We actually need two build steps as you will see one for *.ipa and one for running unit tests on simulator.
- Give your project a name.
- Select Git, paste the git url from Red Hat Mobile Application Platform and select the right credentials.
- Make sure the right branch is selected, here we have master

- We need three build steps:
- Execute shell for running pod install since our Red Hat Mobile Application Platform template uses pods

- First Xcode build step to build and archive *.ipa
- Select Clean before build
- Select Generate archive
- Set Configuration for Debug
- Select Pack application and build ipa
- ${BUILD_DATE} for ipa filename
- Output directory to artifacts

- Advanced Xcode build options
- Xcode Schema File to helloword-ios-app
- Xcode Workspace File to helloworld-ios-app
- Build output directory /Users/Shared/Jenkins/Home/workspace/iOSBuildAndTest/DerivedData

4.Second build step for running unit tests
- Specify Target to limit it to testing: helloworld-ios-appTest
- Clean before build NO ← make sure this is NO or else it deletes the artifacts
- Configuration Debug

Advanced Xcode build options
- Clean test reports = yes
- Xcode Schema file: helloworld-ios-app
- SDK = iphonesimulator
- Custom xcodebuild arguments= test -destination 'platform=iOS Simulator,name=iPhone 6s,OS=9.3'
- Xcode Workspace file = helloworld-ios-app

Post build steps
- Add Archive the artifacts and place the url to DerivedData/artifacts/*.ipa
- Add Publish JUnit test result report specify url to test-reports/*.xml

Results should look like this

This concludes part two of our tutorial for setting up Jenkins to build iOS native applications. In part one of our tutorial we added unit tests to our Red Hat Mobile Application Platform native iOS application.
Connect with Red Hat Services
Learn more about Red Hat Consulting
Learn more about Red Hat Training
Learn more about Red Hat Certification
Subscribe to the Training Newsletter
Follow Red Hat Services on Twitter
Follow Red Hat Open Innovation Labs on Twitter
Like Red Hat Services on Facebook
Watch Red Hat Training videos on YouTube
Follow Red Hat Certified Professionals on LinkedIn

关于作者


产品
工具
试用购买与出售
沟通
关于红帽
我们是世界领先的企业开源解决方案供应商,提供包括 Linux、云、容器和 Kubernetes。我们致力于提供经过安全强化的解决方案,从核心数据中心到网络边缘,让企业能够更轻松地跨平台和环境运营。