Image Builder is a new tool shipped with Red Hat Enterprise Linux (RHEL) 8 and 7.6. It allows you to create custom system images in a variety of formats. These include compatibility with major cloud providers and virtualization technologies available in the market. Today, we will have a look at how to create an OS image of a web server to deploy on Azure. Doing so involves a few steps. But, follow along with the steps below and you'll be well on your way to customize an OS image and deploy it on Azure.
You’ll first need to build an OS image and save it as .vhd format using Image Builder. Once the image creates, use libvirt tools to customize the image. When the image is in place, you can deploy it on Azure.
Prerequisite
Before starting, you need to prepare a few things:
You’ll first need to download a web application, which will add to the image. Let’s play with aSpace Invaderstype game. Its goal is to defeat wave after wave of descending aliens with a horizontally moving laser to earn as many points as possible. The original was created in 1978, and we'll be working with a MIT-licensed clone written in JavaScript, CSS and HTML.Here is the link of source code.
The other thing you need to prepare is to install Image Builder, please follow the section “Installing Image Builder” in this blog. Of course, you need to have an Azure account to use Azure.
Build an OS image using Image Builder
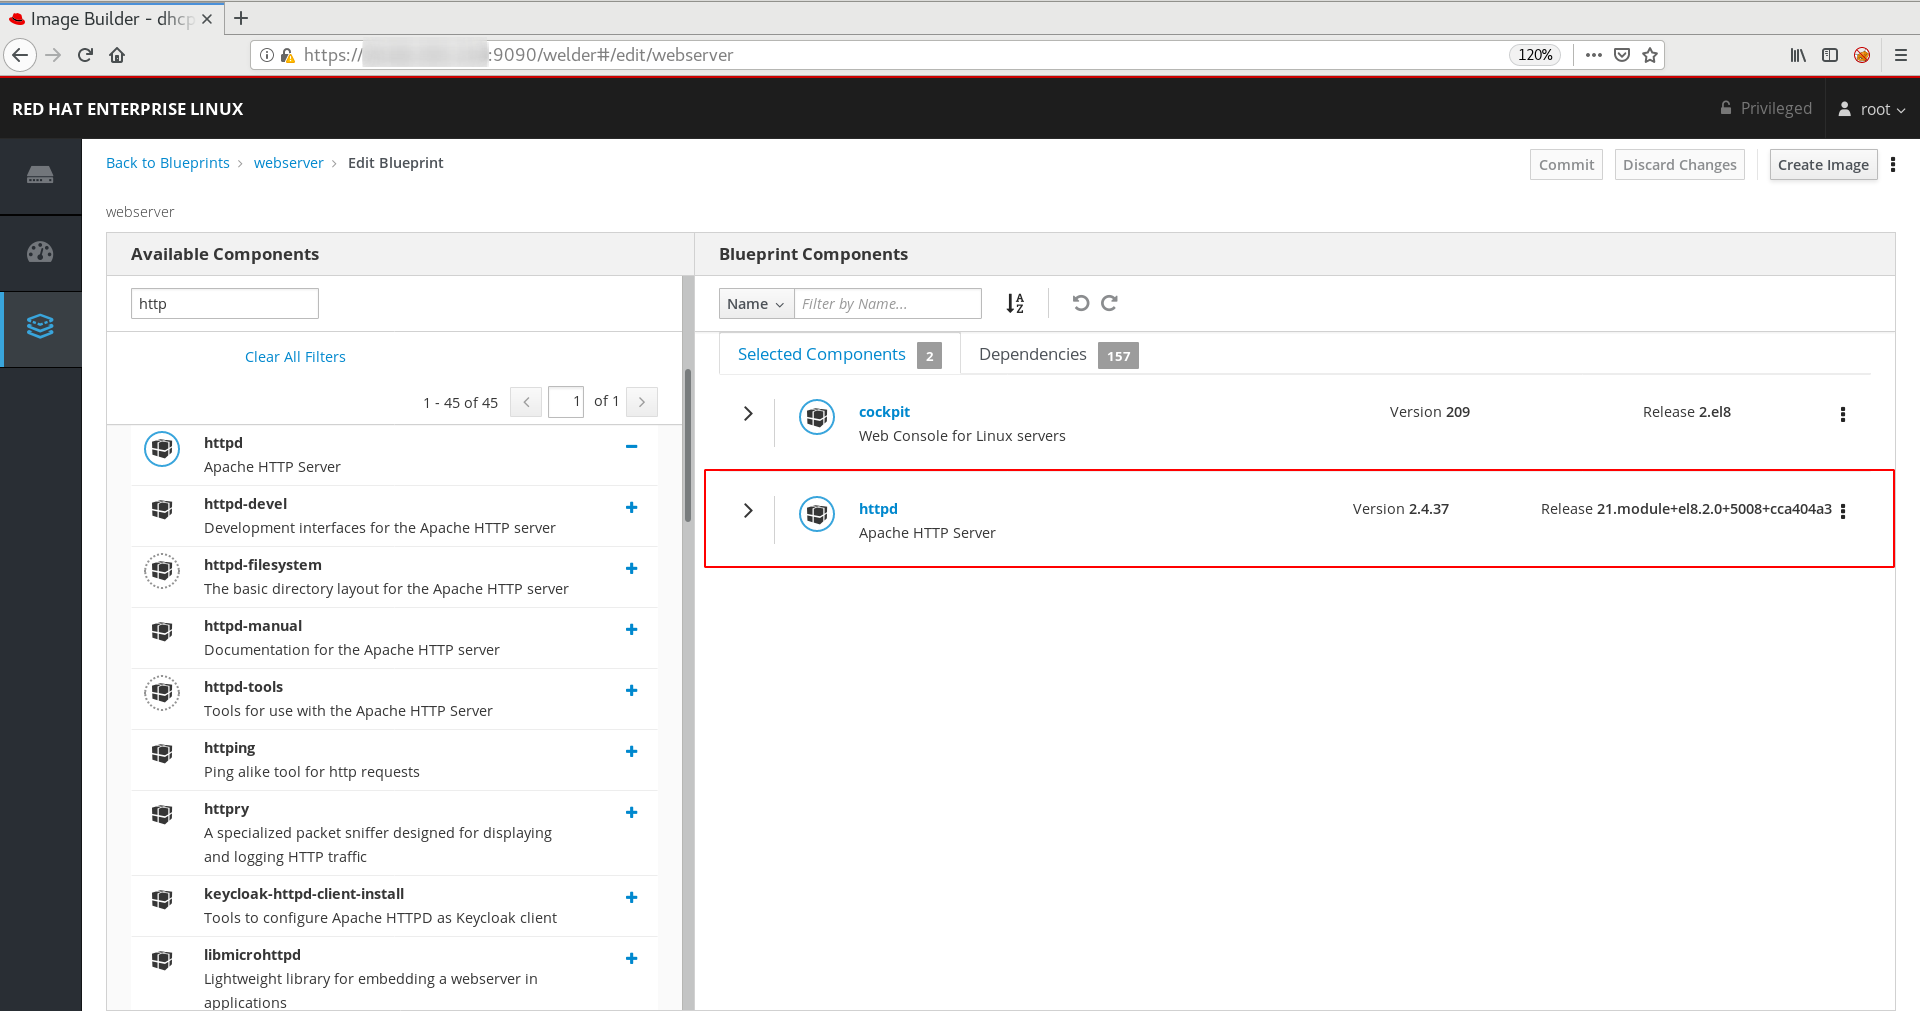
Once completing the above steps, It is time to build an OS image using Image Builder. Follow the section “Creating a custom image using the web console” in this blog. Most of the steps will be the same, there are 2 steps you need to be aware of. First, because we need to create an OS image for a web application, so let’s choose “Apache HTTP Server” package:

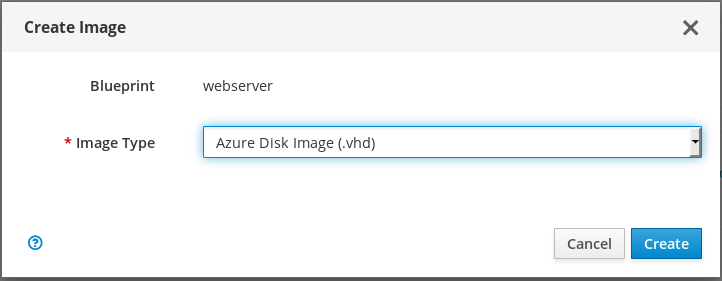
The other step is to select “Azure Disk Image (.vhd)” as Image Type.

Then, you click on the “Create” button to create an image. Once, the image is created, download the image to your local drive, and save it as /root/webserver.vhd.

Customize the image with libvirt tool
Now, you have an OS image with the httpd package installed. Since the image will be run as a web server, you need to customize the image a bit. You will need to enable httpd service and allow port 80 on firewall permanently, and then copy the web application code into the OS image. To do so, you need to run this command as root:
# virt-customize -a webserver.vhd --firstboot $(pwd)/run_on_webserver.sh \
    --copy-in ./spaceinvaders:/var/www/html \
    --root-password "password:redhat" --selinux-relabel
Test the image outside Azure
Once it is finished, you can test it before putting it on Azure. First, duplicate the image.
# cp webserver.vhd spaceinvaders.vhd
# chown qemu:qemu spaceinvaders.vhd
Register the image into the local hypervisor on your workstation.
# virt-install --name mygame --memory 2048 --vcpus 2 \
    --os-variant rhel8.0 --import \
    --disk ./spaceinvaders.vhd --graphics vnc,listen=127.0.0.1 \
    --noautoconsole
Log in to the console and see the server boot up:
# virsh console spaceinvaders
Log in as root, and check to see that httpd is installed and enabled, port 80 is opened,
# systemctl status httpd
# firewall-cmd --list-all
Check where the VM is running. Since my hypervisor is KVM, I can see thisoutput:
# virt-what
kvm
Then, you can open a link http://<web server ip>/spaceinvaders/ in your browser to see the web application.
Deploy the Azure VM image
Once the test succeeds, let’s deploy it on Azure. Doing so involves a few steps. You’ll first prepare Azure resources, e.g. resource group, virtual network, subnet, storage account and etc. When the resource is ready, upload the image to Azure. After that, you deploy a web server using the image.
To complete it, there are three ways: Azure portal (Azure web UI), Azure CLI, and Ansible playbook. Here, let’s choose an Ansible playbook to automate the process.
Before running the playbook, you will need to set up the running environment, which involves Install Ansible Azure packages and Configure Azure credential file on your test machine.
After setting up the environment, you can run the ansible-playbookcommand to run the playbook, and the playbook is included as well.
# ansible-playbook deploy_webserver.yml
---
- hosts: localhost
 connection: local

 vars:
   resource_group: webserverRG
   storage_account: goldimagesa
   storage_container: goldimagecont
   gold_image: webserverGI
   virtual_network: webservervnet1
   virtual_subnet: webserversubnet1
   image_src: /root/webserver.vhd
   image_dest: webserver.vhd
   virtual_machine: spaceinvaders
   public_ip: spaceinvadersPublicIP
   nic: spaceinvadersVMNic
   security_group: secgroup1
   image_URI: "https://{{ storage_account }}.blob.core.windows.net/{{ storage_container }}/{{ image_dest }}"

 tasks:
   - name: Create a resource group
     azure_rm_resourcegroup:
       name: "{{ resource_group }}"
       location: eastus
    - name: Create a storage account
     azure_rm_storageaccount:
       resource_group: "{{ resource_group }}"
       name: "{{ storage_account }}"
       account_type: Standard_LRS

   - name: Create a container
     azure_rm_storageblob:
       resource_group: "{{ resource_group }}"
       account_name: "{{ storage_account }}"
       container_name: "{{ storage_container }}"
       public_access: blob

   - name: Upload a blob image
     azure_rm_storageblob:
       resource_group: "{{ resource_group }}"
       storage_account_name: "{{ storage_account }}"
       container: "{{ storage_container }}"
       blob: "{{ image_dest }}"
       src: "{{ image_src }}"
       public_access: container
       blob_type: 'page'

   - name: Create an image from os disk
     azure_rm_image:
       resource_group: "{{ resource_group }}"
       name: "{{ gold_image }}"
       source: "{{ image_URI }}"
       os_type: Linux

   - name: Create a virtual network
     azure_rm_virtualnetwork:
       resource_group: "{{ resource_group }}"
       name: "{{ virtual_network }}"
       address_prefixes: "10.10.0.0/22"

   - name: Create a subnet
     azure_rm_subnet:
       resource_group: "{{ resource_group }}"
       name: "{{ virtual_subnet }}"
       address_prefix: "10.10.0.0/24"
       virtual_network: "{{ virtual_network }}"

   - name: Create a public ip
     azure_rm_publicipaddress:
       resource_group: "{{ resource_group }}"
       allocation_method: Static
       name: "{{ public_ip }}"

   - name: Create a security group that allows SSH and HTTP
     azure_rm_securitygroup:
       resource_group: "{{ resource_group }}"
       name: "{{ security_group }}"
       rules:
         - name: SSH
           protocol: Tcp
           destination_port_range: 22
           access: Allow
           priority: 101
           direction: Inbound
         - name: HTTP
           protocol: Tcp
           destination_port_range: 80
           access: Allow
           priority: 102
           direction: Inbound

   - name: Create a network interface
     azure_rm_networkinterface:
       resource_group: "{{ resource_group }}"
       name: "{{ nic }}"
       virtual_network: "{{ virtual_network }}"
       subnet: "{{ virtual_subnet }}"
       security_group: "{{ security_group }}"
       ip_configurations:
         - name: ipconfig1
           public_ip_address_name: "{{ public_ip }}"
           primary: True

   - name: Create a web server
     azure_rm_virtualmachine:
       resource_group: "{{ resource_group }}"
       name: "{{ virtual_machine }}"
       vm_size: Standard_DS1_v2
       admin_username: clouduser
       admin_password: Passw0rd!
       network_interfaces: "{{ nic }}"
       image:
         name: myImage
         resource_group: "{{ resource_group }}"
There is one thing that you should be aware of,it can take some time to upload the image depending on your network bandwidth. My image is about 4.4 GB, which took about two hours to upload to Azure, and there is no progress prompt while running the Ansible playbook.
So, if you prefer to see the uploading progress, try Azure CLI or AzCopy. In that case, you probably need to separate the Ansible playbook into 2 pieces. One piece is to prepare the Azure resources, and the other is to create the VM after the image is being uploaded.
Here is the output while running the Ansible playbook:
# ansible-playbook deploy_webserver.yml
[WARNING]: provided hosts list is empty, only localhost is available. Note that the implicit localhost does not match 'all'

PLAY [localhost] ************************************************************************

TASK [Gathering Facts] ************************************************************************
Friday 20 March 2020  14:17:57 +0800 (0:00:00.035)       0:00:00.035 **********
ok: [localhost]

TASK [Create a resource group] ************************************************************************
Friday 20 March 2020  14:17:58 +0800 (0:00:00.882)       0:00:00.917 **********
changed: [localhost]

TASK [Create a storage account] ************************************************************************
Friday 20 March 2020  14:18:05 +0800 (0:00:07.220)       0:00:08.138 **********
changed: [localhost]

TASK [Create a container] ************************************************************************
Friday 20 March 2020  14:18:35 +0800 (0:00:29.750)       0:00:37.888 **********
changed: [localhost]

TASK [Upload a blob image] ************************************************************************
Friday 20 March 2020  14:18:38 +0800 (0:00:03.131)       0:00:41.019 **********
changed: [localhost]

TASK [Create an image] ************************************************************************
Friday 20 March 2020  15:15:38 +0800 (0:57:00.273)       0:57:41.292 **********
changed: [localhost]

TASK [Create a virtual network] ************************************************************************
Friday 20 March 2020  15:16:29 +0800 (0:00:50.758)       0:58:32.051 **********
changed: [localhost]

TASK [Create a subnet] ************************************************************************
Friday 20 March 2020  15:16:55 +0800 (0:00:25.324)       0:58:57.376 **********
changed: [localhost]

TASK [Create a public ip] ************************************************************************
Friday 20 March 2020  15:17:02 +0800 (0:00:07.632)       0:59:05.008 **********
changed: [localhost]

TASK [Create a security group that allows SSH and HTTP] ************************************************************************
Friday 20 March 2020  15:17:16 +0800 (0:00:14.151)       0:59:19.160 **********
changed: [localhost]

TASK [Create a network interface] ************************************************************************
Friday 20 March 2020  15:17:31 +0800 (0:00:14.711)       0:59:33.871 **********
changed: [localhost]

TASK [Create a web server] ************************************************************************
Friday 20 March 2020  15:18:14 +0800 (0:00:42.523)       1:00:16.395 **********
changed: [localhost]

PLAY RECAP ************************************************************************
localhost                  : ok=12   changed=11   unreachable=0    failed=0    skipped=0    rescued=0    ignored=0

Friday 20 March 2020  15:21:22 +0800 (0:03:08.689)       1:03:25.084 **********
========================================================================
Upload a blob image ------------------------------------------- 3420.27s
Create a web server -------------------------------------------- 188.69s
Create an image ------------------------------------------------- 50.76s
Create a network interface -------------------------------------- 42.52s
Create a storage account ---------------------------------------- 29.75s
Create a virtual network ---------------------------------------- 25.32s
Create a security group that allows SSH and HTTP ---------------- 14.71s
Create a public ip ---------------------------------------------- 14.15s
Create a subnet -------------------------------------------------- 7.63s
Create a resource group ------------------------------------------ 7.22s
Create a container ----------------------------------------------- 3.13s
Gathering Facts -------------------------------------------------- 0.88s
# ssh clouduser@<vm public ip>
# sudo virt-what
hyperv
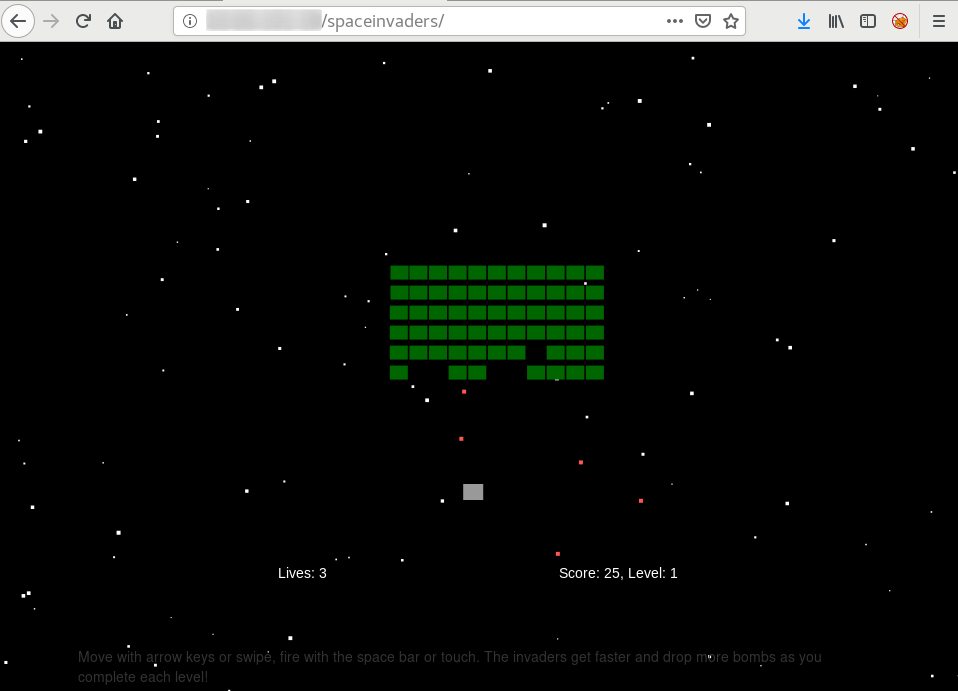
Now, let’s enjoy the game from the browser. Good luck!
http://<VM public IP>/spaceinvaders/
The image shown here is indicative only. The actual interface you see may differ.


Conclusion
The VM image created by Image Builder can also work together with other cloud services, e.g. Azure VM scale sets to easily scale up and down applications in 2-3 minutes. Image Builder facilitates the creation of RHEL OS images, which can ease the deployment of an application on hypervisors and cloud vendors. For example, when a group of web servers are running on heavy load. With the OS image, you can quickly deploy a server to the cluster, to make sure your business is running in good shape.
About the author
Edward Jin has been working in IT for more than 12 years. He has a strong service mindset and design thinking and insights to IT systems and processes within the pharmaceutical , manufacturing and finance industry. Currently, he is helping customers on their digital journey using open source technology.
More like this
Browse by channel
Automation
The latest on IT automation for tech, teams, and environments
Artificial intelligence
Updates on the platforms that free customers to run AI workloads anywhere
Open hybrid cloud
Explore how we build a more flexible future with hybrid cloud
Security
The latest on how we reduce risks across environments and technologies
Edge computing
Updates on the platforms that simplify operations at the edge
Infrastructure
The latest on the world’s leading enterprise Linux platform
Applications
Inside our solutions to the toughest application challenges
Original shows
Entertaining stories from the makers and leaders in enterprise tech
Products
- Red Hat Enterprise Linux
- Red Hat OpenShift
- Red Hat Ansible Automation Platform
- Cloud services
- See all products
Tools
- Training and certification
- My account
- Customer support
- Developer resources
- Find a partner
- Red Hat Ecosystem Catalog
- Red Hat value calculator
- Documentation
Try, buy, & sell
Communicate
About Red Hat
We’re the world’s leading provider of enterprise open source solutions—including Linux, cloud, container, and Kubernetes. We deliver hardened solutions that make it easier for enterprises to work across platforms and environments, from the core datacenter to the network edge.
Select a language
Red Hat legal and privacy links
- About Red Hat
- Jobs
- Events
- Locations
- Contact Red Hat
- Red Hat Blog
- Inclusion at Red Hat
- Cool Stuff Store
- Red Hat Summit

