In today's digital landscape, the need for reliability and security compliance is more critical than ever. For an organization navigating restricted or disadvantaged internet connectivity, the choice of a standard Red Hat OpenShift installation and a disconnected, or air-gapped installation, can be a game-changer. A disconnected installation empowers enterprises to establish and maintain OpenShift clusters in isolated, security-focused, and self-contained environments, ensuring the robust infrastructure required for success in an increasingly complex world.
In this article, we explore the benefits and key considerations of this essential deployment and operating paradigm.
Installation methods
First, let's review each of the installation methods available for self-managed OpenShift clusters.
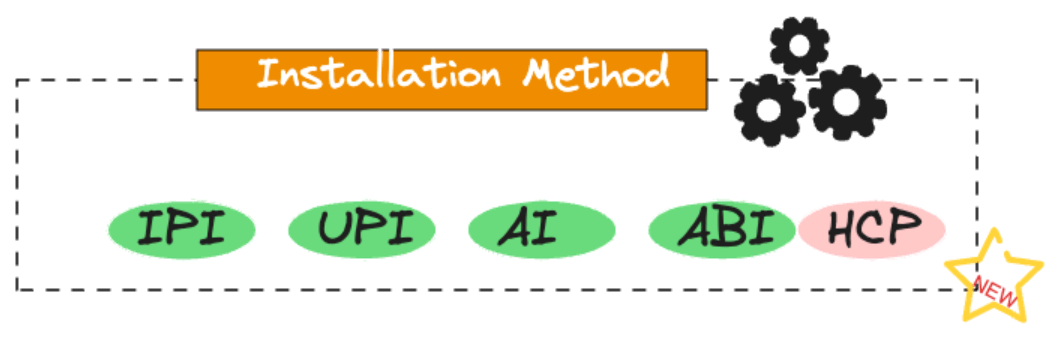
Image-1: Different Installation Methods
Installer-Provisioned Infrastructure (IPI)
IPI is one of the most straightforward installation methods. It's suitable for users who want a guided, automated installation experience. In IPI, OpenShift provisions infrastructure including virtual machines or physical hardware. This is typically used with cloud providers, but can also be used for on-premise installations.
Assisted Installer (AI)
Assisted Installer is a web-based interactive tool to perform OpenShift installations. This is an ideal approach for clusters with networks connected to the internet. It also provides a RESTful API for automation and advanced configuration scenarios. AI is part of Red Hat Advanced Cluster Management too.
Agent Based Installer (ABI)
Agent Based Installation comprises a bootable ISO that contains the Assisted discovery agent and the Assisted Service. Agent-based installation is a subcommand of the OpenShift installer. It generates a bootable ISO image containing all of the assets required to deploy an OpenShift cluster, with an available OpenShift release image. This approach is ideal for air-gapped, disconnected or restricted environments.
User-Provisioned Infrastructure (UPI)
UPI is a flexible installation method for users who prefer to manage their own infrastructure, whether it's on-premises, in their own datacenters, or on public cloud providers. With UPI, users are responsible for provisioning virtual machines, storage, and networking components such as a load balancer. Once the infrastructure has been provisioned, OpenShift's installer can be used to deploy OpenShift on the infrastructure of choice.
Hosted Control Plane (HCP)
OpenShift clusters can be deployed by using two different control plane configurations: standalone or hosted control planes. The standalone configuration uses dedicated virtual machines or physical machines to host the control plane. With hosted control planes for OpenShift, you create control planes as pods on a hosting cluster without the need for dedicated virtual or physical machines for each control plane. Refer to the official HCP documentation and this article for more information.
What is a disconnected installation?
There are different types of installation for different scenarios. It's important to select the right method for your use case. A disconnected OpenShift installation is a crucial solution for organizations and environments where security compliance, control, and reliability are paramount, and where direct internet connectivity is restricted or undesirable. It provides the infrastructure necessary to manage and maintain OpenShift clusters in isolated, security-focused, and self-contained networks.
Restricted: Disconnected
When operating within a disconnected environment, the OpenShift cluster has no direct internet connection, not even through a proxy. All required content that supports the environment must be mirrored locally. The machine running the oc toolset must have access to the internet, directly or indirectly through a Proxy as well as access to an image registry along with the OpenShift API.
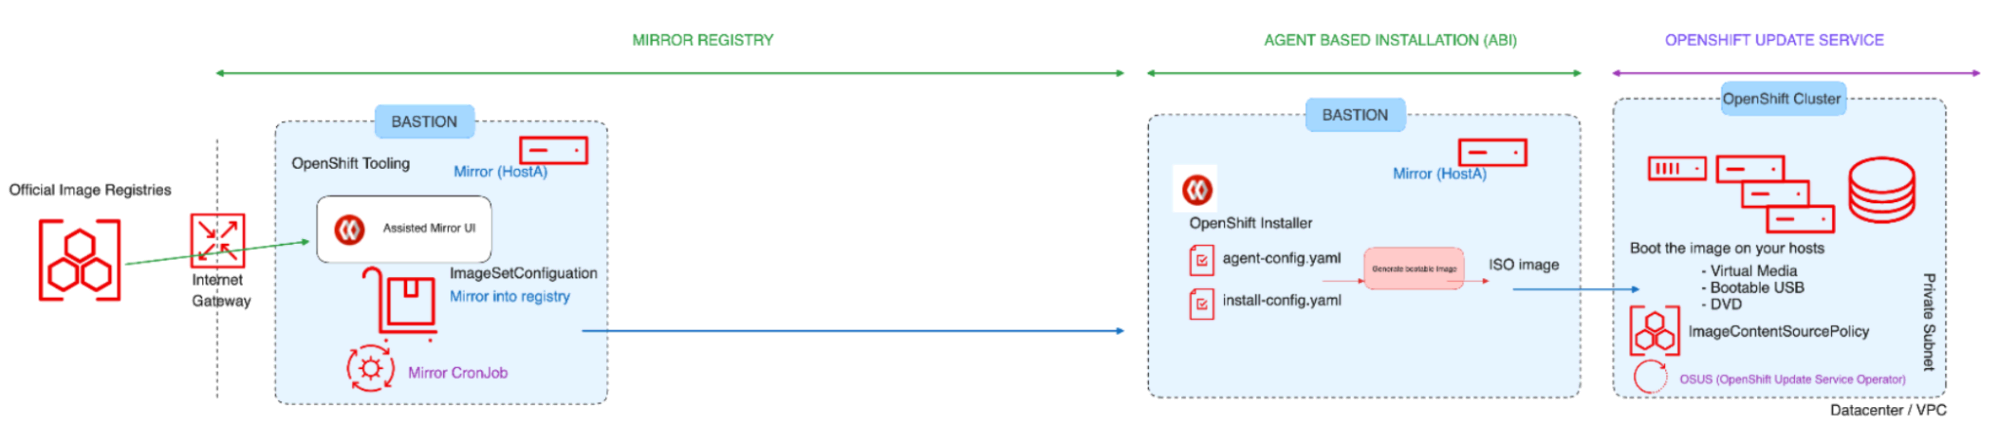
Image-2: Restricted - Disconnected
In this blog, we're focusing on the Agent Based Installation method for disconnected/restricted networks, where internet connectivity is possible through the bastion host.
Restricted: Air Gapped
According to RFC 4949, an "airgap" is when two systems are not connected physically, and no logical connection is automated. Data is transferred manually, through human intervention.

Image-3: Restricted - Air-gapped
In this case, the OpenShift cluster has no direct internet connection, not even through a proxy. All required content that supports the environment is mirrored locally. The machine executing the install has access to the mirror registry as well as the OpenShift API, but it does NOT have access to the internet in any form. All content must be shipped on a USB stick, optical media, or by other "offline" means.
If the bastion host does not have an internet connection, refer to this section of the official documentation to perform additional steps to mirror the image set to disk then mirror the image set file on disk to a mirror which are beyond the scope of this article.
Tools required to perform disconnected installation
Before getting into the actual installation using the Agent Based Installer, let's discuss the tools necessary to perform the disconnected installation.
Mirror Registry for RedHat OpenShift
You can mirror the images required to support the OpenShift installation and subsequent product updates to a container mirror registry that supports Docker v2-2, such as Red Hat Quay. If you do not have access to a large-scale container registry, you can use the mirror registry for Red Hat OpenShift, which is a small-scale container registry included with OpenShift subscriptions.
OpenShift Client (oc) mirror Plugin
The oc-mirror command is an OpenShift CLI (oc) plugin that can be used to mirror images. You must run oc-mirror from a system with internet connectivity to download the required content from the originating source.
Pre-requisites for Mirror Registry
- An OpenShift subscription.
- Red Hat Enterprise Linux (RHEL) 8 or 9 with Podman 3.4.2 or later and OpenSSL installed.
- Fully qualified domain name for the Red Hat Quay service, which must resolve through a DNS server.
- 2 or more vCPUs.
- 8 GB of RAM.
- About 17 GB for OpenShift 4.13 release images, or about 358 GB for OpenShift 4.13 release images and OpenShift 4.13 Red Hat Operator images. Up to 1 TB or more for each stream is suggested.
Installation tasks
Once the base RHEL VM has been installed, download the following tools on the bastion host,
- Podman 3.4.2 or later
$ sudo dnf install -y podman- OpenShift Client (oc CLI)
$ wget https://mirror.openshift.com/pub/openshift-v4/x86_64/clients/ocp/stable/openshift-client-linux.tar.gz
$ tar --extract --file openshift-client-linux.tar.gz
$ chmod +x oc
$ sudo mv oc /usr/local/bin/$ wget https://developers.redhat.com/content-gateway/rest/mirror/pub/openshift-v4/clients/mirror-registry/latest/mirror-registry.tar.gz
$ tar --extract --file mirror-registry.tar.gz
$ chmod +x mirror-registry$ wget https://mirror.openshift.com/pub/openshift-v4/x86_64/clients/ocp/stable/oc-mirror.tar.gz
$ tar --extract --file oc-mirror.tar.gz
$ chmod +x oc-mirror
$ sudo mv oc-mirror /usr/local/bin/Mirror Registry installation
The Mirror Registry can be installed with a single command:
$ ./mirror-registry install --quayHostname<hostname fqdn> \
--quayRoot /root/ocpmirror
For example :
$ sudo mirror-registry install \
--quayHostname bastion.j9287.dynamic.opentlc.com \
--quayRoot /root/ocpmirror
A successful installation of the Mirror Registry returns output like this:
[...]
INFO[2023-10-31 11:17:28] Quay installed successfully, config data is stored in /root/ocpmirror
INFO[2023-10-31 11:17:28] Quay is available at https://bastion.j9287.dynamic.opentlc.com:8443 with credentials (init, 7HFdq385A9EG0ngVWo4cKeDtxRzp621N)
Verify that the Mirror Registry can be accessed using the URL the credentials provided:
$ podman login -u init -p <password generated by installer> \
https://<hostname fqdn>:8443 \
--tls-verify=false
For example:
$ podman login -u init \
-p 7HFdq385A9EG0ngVWo4cKeDtxRzp621N \ https://bastion.j9287.dynamic.opentlc.com:8443 \
--tls-verify=false
Because the Mirror Registry comes with a custom CA, you can export the below variable to access the registry securely:
$ export SSL_CERT_DIR=/root/ocpmirror/quay-rootCA/
$ podman login -u init \
-p 7HFdq385A9EG0ngVWo4cKeDtxRzp621N \
https://bastion.j9287.dynamic.opentlc.com:8443
Download your OpenShift pull secret from https://console.redhat.com/openshift/downloads, and save the downloaded file as pull-secret.
Run the below commands from your home directory to configure the registry authentication:
$ cat pull-secret | jq . > pull-secret.json
$ mkdir .docker ; cp pull-secret.json ~/.docker/config.json
$ echo -n 'init:7HFdq385A9EG0ngVWo4cKeDtxRzp621N' | \
base64 -w0
Using the output of the previous command, adjust the file to include local mirror authentication in ~/.docker/config.json:
"auths": {
 "bastion.j9287.dynamic.opentlc.com:8443": {
   "auth": "aW5pdDo3SEZkcTM3NUE5RUcwbmdWV280Y0tlRHR4UnpwNjIxTg==",
   "email": "email@example.com"
 },
At this point, a Mirror Registry is installed and configured. For more information, refer to the official documentation.
Mirroring images
In this section, the oc mirror OpenShift CLI plugin will be used to mirror the required content to the Mirror Registry.
In a disconnected environment, you can mirror an image set directly to the target mirror registry.
In an air-gapped environment, you must first mirror the image set to disk, then mirror the image set file on disk to a mirror.
First, create a new file for the ImageSetConfiguration:
kind: ImageSetConfiguration
apiVersion: mirror.openshift.io/v1alpha2
storageConfig:
 registry:
   imageURL: bastion.j9287.dynamic.opentlc.com:8443/mirror/oc-mirror-metadata # Local mirror registry URL
   skipTLS: false
mirror:
 platform:
   channels:
   - name: stable-4.13    # Version of OpenShift to be mirrored
     minVersion: 4.13.17  # Minimum version of OpenShift to be mirrored
     maxVersion: 4.13.18  # Maximum version of OpenShift to be mirrored
     shortestPath: true
     type: ocp
   graph: true   # Useful when updating in disconnected setup with OSUS operator
 operators:
 - catalog: registry.redhat.io/redhat/redhat-operator-index:v4.13 # Operators catalog to mirror
 additionalImages:
 - name: registry.redhat.io/ubi8/ubi:latest
 helm: {}
A sample file has been provided in this repository. For a full list of options to adjust this file for your needs, refer to the official documentation.
For this example, the ImageSetConfiguration file uses a registry storage backend (bastion.j9287.dynamic.opentlc.com:8443/mirror/oc-mirror-metadata) and includes all OpenShift versions starting at a minimum version of 4.13.17 to the latest version in the channel here 4.13.18. On every invocation of oc-mirror with this image set configuration, the latest release of the stable-4.13 channel is evaluated, so running oc-mirror at regular intervals ensures that you automatically receive the latest releases of OpenShift images.
Once the ImageSetConfiguration file is ready, run the following command to mirror the content to the registry. The time required for the mirroring process varies depending on your configuration and connection speed.
$ oc mirror --config=imageset-config.yaml \
docker://<hostname fqdn>:8443
For example:
$ oc mirror --config=imageset-config.yaml \ docker://bastion.j9287.dynamic.opentlc.com:8443The optional parameters --continue-on-error and --skip-missing can be useful if you need to ignore errors.
A successful execution of the previous command displays output like this:
[...]
bastion.j9287.dynamic.opentlc.com:8443/openshift/release-images:4.13.17-x86_64
bastion.j9287.dynamic.opentlc.com:8443/openshift/release-images:4.13.18-x86_64
Writing image mapping to oc-mirror-workspace/results-1698872844/mapping.txt
Writing UpdateService manifests to oc-mirror-workspace/results-1698872844
Writing CatalogSource manifests to oc-mirror-workspace/results-1698872844
Writing ICSP manifests to oc-mirror-workspace/results-1698872844
Some files are generated by oc-mirror. This includes updateService:
apiVersion: updateservice.operator.openshift.io/v1
kind: UpdateService
metadata:
 name: update-service-oc-mirror
spec:
 graphDataImage: bastion.j9287.dynamic.opentlc.com:8443/openshift/graph-image@sha256:a8730004abd6a4c1d02f52d8052a69a014a4e3de677135b2dfe50259fb6b63fa
 releases: bastion.j9287.dynamic.opentlc.com:8443/openshift/release-images
 replicas: 2
The file ImageContentSourcePolicy:
apiVersion: operator.openshift.io/v1alpha1
kind: ImageContentSourcePolicy
metadata:
 name: release-0
spec:
 repositoryDigestMirrors:
 - mirrors:
   - bastion.j9287.dynamic.opentlc.com:8443/openshift/release-images
   source: quay.io/openshift-release-dev/ocp-release
 - mirrors:
   - bastion.j9287.dynamic.opentlc.com:8443/openshift/release
   source: quay.io/openshift-release-dev/ocp-v4.0-art-dev
And finally, CatalogSource:
apiVersion: operators.coreos.com/v1alpha1
kind: CatalogSource
metadata:
 name: redhat-operator-index
 namespace: openshift-marketplace
spec:
 image: bastion.j9287.dynamic.opentlc.com:8443/redhat/redhat-operator-index:v4.13
 sourceType: grpc
These files are required later to configure the Mirror Registry for installation, and to direct Operators and Update Service to use the local registry.
You can also navigate to https:// to log in to the Mirror Registry User Interface.
Agent Based Installation
With the local Mirror Registry installed and configured, we can look at the installation of OpenShift using the Agent Based Installer. At the time of writing, the Agent Based Installer supports the following platforms:
- baremetal
- vsphere
- none
Agent Based Installation uses a bootable ISO containing the Assisted Discovery Agent and the Assisted Service. Both are required to perform the cluster installation, but the latter runs on only one of the hosts. The openshift-install agent create image subcommand generates an ephemeral ISO based on the inputs you provide.
In the install-config.yaml file, you must include the pull secret and the additional certificate trust bundle of the local Mirror Registry and ImageContentSources pointing to the local mirror.
In the agent-config.yaml file, you must include the parameter “rendezvousIP” which is the IP address of the host that will become the temporary bootstrap node during the installation. This IP address should match one of the nodes.
For a complete list of installation preparation steps using Agent Based Installer, refer to this link. A sample install-config.yaml and agent-config.yaml can be found in this repository.
Create the ISO
Once you have adjusted both the install-config.yaml and agent-config.yaml files, it's time to create the ISO image.
First, install the nmstate package:
$ sudo dnf install /usr/bin/nmstatectlNext, download the OpenShift Installer. The version of OpenShift Installer must be downloaded to match the version of the cluster you intend to install. In this article, we're using Openshift 4.13.17 so we'll install that first, and then update the cluster to 4.13.18.
$ wget https://mirror.openshift.com/pub/openshift-v4/x86_64/clients/ocp/4.13.17/openshift-install-linux.tar.gz
$ tar --extract --file openshift-install-linux.tar.gz
$ chmod +x openshift-install
$ sudo mv openshift-install /usr/local/bin/
Finally, create the ISO:
$ openshift-install agent create image --dir <directory>You'll see output similar to this:
INFO Configuration has 3 master replicas and 3 worker replicas
INFO The rendezvous host IP (node0 IP) is 192.168.94.21
INFO Extracting base ISO from release payload
INFO Base ISO obtained from release and cached at [/root/.cache/agent/image_cache/coreos-x86_64.iso]
INFO Consuming Install Config from target directory
INFO Consuming Agent Config from target directory
Depending on your platform, you must prepare the nodes (BareMetal or VM) for the control plane and compute nodes. Make sure all the nodes of the cluster are booting from the generated ISO image.
Creating the DNS records
You must create DNS records for two static IP addresses in DNS. In each record, <cluster_name> is the cluster name and <base_domain> is the cluster base domain you specify when you install the cluster. A complete DNS record takes the form: <component>.<cluster_name>.<base_domain>
API VIP - api.<cluster_name>.<base_domain>
Ingress VIP - *.apps.<cluster_name>.<base_domain>
OpenShift cluster creation
You'll boot the ISO image on each cluster host, including your virtual media, bootable USB, and DVD.
Configure the nodes to boot from the ISO image you've created. Once all nodes have booted from the ISO image, you can monitor the installation using the command below:
$ openshift-install agent wait-for bootstrap-complete \
--dir <directory> --log-level=debug
[...]
INFO Cluster is ready for install
INFO Cluster validation: All hosts in the cluster are ready to install.
INFO Preparing cluster for installation
INFO Cluster installation in progress
INFO Bootstrap configMap status is complete
INFO cluster bootstrap is complete
Once the bootstrap process is complete, you can run the following command to monitor further progress.
$ openshift-install agent wait-for install-complete \
--dir <directory> --log-level=debug
[...]
INFO Cluster is installed
INFO Install complete!
INFO To access the cluster as the system:admin user when using 'oc', run
INFO     export KUBECONFIG=/root/auth/kubeconfig
INFO Access the OpenShift web-console here: https://console-openshift-console.apps.j9287.dynamic.opentlc.com
INFO Login to the console with user: "kubeadmin", and password: "HR377-xxxxx-yyyyy-ynxGC"
Once you get the message that the install is complete, you can log in to the cluster using the oc command and verify the version of the OpenShift cluster.
$ oc get clusterversion
NAME      VERSION   AVAILABLE   PROGRESSING   SINCE   STATUS
version   4.13.17   True        False         11m     Cluster version is 4.13.17
For more detail on the Agent Based Installer, refer to the official OpenShift documentation.
You can verify the ImageContentSourcePolicy to confirm that the OpenShift cluster is receiving images from the local Mirror Registry:
$ oc get imagecontentsourcepolicy
NAME             AGE
image-policy-0   18h
image-policy-1   18h
$ oc describe imagecontentsourcepolicy image-policy-0 |grep -A4 Spec:
Spec:
 Repository Digest Mirrors:
   Mirrors:
     bastion.j9287.dynamic.opentlc.com:8443/openshift/release
   Source:  quay.io/openshift-release-dev/ocp-v4.0-art-dev
$ oc describe imagecontentsourcepolicy image-policy-1 |grep -A4 Spec:
Spec:
 Repository Digest Mirrors:
   Mirrors:
     bastion.j9287.dynamic.opentlc.com:8443/openshift/release-images
   Source:  quay.io/openshift-release-dev/ocp-release
You must perform some additional configuration to remove all the default catalog sources, because your cluster is not connected to the Internet. Execute the following commands to patch the OperatorHub resource to disable the default CatalogSources:
$ oc get catsrc -A
NAMESPACE               NAME                  DISPLAY               TYPE   PUBLISHER   AGE
openshift-marketplace   certified-operators   Certified Operators   grpc   Red Hat     32m
openshift-marketplace   community-operators   Community Operators   grpc   Red Hat     32m
openshift-marketplace   redhat-marketplace    Red Hat Marketplace   grpc   Red Hat     32m
openshift-marketplace   redhat-operators      Red Hat Operators     grpc   Red Hat     32m
$ oc patch OperatorHub cluster --type json \
-p '[{"op": "add", "path": "/spec/disableAllDefaultSources", "value": true}]'
operatorhub.config.openshift.io/cluster patched
$ oc get catsrc -A
No resources found
Create a new CatalogSource resource pointing to the local Mirror Registry by applying the CatalogSource.yaml from the Image mirroring section above.
apiVersion: operators.coreos.com/v1alpha1
kind: CatalogSource
metadata:
 name: redhat-operator-index
 namespace: openshift-marketplace
spec:
 image: bastion.j9287.dynamic.opentlc.com:8443/redhat/redhat-operator-index:v4.13
 sourceType: grpc

$ oc apply -f ./oc-mirror-workspace/results-1698872844/

$ oc apply -f ./oc-mirror-workspace/results-1698872844/release-signatures/
Once applied, rerun the verification steps previously attempted:
$ oc get po -n openshift-marketplace
NAME                                    READY   STATUS    RESTARTS   AGE
marketplace-operator-7bc7549555-4ckdm   1/1     Running   0          48m
redhat-operator-index-t4cgd             1/1     Running   0          75s

$ oc get catsrc -A
NAMESPACE               NAME                    DISPLAY   TYPE   PUBLISHER   AGE
openshift-marketplace   redhat-operator-index             grpc               82s
At this point, the following has been completed:
- A new OpenShift cluster has been installed using the Agent Based Installation method.
- The installation images have been pulled from the local Mirror Registry instead of the Internet.
- The Operator Hub has been configured to use the local Mirror Registry.
OpenShift updates in disconnected environments
In the first part of the blog, we mirrored a local registry with two versions of OpenShift 4.13.17 and 4.13.18 (see content of ImageSetConfiguration file). For clusters with internet access, Red Hat provides over-the-air updates by using an OpenShift Update Service (OSUS) as a hosted service located behind public APIs, but for this example we're focusing on the disconnected mode. OSUS has been covered in greater detail in this Guide to OpenShift Update for Cluster Administration.
There are two methods to do OpenShift update in disconnected/air-gapped environments: Without OpenShift Update Service Operator (OSUS), or With OpenShift Update Service Operator (OSUS).
Without OpenShift Update Service Operator (OSUS)
First, let’s look at the simplest option of updating the OpenShift cluster from 4.13.17 to 4.13.18. Execute the commands below from a laptop or a system with the oc command available, and that's got an active Internet connection:
$ export OCP_RELEASE_VERSION=4.13.18
$ export ARCHITECTURE=x86_64
$ oc adm release info -o 'jsonpath={.digest}{"\n"}' quay.io/openshift-release-dev/ocp-release:${OCP_RELEASE_VERSION}-${ARCHITECTURE}
sha256:d0fd9d3ab8690605f816c879d74f4e6d6d9f72982f63a3e0ef3e027ecc512e1c
Take the output from the previous command and use it to upgrade the OpenShift cluster from the bastion node where you can access the OpenShift Cluster:
$ oc adm upgrade --allow-explicit-upgrade \
--to-image quay.io/openshift-release-dev/ocp-release@sha256:d0fd9d3ab8690605f816c879d74f4e6d6d9f72982f63a3e0ef3e027ecc512e1c
Requested update to 4.13.18

$ oc get clusterversion
NAME      VERSION   AVAILABLE   PROGRESSING   SINCE   STATUS
version   4.13.17   True        True          78m     Working towards 4.13.18: 106 of 843 done (12% complete), waiting up to 40 minutes on etcd, kube-apiserver

$ oc get clusterversion
NAME      VERSION   AVAILABLE   PROGRESSING   SINCE   STATUS
version   4.13.18   True        False         5m25s   Cluster version is 4.13.18
For more information on updating OpenShift, refer to the official documentation.
With OpenShift Update Service Operator (OSUS)
To use the OpenShift Update Service Operator (OSUS), you must configure access to a secured registry, if the registry is different from the one used for installation. This doesn't apply for this article, because we used a local Mirror Registry.
You also must update the global cluster pull secret to access your mirror registry if the registry is different from the one used for installation. This doesn't apply for this article, because we used a local Mirror Registry.
To use OSUS, you must first install the OSUS Operator from the Operator Hub.
Next, create a graph data container image for the OpenShift Update Service. This step is not required for the example in this article, because this article used oc mirror for mirroring the images and included graph: true in the ImageSetConfiguration file while mirroring.
Once that's done, install the OSUS application and configure your clusters to use the local OpenShift Update Service. Use UpdateService.yaml to apply the necessary configuration. For example:
apiVersion: updateservice.operator.openshift.io/v1
kind: UpdateService
metadata:
 name: update-service-oc-mirror
spec:
 graphDataImage: bastion.j9287.dynamic.opentlc.com:8443/openshift/graph-image@sha256:a8730004abd6a4c1d02f52d8052a69a014a4e3de677135b2dfe50259fb6b63fa
 releases: bastion.j9287.dynamic.opentlc.com:8443/openshift/release-images
 replicas: 2
Once the OSUS application is installed, run the following commands to make the CVO (Cluster Version Operator) pull the graph data from the locally installed OSUS instead of the internet.
$ export NAMESPACE=openshift-update-service
$ export NAME=update-service-oc-mirror
$ export POLICY_ENGINE_GRAPH_URI="$(oc -n "${NAMESPACE}" get -o jsonpath='{.status.policyEngineURI}/api/upgrades_info/v1/graph{"\n"}' updateservice "${NAME}")"
$ export PATCH="{\"spec\":{\"upstream\":\"${POLICY_ENGINE_GRAPH_URI}\"}}"
$ oc patch clusterversion version -p $PATCH --type merge
If certificate errors are returned when executing the oc adm upgrade command, make sure you've enabled a cluster-wide proxy, and configure the CA to trust the update server.
Finally perform the update procedure as described in the previous section. Refer to the documentation to learn more about the OpenShift Update Service Operator.
Final thoughts
This blog has provided detailed instructions on how to use tools like Mirror Registry and oc mirror to set up a local repository for disconnected/air-gapped installations. With this knowledge, an OpenShift administrator can use locally mirrored images not only to install an OpenShift cluster, but also to upgrade and update.
About the authors

With over 23 years of professional IT experience, Prakash Rajendran is passionate about partnering with customers to ensure open source and emerging technologies bring them value and competitive advantage in today's fast-changing industry landscape. Serving as a Senior Specialist Solution Architect at Red Hat, Rajendran is delivering successful Red Hat OpenShift workshops/PoCs/deep dive technical discussions for small to medium teams of technical and non-technical backgrounds that shape the customer's use cases and architecture design decisions.
Rajendran specializes in designing, creating and delivering content that helps Red Hat sell, service and support OpenShift at scale. He works closely with internal product teams, Product Engineering, Professional Services, Global Support and Sales to ensure a world-class customer experience with Red Hat solutions.

With over 25 years of professional IT experience, Didier Wojciechowski is a passionate advocate for innovation. Serving as a Principal Solution Architect at Red Hat, Didier Wojciechowski is a pivotal EMEA resource for leading customer projects that demand strategic technology integration and systemic thinking. They are known for their collaborative team approach, which is driven by a keen understanding of business needs and opportunities.
Wojciechowski specializes in designing, validating and supporting end-to-end solutions that tackle complex technical, business and commercial challenges. His methodology has consistently delivered creative solutions to drive IT and business transformation in the hybrid cloud era, where innovation is key. Wojciechowski has been at the forefront of the tech industry for many years, having spent the first part of his career at Oracle before joining the Red Hat team in June 2016 with a strong focus on creating innovative value.
More like this
MCP security: Implementing robust authentication and authorization
AI trust through open collaboration: A new chapter for responsible innovation
Post-quantum Cryptography | Compiler
Understanding AI Security Frameworks | Compiler
Browse by channel

Automation
The latest on IT automation for tech, teams, and environments

Artificial intelligence
Updates on the platforms that free customers to run AI workloads anywhere

Open hybrid cloud
Explore how we build a more flexible future with hybrid cloud

Security
The latest on how we reduce risks across environments and technologies

Edge computing
Updates on the platforms that simplify operations at the edge

Infrastructure
The latest on the world’s leading enterprise Linux platform

Applications
Inside our solutions to the toughest application challenges
Virtualization
The future of enterprise virtualization for your workloads on-premise or across clouds