Lorsqu'une entreprise décide d'envisager une nouvelle plateforme d'hyperviseurs, par exemple Red Hat OpenShift Virtualization, la première question est souvent de savoir comment migrer les machines virtuelles de l'infrastructure existante vers OpenShift Virtualization. C'est là qu'intervient la solution Red Hat Migration Toolkit for Virtualization. Le MTV est un opérateur OpenShift qui ajoute des fonctionnalités de migration à grande échelle et permet à votre entreprise de migrer plus rapidement et facilement les charges de travail des machines virtuelles depuis vSphere, Red Hat Virtualization (RHV), Red Hat OpenStack Services on OpenShift ou d'autres clusters OpenShift Virtualization.
Une fois que vos machines virtuelles ont migré vers OpenShift Virtualization, votre entreprise peut récupérer l’ancienne infrastructure d’hyperviseur et entamer le processus de conteneurisation des charges de travail qui s’exécutent sur les machines virtuelles sans jamais avoir à quitter la plateforme OpenShift.
Dans cet article, je vais vous présenter les étapes qui permettent d'installer la boîte à outils de migration pour la virtualisation, puis la configurer pour la migration des machines virtuelles depuis VMware vSphere et enfin démontrer le processus de migration. À la fin de cet article, vous disposerez de toutes les informations dont vous avez besoin pour migrer vos charges de travail Linux et Windows de vSphere vers OpenShift Virtualization.
Installez la boîte à outils de migration pour l’opérateur de virtualisation
La première étape consiste à installer la boîte à outils de migration pour la virtualisation sur le cluster où vous avez déjà installé OpenShift Virtualization. L'installation de l'opérateur MTV s'effectue depuis le registre Operator Hub, comme vous le feriez pour tout autre opérateur.
Recherchez MTV, puis cliquez sur la vignette d’opérateur correspondante. Cliquez sur Install pour continuer.
L'opérateur MTV est installé dans l'espace de noms openshift-mtv, c'est-à-dire où vous créerez toutes vos configurations de migration plus tard.
Une fois l'opérateur installé, vous êtes invité à créer un contrôleur Forklift. Il s’agit du service responsable de l’exécution de toutes les migrations. Cliquez sur le bouton bleu Create ForkliftController, puis sur le bouton Create.
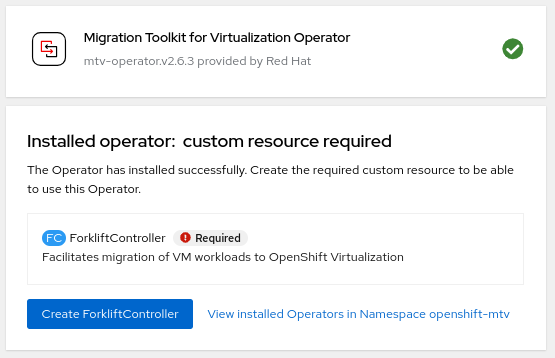
Après un certain temps, vous voyez l’état de ForkliftController passer à Conditions: Running avec une case à cocher verte.

Après avoir actualisé la console, vous voyez un nouvel onglet Migration dans le panneau gauche de la console OpenShift.
Configurer un fournisseur
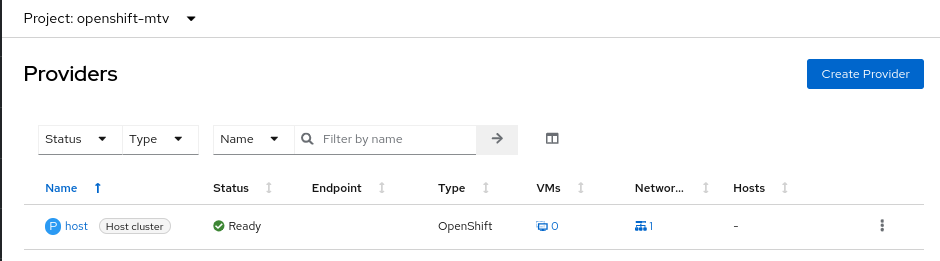
Avant de pouvoir migrer quoi que ce soit, vous devez créer un fournisseur. Un fournisseur est un hyperviseur (tel que vSphere) sur lequel s’exécutent les machines virtuelles et que vous souhaitez migrer vers OpenShift Virtualization. Dans l’onglet de navigation Migration , cliquez sur Providers for virtualization. Un Provider appelé host existe déjà. Cela représente le cluster OpenShift Virtualization sur lequel est exécuté l’opérateur MTV, et il a été créé automatiquement lors de la création du contrôleur Forklift.
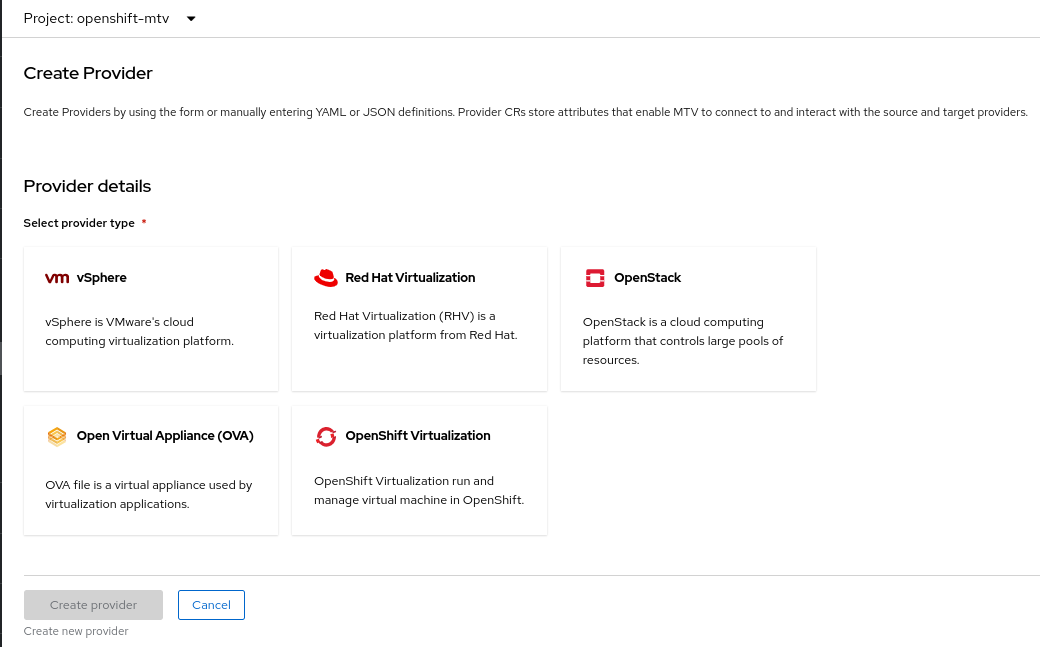
Cliquez sur le bouton bleu Create Provider pour créer un fournisseur pour le cluster vSphere.
Bien que la boîte à outils de migration pour la virtualisation soit capable d'effectuer une migration depuis d'autres clusters OpenShift Virtualization, Red Hat OpenStack ou Red Hat Virtualization, je me concentre sur la migration depuis vSphere. Sélectionnez vSphere dans les options présentées.
À ce stade, vous avez besoin d’informations sur le cluster vSphere afin de configurer le fournisseur.
- Provider resource name: Il s’agit d’une chaîne de texte que vous pouvez utiliser pour savoir à quel cluster vSphere cette configuration s’applique. Dans cet exemple, il n’y a qu’un seul cluster vSphere, alors appelez-le
vsphere. - Type de point de terminaison : le processus de configuration et de migration est le même que vous sélectionniez
vCenterouESXi. Toutefois, la sélection devCentervous permet de voir toutes les machines virtuelles du cluster, tandis que la sélection deESXin’affiche que les machines virtuelles exécutées sur ce serveurESXi. L’option ESXi peut être utile si votre intention est de migrer un hôte entier afin de le réutiliser en tant que nœud de calcul OpenShift Virtualization. - URL: il s’agit du nom DNS ou de l’adresse IP du serveur vCenter, suivi de /sdk, qui représente le point d’accès de l’accès du SDK au serveur vCenter.
- Image d'initialisation VDDK : l'image d'initialisation VDDK (Virtual Disk Development Kit) de VMware est facultative, mais fortement recommandée, car elle accélère considérablement la migration. Cette image est utilisée par l’opérateur MTV pour injecter les pilotes VirtIO dans le système d’exploitation invité lors de la migration. Étant donné que la création de l'image VDDK nécessite des licences propriétaires de VMware, j'omet les instructions pour la créer, mais la documentation de Red Hat pour la création de l'image VDDK est très facile à suivre.
- Nom d’utilisateur: il s’agit d’un nom d’utilisateur vCenter qui a accès à toutes les machines virtuelles ou à un sous-ensemble de machines virtuelles dans le cluster vSphere. Dans cet exemple, j'utilise le compte vSphere Administrator.
- Password : mot de passe pour le nom d’utilisateur ci-dessus.
- Ignorer la validation des certificats : activez cette option pour un serveur vCenter utilisant des certificats auto-signés.
- Certificat CA : copiez et collez le certificat CA dans ce champ, ou appuyez simplement sur le bouton Fetch certificate from URL, puis acceptez l'autorité de certification dans la fenêtre qui s'affiche.

Une fois que vous avez cliqué sur le bouton Create provider, la configuration est créée et validée. Après quelques secondes, le fournisseur apparaît sous la forme Ready dans la console.

Création d'un plan de migration
Les migrations de machines virtuelles sont effectuées dans MTV avec un plan de migration, c'est-à-dire une configuration qui comprend une liste de machines virtuelles à migrer, ainsi que des mappages de réseaux et de stockage. Les mises en correspondance sont requises, car l’opérateur MTV n’est pas nécessairement en mesure de déterminer les réseaux et magasins de données vSphere qui doivent être mis en correspondance avec les réseaux OpenShift Virtualization et les StorageClass.
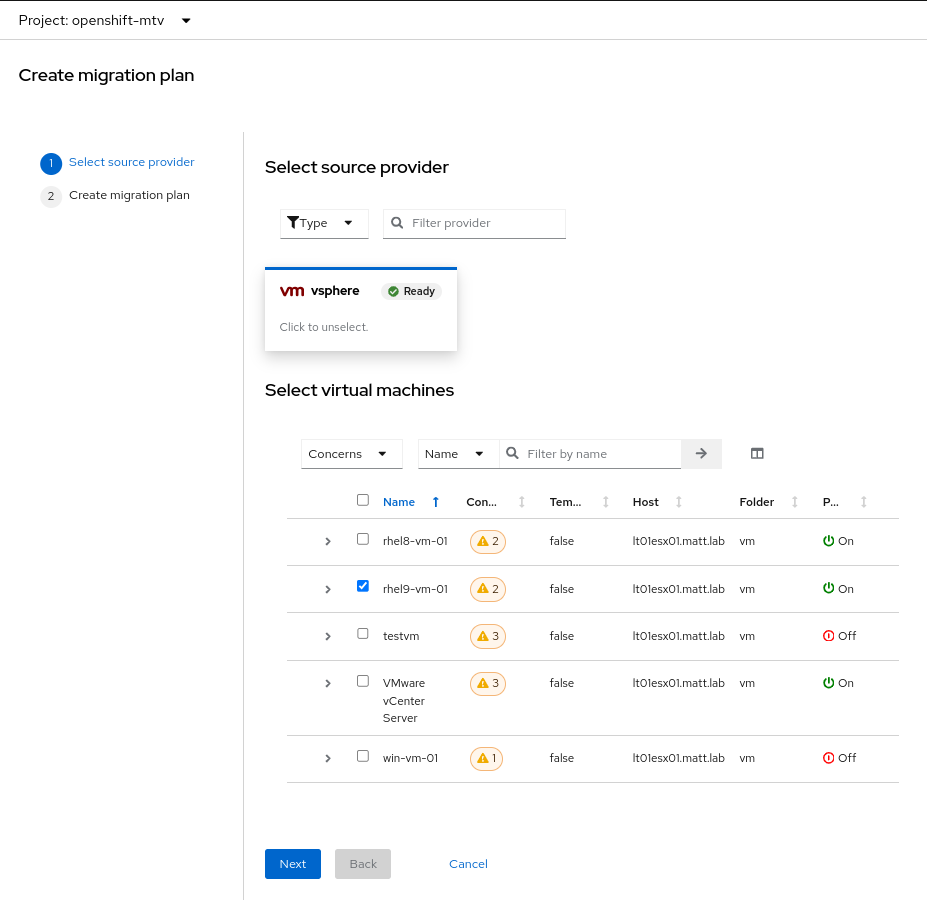
Après avoir cliqué sur le bouton Create Plan, vous accédez à une fenêtre vous demandant quel fournisseur source utiliser. Notez que, bien que le cluster hôte local s'affiche dans cette liste, il n'est pas possible de migrer une machine virtuelle d'OpenShift Virtualization vers vSphere à l'aide de l'opérateur MTV. Dans cet exemple, un seul fournisseur source valide est configuré.
Après avoir sélectionné vSphere dans la liste, vous recevez une liste des machines virtuelles existant sur ce fournisseur. Il est possible de sélectionner plusieurs machines virtuelles à la fois, mais pour cet exemple, je ne sélectionne que la machine virtuelle appeléerhel9-vm-01.
Dans la fenêtre suivante, attribuez un nom au plan de migration, sélectionnez l’espace de noms cible et configurez les mappages de réseau et de stockage. L’espace de noms Target par défaut est défini sur openshift-mtv, qui n’est sûrement pas l’endroit où vous souhaitez que les machines virtuelles s’exécutent après la migration. Veillez donc à remplacer ce champ par l’espace de noms approprié à votre environnement.
Cet exemple d’environnement simple n’a qu’un seul réseau vSphere appelé VM Network et il va être mappé sur un réseau Multus externe dans le cluster OpenShift Virtualization. Dans ce cas, j'ai suivi mon article précédent décrivant comment configurer votre cluster OpenShift pour permettre aux machines virtuelles de communiquer directement sur le réseau externe. Le réseau vSphere sélectionné et le réseau OpenShift Virtualization sélectionné se trouvent ainsi dans le même VLAN, et partagent donc le même espace d’adresses IP.
De même, cet exemple d'environnement ne contient qu'un seul magasin de données, qui va être associé à une ressource StorageClass appropriée dans l'environnement OpenShift Virtualization.
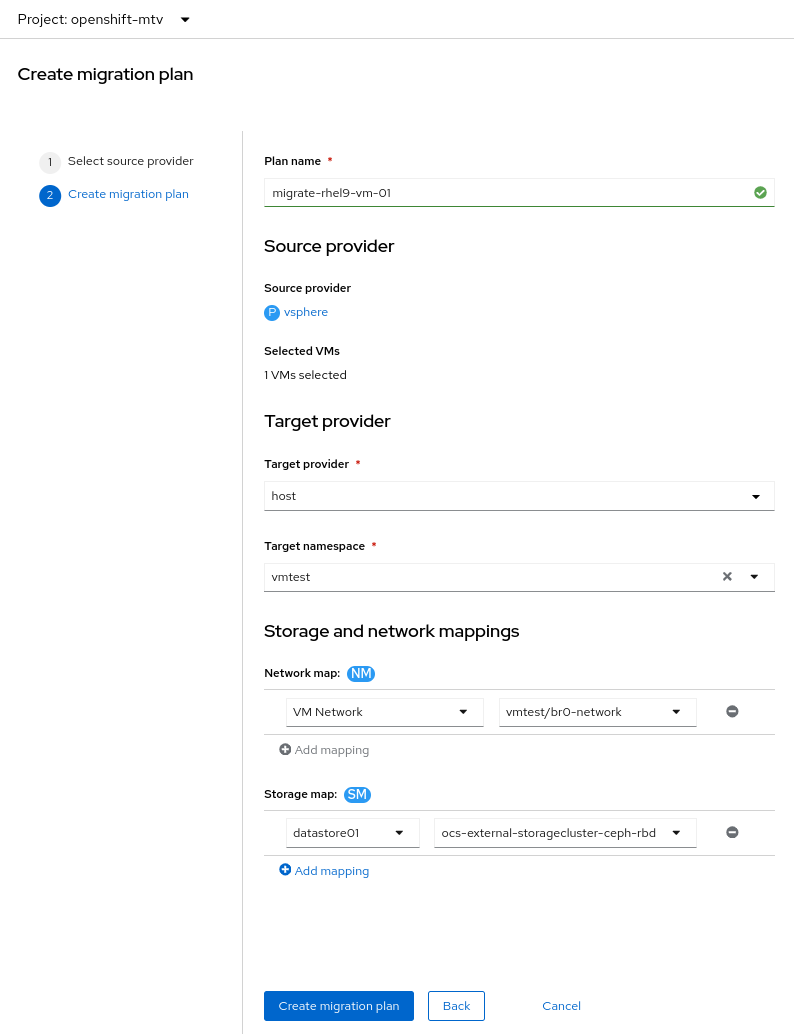
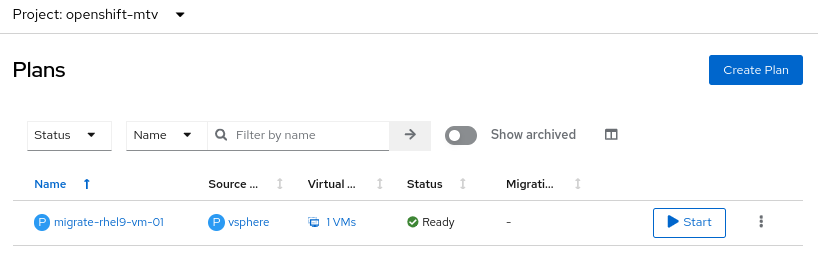
Maintenant que le plan de migration a été créé et que certaines vérifications sont exécutées, le plan de migration affiche l'état Ready et un bouton bleu Start.
Migration de machines virtuelles
Les migrations de machines virtuelles à l'aide de l'opérateur MTV entraînent toujours un temps d'arrêt de la machine virtuelle migrée. La durée de cette interruption dépend de plusieurs facteurs, notamment :
- Suivi des modifications par blocs (CBT) : Si CBT est activé dans vSphere, MTV peut effectuer une migration à chaud. Les données de la machine virtuelle sont copiées pendant que le système d’exploitation invité est encore en cours d’exécution. La machine virtuelle est ensuite arrêtée dans vSphere et démarrée immédiatement dans OpenShift Virtualization. En l’absence de CBT, seule la migration à froid est possible, ce qui exige que la machine virtuelle soit arrêtée pendant tout le processus de migration.
- Image VDDK disponible : Si l'image VDDK est disponible, MTV est en mesure de modifier l'image de machine virtuelle cible plus efficacement.
- Vitesse du réseau et du disque : la vitesse du réseau et des disques sous-jacents peut également affecter la vitesse de migration, ce qui a pour effet de déterminer la durée pendant laquelle une machine virtuelle est inactive pendant la migration.
En effet, celles-ci subissent des changements qui résultent du passage d'un hyperviseur à un autre. Outre l’installation de pilotes de périphériques, les noms des interfaces réseau sur le système d’exploitation invité sont susceptibles de changer. Si aucune intervention n'est prise avant la migration, la machine virtuelle migrée ne pourra pas se connecter au réseau. Dans cet article, je propose des options pour atténuer ce problème et assurer une migration fluide des paramètres réseau du système d’exploitation invité.
Une fois que vous êtes prêt à lancer la migration, cliquez sur le bouton Start pour le plan de migration. Si les machines virtuelles du plan de migration sont toujours en cours d'exécution dans vSphere, elles sont automatiquement arrêtées à ce stade. Une fois la migration des machines virtuelles effectuée, OpenShift Virtualization ne démarre qu’une machine virtuelle migrée qui s’exécutait dans vSphere. En d’autres termes, l’état d’exécution d’une machine virtuelle migrée est dupliquée une fois la migration terminée. Ainsi, une machine virtuelle qui s’arrête dans vSphere au début de la migration l’est toujours dans OpenShift Virtualization jusqu’à ce qu’elle soit démarrée manuellement après la migration.
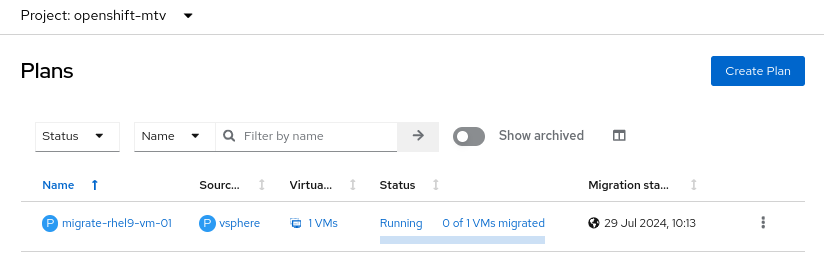
Vous pouvez surveiller les détails d'une migration en cliquant sur le texte bleu avec lien hypertexte dans la colonne Status, intitulé Running. Cela vous fournit divers états, tels que les PersistentVolumeClaims utilisés pour la migration et le pod responsable de la migration réelle des données de la machine virtuelle. Dans l'image ci-dessous, remarquez le lien bleu intitulé Logs qui affiche les journaux du pod exécutant la migration :

Il est également possible de surveiller les ressources de migration à partir de l'interface de ligne de commande. Cet exemple montre l’état des Pods, du DataVolume et du PersistentVolumeClaim :
$ oc get pods,dv,pvc NAME READY STATUS RESTARTS AGE pod/migrate-rhel9-vm-01-vm-1001-nb95n 1/1 Running 0 17s pod/vddk-validator-migrate-rhel9-vm-014wnpf-6sr5r 0/1 Completed 0 4m47s NAME PHASE PROGRESS RESTARTS AGE datavolume.cdi.kubevirt.io/migrate-rhel9-vm-01-vm-1001-tbwhg Succeeded 100.0% 40s NAME STATUS VOLUME CAPACITY ACCESS MODES STORAGECLASS AGE persistentvolumeclaim/migrate-rhel9-vm-01-vm-1001-tbwhg Bound pvc-2834ec68-489a-4a77-a5e4-960a6f48d7cf 16Gi RWX ocs-external-storagecluster-ceph-rbd 40sAprès un certain temps, le plan de migration se termine. Le pod de migration reste à l’état Completed afin que vous puissiez examiner les journaux une fois la migration terminée. Le pod est supprimé lors de l’archivage du plan de migration.
Examen de la machine virtuelle migrée
Une fois la migration terminée, vous pouvez afficher la machine virtuelle dans l'espace de noms cible que vous avez sélectionné lors de la création du plan de migration. Dans ce cas, cet espace de noms s’appelait vmtest.

Lorsque vous vous connectez à la machine virtuelle migrée, vous pouvez voir que la carte réseau est correctement configurée et que la machine virtuelle est en mesure de communiquer avec le réseau externe. La migration est terminée !
Pour les machines virtuelles fonctionnant sous Windows, la procédure est identique. La boîte à outils de migration pour la virtualisation s’occupe d’ajouter les pilotes VirtIO requis à l’image de disque Windows pendant la migration afin que la machine virtuelle démarre correctement lors de la première tentative.
Tâches de post-migration
L’opérateur MTV ne supprime pas les machines virtuelles migrées de vSphere. Les machines virtuelles migrées existent dans les deux hyperviseurs. Il est donc important de veiller à ce que l’ancienne machine virtuelle dans vSphere ne soit pas démarrée en même temps que la nouvelle machine virtuelle dans OpenShift Virtualization. Dès que la machine virtuelle migrée est mise à disposition, vous devez supprimer l’ancienne machine virtuelle dans vSphere.
En cas d’échec du processus de migration, redémarrez la machine virtuelle dans vSphere, résolvez les problèmes et réessayez la migration. À moins que vous ne spécifiiez un playbook Ansible à exécuter avant la migration, l’opérateur MTV n’apporte aucune modification à la machine virtuelle dans vSphere, de sorte que la machine virtuelle puisse être utilisée comme sauvegarde en cas d’échec de la migration.
Les outils de la réussite
La migration depuis un hyperviseur intégré à votre environnement depuis des décennies vers une nouvelle plateforme novatrice est une tâche redoutable qui ne doit pas être prise à la légère. Comme nous l'avons vu dans cet article, des outils tels que la solution Red Hat Migration Toolkit for Virtualization peuvent vous aider à automatiser cette tâche plus facilement.
Pour plus d'informations sur OpenShift Virtualization, consultez un autre article de blog sur le sujet, consultez le produit sur notre site web et vous trouverez plus d'informations sur la Boîte à outils de migration pour la virtualisation sur notre site Web.
À propos de l'auteur

Matthew Secaur is a Red Hat Principal Technical Account Manager (TAM) for Canada and the Northeast United States. He has expertise in Red Hat OpenShift Platform, Red Hat OpenShift Virtualization, Red Hat OpenStack Platform, and Red Hat Ceph Storage.
Plus de résultats similaires
Migrate your VMs faster with the migration toolkit for virtualization 2.11
Building the foundation for an AI-driven, sovereign future with Red Hat partners
Parcourir par canal

Automatisation
Les dernières nouveautés en matière d'automatisation informatique pour les technologies, les équipes et les environnements

Intelligence artificielle
Actualité sur les plateformes qui permettent aux clients d'exécuter des charges de travail d'IA sur tout type d'environnement

Cloud hybride ouvert
Découvrez comment créer un avenir flexible grâce au cloud hybride

Sécurité
Les dernières actualités sur la façon dont nous réduisons les risques dans tous les environnements et technologies

Edge computing
Actualité sur les plateformes qui simplifient les opérations en périphérie

Infrastructure
Les dernières nouveautés sur la plateforme Linux d'entreprise leader au monde

Applications
À l’intérieur de nos solutions aux défis d’application les plus difficiles
Virtualisation
L'avenir de la virtualisation d'entreprise pour vos charges de travail sur site ou sur le cloud