
The Domain Name System (DNS) is used to resolve (translate) hostnames to internet protocol (IP) addresses and vice versa. A DNS server, also known as a nameserver, maps IP addresses to hostnames or domain names.
In this article, you will learn the basics of DNS, from how DNS gets the IP address and hostname, to the concepts of forward and reverse lookup zones. It will also show you how to install and configure DNS, define and edit zone files, and verify whether the DNS can resolve to the correct address with the help of commands. If you are new to DNS, this article will help you play with it on your system using basic configurations.
How DNS works
When a client requests information from a nameserver, it usually connects to port 53, and then the nameserver resolves the name requested.

- Sending a request from the DNS client to the DNS server is called a lookup request.
- Getting a response from the DNS server to the DNS client is called a lookup response.
- The system on which the DNS service is configured is called a DNS server.
- The system that accesses the DNS server is called a DNS client.
Where does DNS get IP addresses?
You might wonder how DNS gets the IP of the corresponding hostname or domain name. How does DNS search among different IP addresses and associate your domain name correctly? Who stores those mappings between domain names and IP addresses?
The DNS workflow illustrates how communication happens within DNS and how it resolves the addresses.

- When the client searches for the domain
www.example.com, the request will initially go to the internet service provider's (ISP) resolver. It will respond to the user's request to resolve a domain name. - If the IP address is not found on the resolver, the request is forwarded to a root DNS server and later to the top-level domain (TLD) servers.
- TLD servers store information for top-level domains, such as .com or .net.
- Requests are forwarded to the nameservers, which know detailed information about domains and IP addresses.
- Nameservers respond to the ISP's resolver, and then the resolver responds to the client with the requested IP.
- When the resolver doesn't know the IP, it stores the IP and its domain in a cache to service future queries.
[ Download now: A system administrator's guide to IT automation. ]
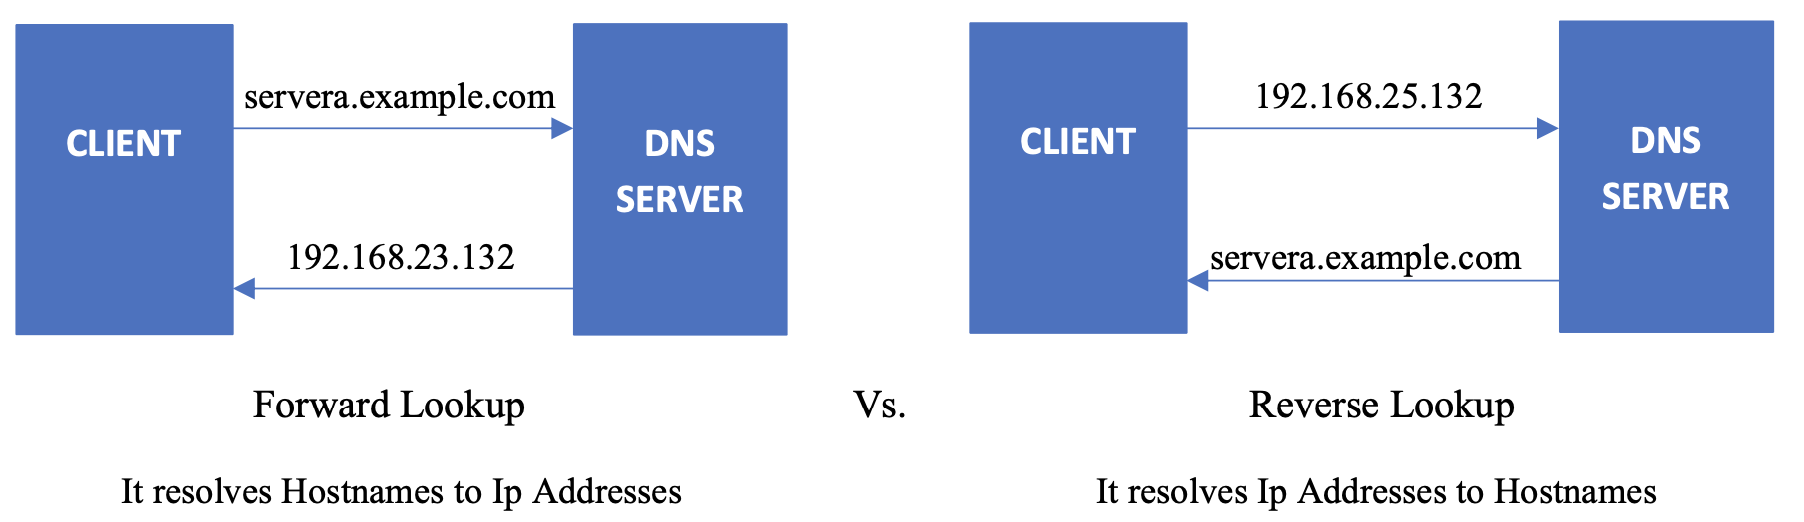
Forward and reverse lookups
The forward lookup zone uses the domain name to search for IP addresses, whereas the reverse lookup zone uses IP addresses to search for the domain name.
Install and configure DNS
BIND is a nameserver service responsible for performing domain-name-to-IP conversion on Linux-based DNS servers.
[root@servera ~] # yum install bind
The BIND package provides the named service. It reads the configuration from the /etc/named and /etc/named.conf files. Once this package is installed, you can start configuring DNS.
Configure the /etc/named.conf file
First, add or edit the two values in the options field. One is the DNS server address, and the other is the allow-query to any.
[root@servera ~] # vim /etc/named.conf
listen-on port 53 { 127.0.0.1; 192.168.25.132; };
allow-query { localhost; any; };
Here are the values from the above file:
- 192.168.25.132 – DNS server address
- any – matches every IP address
Define the forward and reverse zones
Define the forward and reverse zones in the /etc/named.conf or /etc/named.rfc1912.zones (you can define zones in either of those files). In this example, I am appending zone definition details to the /etc/named.rfc1912.zones file.
[root@servera ~] # vim /etc/named.rfc1912.zones
  zone "example.com" IN { type master;
  file "example.forward.zone";
  allow-update { none; };
};

  zone "25.168.192.in-addr.arpa" IN {
   type master;
   file "example.reverse.zone";
   allow-update { none; };
};
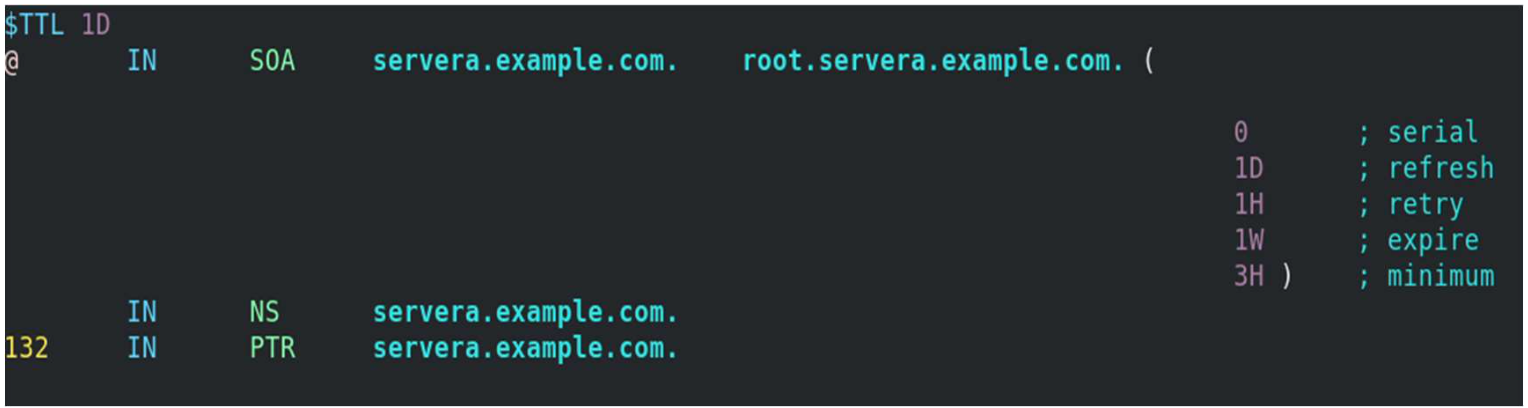
Create forward and reverse zone files
You also need to create forward and reverse zone files in the /var/named directory.
Note: By default, the named.conf file includes the /var/named directory for checking zone files. Sample zone files named.localhost and named.loopback are created during the installation of the BIND package.
[root@servera ~] # vim /var/named/example.forward.zone

[root@servera ~] # vim /var/named/example.reverse.zone
Add the nameserver IP to /etc/resolv.conf
First, you must disable DNS processing by NetworkManager because it dynamically updates the /etc/resolv.conf file with DNS settings from its active connection profiles. To disable this and allow manual editing of /etc/resolv.conf, you must create a file (For example, 90-dns-none.conf), as root in the /etc/NetworkManager/conf.d/ directory that contains the following:
[main]
dns=none
Save the file and reload (restart) NetworkManager.
# systemctl reload NetworkManager
After you reload NetworkManager, it won't update /etc/resolv.conf. Now, you can manually add the nameserver's IP address to the /etc/resolv.conf file.
[root@servera ~] # vim /etc/resolv.conf
# Generated by NetworkManager
search localdomain example.com
nameserver 192.168.25.132
[ Be prepared in case something goes wrong. Read An introduction to DNS troubleshooting. ]
Start/restart and enable the named service
If the named service is not running or is disabled, then start and enable it. If it is already active (running) and you made all these configurations, you need to restart the service to make changes.
[root@servera ~] # systemctl status named.service

[root@servera ~] # systemctl start named.service

[root@servera ~] # systemctl enable named.service

[root@servera ~] # systemctl restart named.service
Verify the DNS name resolution
You have installed the BIND package, configured named files, created lookup zones, and restarted the service to make configurations take effect. Now use the nslookup and dig commands to check whether DNS is working properly and verify whether you are getting the intended results.
nslookupis a program to query internet domain name servers.digis a tool for interrogating DNS servers. It performs DNS lookups and displays the answers that are returned from the nameserver.
Query with nslookup
[root@servera ~] # nslookup servera.example.com
  Server: 192.168.25.132
  Address: 192.168.25.132#53
  Name: servera.example.com
  Address: 192.168.25.132

[root@servera ~] # nslookup 192.168.25.132
   132.25.168.192.in-addr.arpa name = servera.example.com.
Query with dig
Here is a forward lookup, where DNS responds with 192.168.11.132 as an IP for servera.example.com:
[root@servera ~] # dig servera.example.com
   ...output truncated...

;; ANSWER SECTION:
servera.example.com. 86400 IN A 192.168.25.132


;; AUTHORITY SECTION:
example.com. 86400 IN NS servera.example.com.

...output truncated...
This example displays a reverse lookup, where the DNS server responds with servera.example.com as the domain name for 192.168.25.132:
[root@servera ~] # dig -x 192.168.25.132
  ...output truncated...

;; ANSWER SECTION:
132.25.168.192.in-addr.arpa. 86400 IN PTR servera.example.com.

;; AUTHORITY SECTION:
25.168.192.in-addr.arpa. 86400 IN NS servera.example.com.

;; ADDITIONAL SECTION:
servera.example.com. 86400 IN A 192.168.25.132

...output truncated...
[ Network getting out of control? Check out Network automation for everyone, a free book from Red Hat. ]
Wrap up
In this article, you learned what DNS is and how it works. Also, you now know what forward and reverse lookup zones are and how they work. You also learned how to install the BIND package, which is responsible for setting up DNS on the system and configuring the named files and lookup zones. Finally, you learned two commands, nslookup and dig, to interrogate DNS resolutions.
저자 소개

Ashish Bharadwaj is an intern at Red Hat who is passionate about
systems administration, networking, and programming.
Ashish believes open source is the future and that contributing to the technologies and community is a great way to solve problems efficiently and create new ideas or products.
He also has an interest in cloud computing, cybersecurity, and writing technical documentation.
In his free time, he enjoys watching TV shows and listening to music.
His favorite quote is, "No one who does good work will ever come to a bad end, either here or in the world to come."
You can find him on Linkedin here: Linkedin: https://www.linkedin.com/in/ashishbharadwajm
채널별 검색

오토메이션
기술, 팀, 인프라를 위한 IT 자동화 최신 동향

인공지능
고객이 어디서나 AI 워크로드를 실행할 수 있도록 지원하는 플랫폼 업데이트

오픈 하이브리드 클라우드
하이브리드 클라우드로 더욱 유연한 미래를 구축하는 방법을 알아보세요

보안
환경과 기술 전반에 걸쳐 리스크를 감소하는 방법에 대한 최신 정보

엣지 컴퓨팅
엣지에서의 운영을 단순화하는 플랫폼 업데이트

인프라
세계적으로 인정받은 기업용 Linux 플랫폼에 대한 최신 정보

애플리케이션
복잡한 애플리케이션에 대한 솔루션 더 보기

오리지널 쇼
엔터프라이즈 기술 분야의 제작자와 리더가 전하는 흥미로운 스토리
제품
- Red Hat Enterprise Linux
- Red Hat OpenShift Enterprise
- Red Hat Ansible Automation Platform
- 클라우드 서비스
- 모든 제품 보기
툴
체험, 구매 & 영업
커뮤니케이션
Red Hat 소개
Red Hat은 Linux, 클라우드, 컨테이너, 쿠버네티스 등을 포함한 글로벌 엔터프라이즈 오픈소스 솔루션 공급업체입니다. Red Hat은 코어 데이터센터에서 네트워크 엣지에 이르기까지 다양한 플랫폼과 환경에서 기업의 업무 편의성을 높여 주는 강화된 기능의 솔루션을 제공합니다.