Convert2RHEL은 CentOS Linux 및 Oracle Linux와 같이 Red Hat Enterprise Linux(RHEL)에서 파생되거나 이와 유사한 운영 체제를 변환하는 Red Hat 유틸리티입니다. 지원되는 운영 체제의 전체 목록은 이 문서에서 확인할 수 있습니다. 자세한 내용은 Terry Bowling의 블로그 게시물인 이 페이지 및 Oracle Linux에 대한 게시물을 참조하세요.
Red Hat Satellite 6.10은 처음으로 대량 Convert2RHEL 작업 기능을 제공했습니다. 저는 이에 대해 블로그 게시물을 작성했습니다. Satellite 6.11은 다음과 같은 두 가지 방식으로 이러한 기능을 기반으로 구축됩니다.
-
Ansible 롤은 Convert2RHEL에 대한 Satellite 서버 구성/준비를 자동화합니다.
-
Ansible 플레이북은 호스트 변환을 자동화합니다.
아래 순서도는 Satellite 6.11에서 대량 Convert2RHEL 작업을 수행하는 데 필요한 작업에 대한 대략적인 개요를 보여줍니다.

준비가 되면 Centos/Oracle Linux 호스트를 Satellite에 등록하고 호스트를 RHEL로 변환하는 작업을 예약합니다.
Ansible 롤은 별도의 Ansible 서버를 사용하여 Satellite 서버에 수동으로 적용할 수 있습니다.
여기에서는 이 새로운 자동화를 구현하는 데 필요한 모든 단계를 자세히 설명합니다.
Satellite 서버 준비
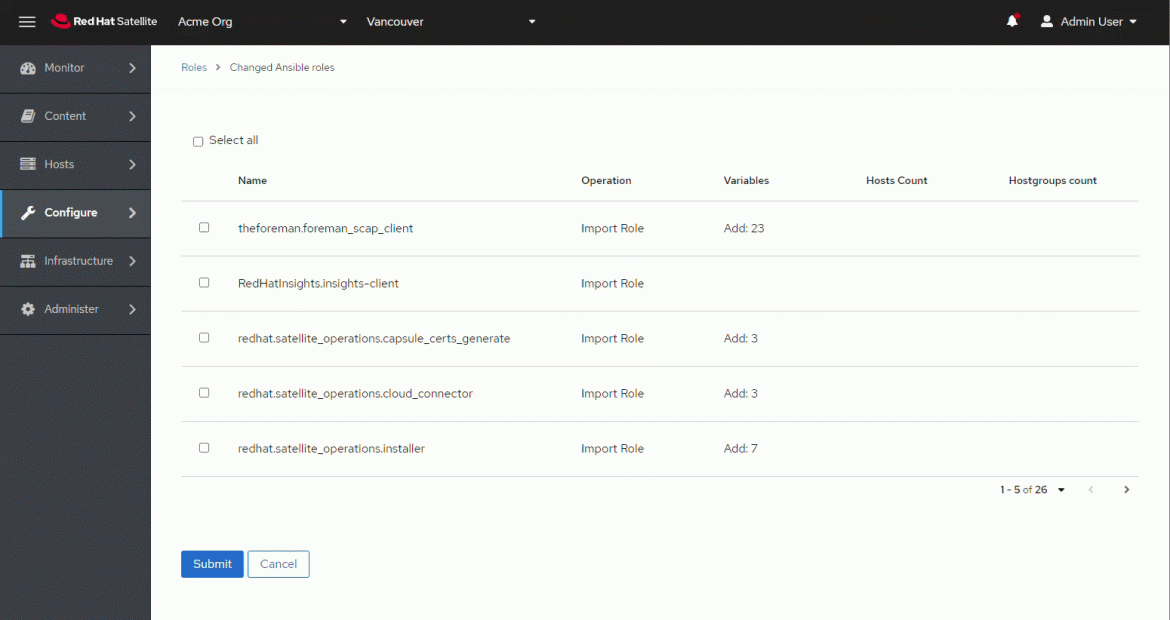
먼저 지침에 따라 포함된 Ansible 롤을 가져옵니다.
먼저 Configure(구성) > Roles(롤)로 이동합니다.

"가져오기..."를 클릭합니다.

"Select All(모두 선택)"을 클릭한 다음 "Submit(제출)"을 클릭합니다.
다음으로, Satellite 서버에서 실행하기 전에 Ansible 롤에 대한 변수를 생성해야 합니다. 이러한 변수는 Satellite 서버에서 대량 Convert2RHEL 작업을 구성하는 방법을 Ansible 롤에 알려줍니다. 여기에는 서브스크립션 매니페스트, 조직, 위치, 관리자 자격 증명 등을 지정하는 작업이 포함됩니다.
Ansible 롤 변수를 구성하는 가장 쉽고 빠른 방법은 Satellite 서버에서 hammer 커맨드라인 유틸리티를 사용하는 것입니다. Satellite 웹 UI를 통해 Ansible 롤 변수를 구성할 수도 있습니다.
이 특정 Satellite 서버에서 다음 변수를 정의합니다.
|
변수 |
값 |
|
satellite_rhel_wait_for_syncs |
true |
|
satellite_manifest_path |
/usr/share/satellite/manifest_satellite_20220815T193102Z.zip |
|
satellite_organization |
Acme Org |
|
satellite_password |
Ha ha no you don’t |
|
satellite_username |
myee |
|
satellite_server_url |
https://ip-172-31-29-4.us-west-1.compute.internal |
|
satellite_validate_certs |
true |
|
satellite_content_rhel_enable_rhel7 |
true |
|
satellite_content_rhel_enable_rhel8 |
true |
다음은 hammer 유틸리티를 사용하여 Ansible 롤 변수를 생성하는 방법입니다.
satellite_rhel_wait_for_syncs
Ansible 롤은 대량 Convert2RHEL 작업을 수행하는 데 필요한 리포지토리를 구성하고 동기화합니다. Satellite_rhel_wait_for_syncs 변수는 리포지토리가 동기화될 때까지 대기하도록 작업에 지시합니다.
루트로 로그인한 상태에서 Satellite 서버의 커맨드라인 인터페이스에 다음을 입력합니다.
hammer ansible variables create --location "Vancouver" --organization "Acme Org" --ansible-role redhat.satellite.convert2rhel --variable satellite_rhel_wait_for_syncs --variable-type boolean --default-value false --override true
Satellite_manifest_path
Ansible 롤이 실행되면 서브스크립션 매니페스트를 업로드하여 모든 새 호스트에 적절한 라이센스가 부여되도록 합니다. 이미 유효한 매니페스트를 업로드한 경우에도 다시 업로드해야 합니다.
hammer ansible variables create --location "Vancouver" --organization "Acme Org" --ansible-role redhat.satellite.convert2rhel --variable satellite_manifest_path --variable-type string --default-value "/usr/share/satellite/manifest_satellite_20220815T193102Z.zip" --override true
satellite_organization/usr
제 Satellite 조직은 “Acme Org”입니다.
hammer ansible variables create --location "Vancouver" --organization "Acme Org" --ansible-role redhat.satellite.convert2rhel --variable satellite_organization --variable-type string --default-value "Acme Org" --override true
satellite_password
Ansible 롤에는 Satellite 관리자 자격 증명이 필요합니다. 여기에 암호를 입력합니다.
hammer ansible variables create --location "Vancouver" --organization "Acme Org" --ansible-role redhat.satellite.convert2rhel --variable satellite_password --variable-type string --default-value "YOUR_ADMIN_PASSWORD" --override true
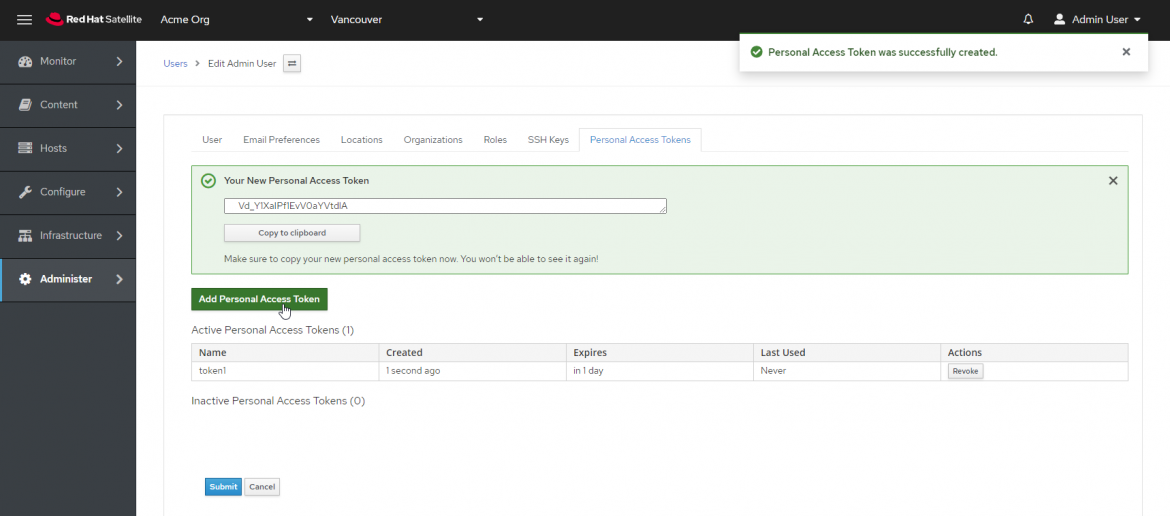
참고: 암호를 사용하지 않으려면 대신 개인용 액세스 토큰을 설정할 수 있습니다.
satellite_username
여기에 관리자 사용자 이름을 입력합니다.
hammer ansible variables create --location "Vancouver" --organization "Acme Org" --ansible-role redhat.satellite.convert2rhel --variable satellite_username --variable-type string --default-value "myee" --override true
satellite_server_url
Satellite 서버 URL은 호스트가 cURL 유틸리티를 사용하여 액세스하는 데 필요한 URL입니다.
hammer ansible variables create --location "Vancouver" --organization "Acme Org" --ansible-role redhat.satellite.convert2rhel --variable satellite_server_url --variable-type string --default-value "https://ip-172-31-29-4.us-west-1.compute.internal" --override true
satellite_validate_certs
이 값은 true로 설정해야 합니다.
hammer ansible variables create --location "Vancouver" --organization "Acme Org" --ansible-role redhat.satellite.convert2rhel --variable satellite_validate_certs --variable-type boolean --default-value true --override true
satellite_content_rhel_enable_rhel7
이 변수는 Ansible 롤이 RHEL7 콘텐츠를 동기화하여 Centos 7(또는 Oracle) 호스트를 RHEL7으로 변환할 수 있도록 지정합니다. RHEL7 콘텐츠를 동기화하지 않으려면 이 변수를 사용하여 false를 지정합니다.
hammer ansible variables create --location "Vancouver" --organization "Acme Org" --ansible-role redhat.satellite.convert2rhel --variable satellite_content_rhel_enable_rhel7 --variable-type boolean --default-value true --override true
satellite_content_rhel_enable_rhel8
이 변수는 Ansible 롤이 RHEL8 콘텐츠를 동기화하여 Centos 8(또는 Oracle) 호스트를 RHEL8으로 변환할 수 있도록 지정합니다. RHEL8 콘텐츠를 동기화하지 않으려면 이 변수를 사용하여 false를 지정합니다.
hammer ansible variables create --location "Vancouver" --organization "Acme Org" --ansible-role redhat.satellite.convert2rhel --variable satellite_content_rhel_enable_rhel8 --variable-type boolean --default-value true --override true
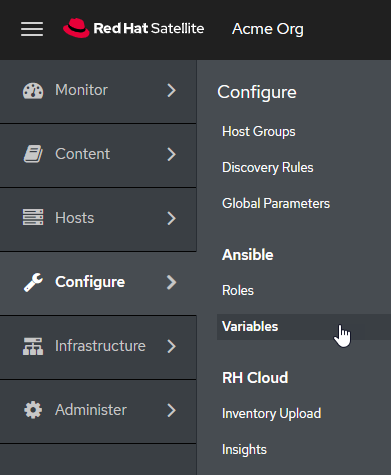
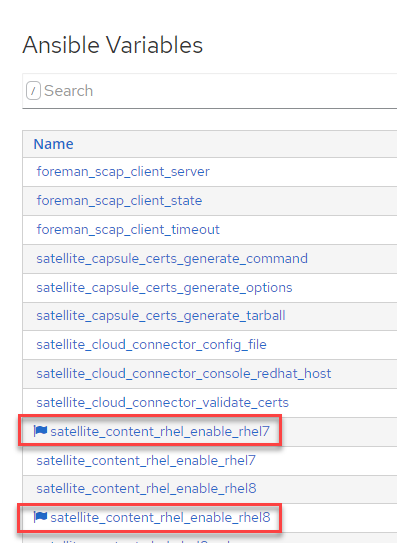
웹 UI에서 변수가 올바르게 설정되었는지 확인할 수 있습니다. Ansible Variables(변수) 하위 메뉴로 이동합니다.
방금 만든 변수를 찾을 때까지 페이지를 이동합니다.
이제 원격 실행 작업을 자체적으로 실행할 수 있도록 Satellite를 구성해야 합니다.
참고: Satellite 서버에 대해 원격 실행 작업을 이미 실행할 수 있는 경우 이 단계가 필요하지 않습니다.
Satellite 서버에 루트로 로그인하고 다음 명령을 실행합니다.
satellite-installer \ --foreman-proxy-plugin-remote-execution-ssh-install-key true
출력은 다음과 같이 표시됩니다.
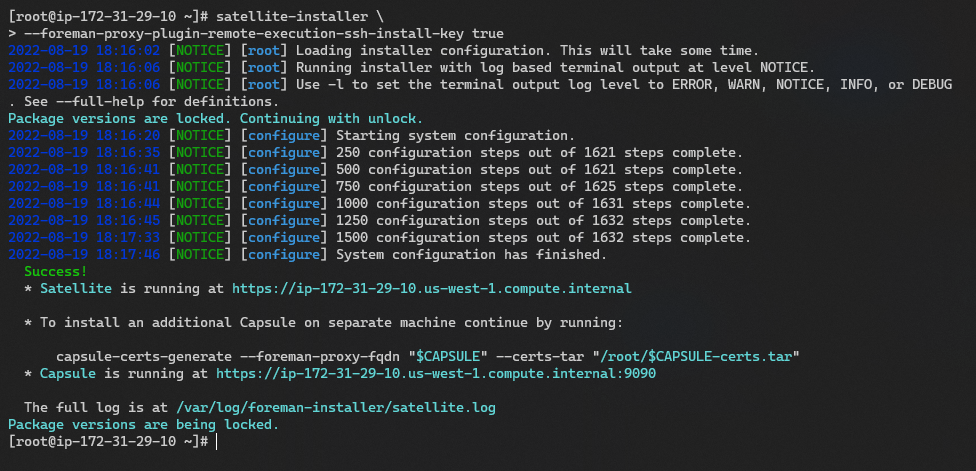
다음으로 Ansible 롤을 Satellite 서버에 적용합니다.
Hosts(호스트) > All Hosts(모든 호스트)를 클릭합니다.
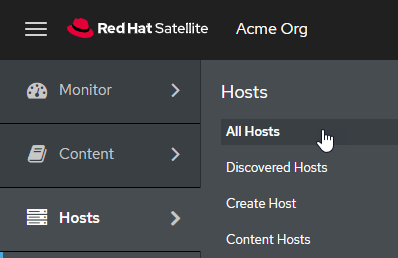
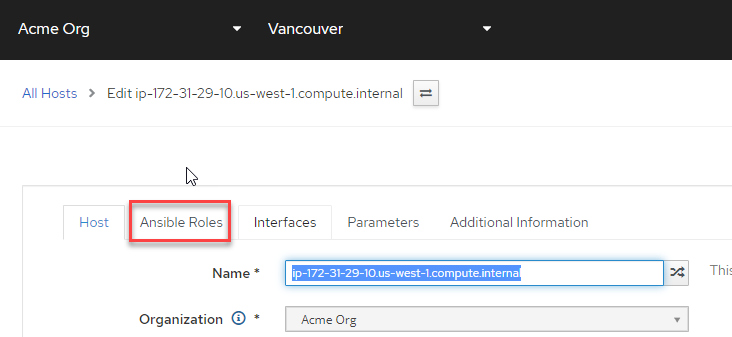
Satellite 서버를 편집합니다.

Ansible Roles(Ansible 롤) 탭을 클릭합니다.
Convert2RHEL 롤은 하위 메뉴의 두 번째 페이지에 있습니다. + 기호를 클릭하여 redhat.satellite.convert2rhel 롤을 Satellite 서버에 할당합니다.
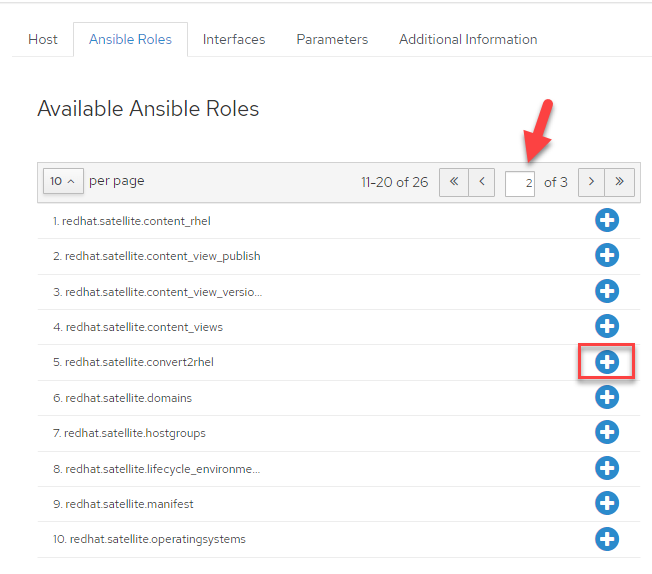
그런 다음 "Submit(제출)"을 클릭합니다.

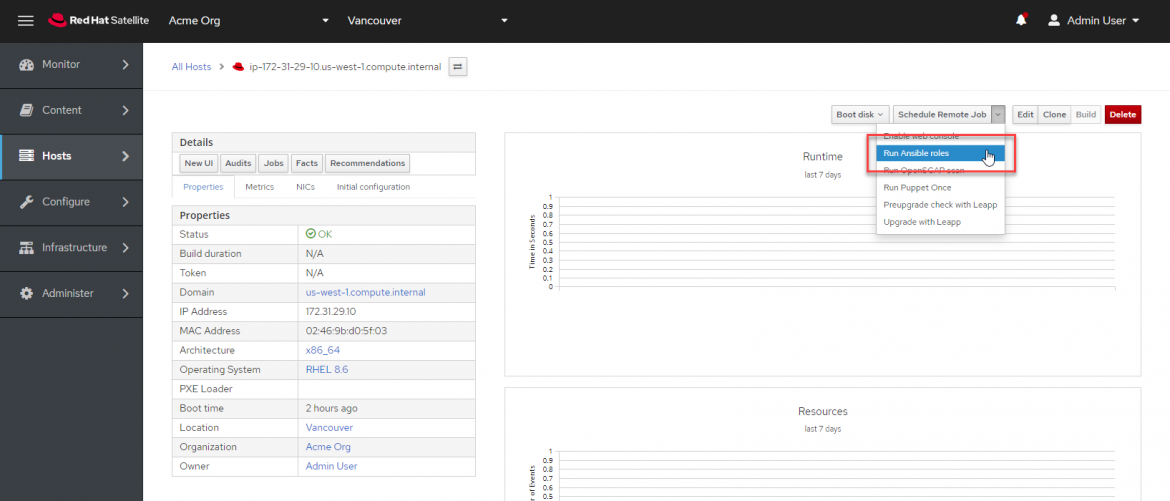
그러면 호스트 정보 페이지로 리디렉션됩니다. "Schedule Remote Job(원격 작업 예약)" 버튼을 클릭하고 "Run Ansible roles(Ansible 롤 실행)"를 선택합니다.
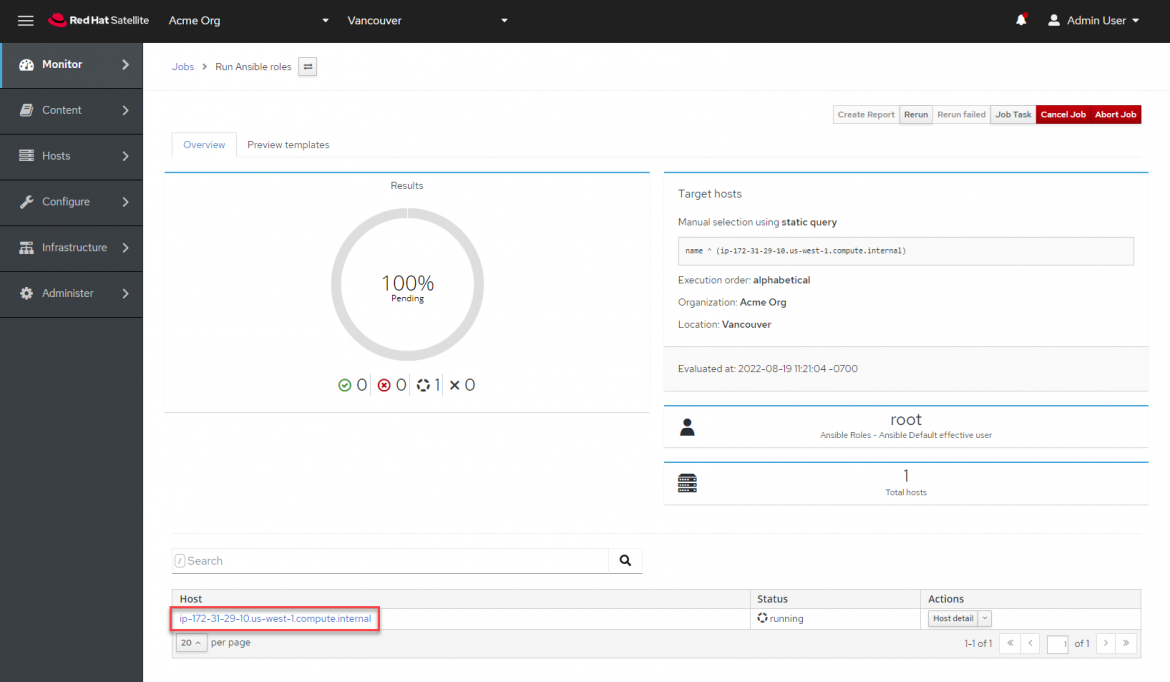
작업 상태를 표시하는 페이지로 리디렉션됩니다. 작업의 실시간 상태를 보려면 Satellite 호스트를 클릭합니다.
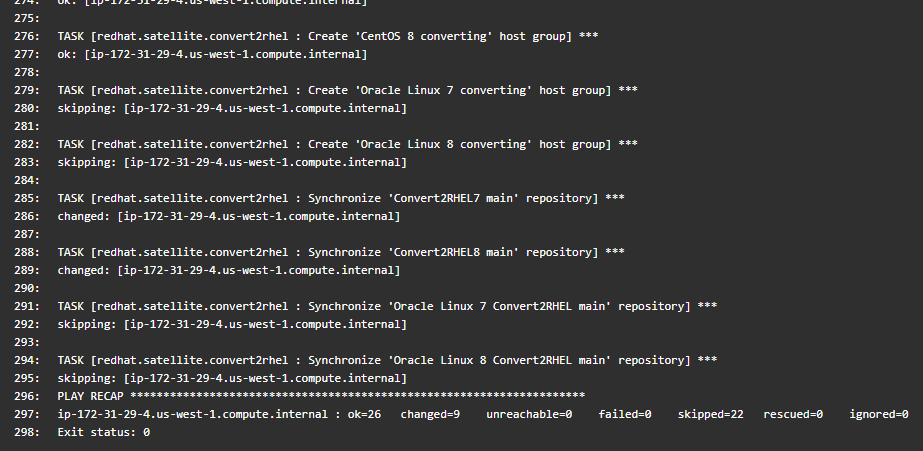
여기에서 실행 중인 작업의 각 태스크를 볼 수 있습니다.
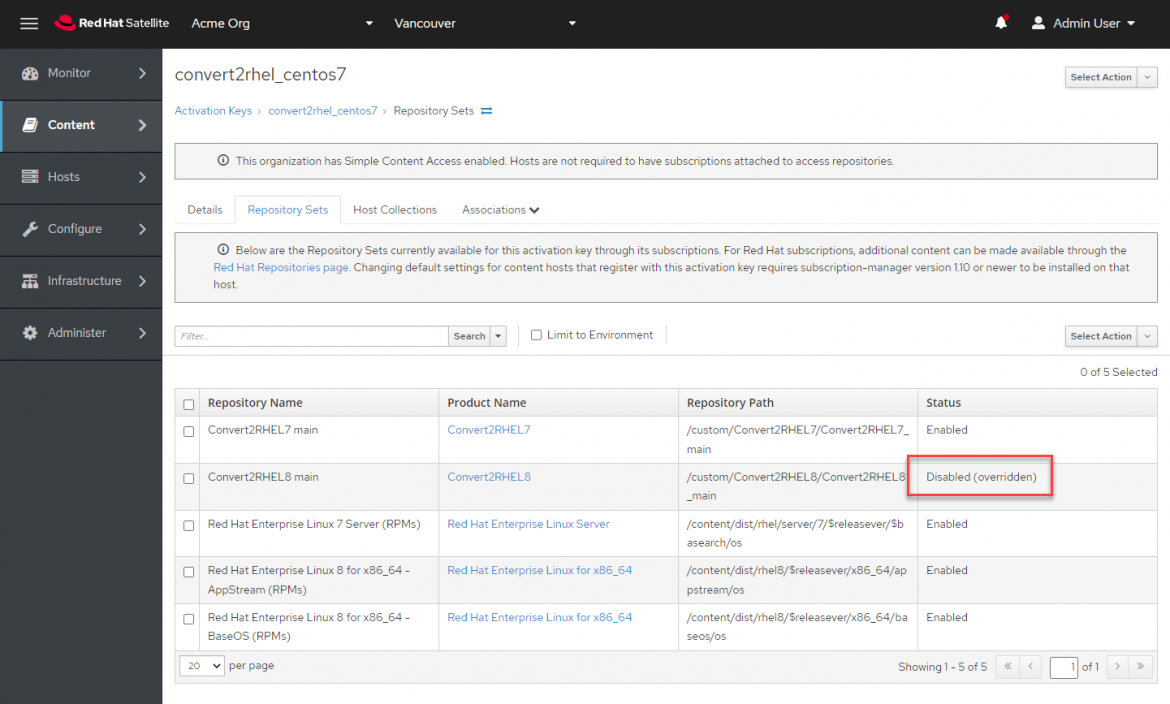
참고: Ansible 롤은 다른 태스크 중에서 필수 콘텐츠를 동기화하고, 호스트 그룹 및 활성화 키를 생성합니다. Satellite 6.11에는 CentOS 7 호스트를 등록하기 위해 생성된 활성화 키 "Convert2RHEL7"이 Convert2RHEL8 리포지토리를 활성화하는 버그가 있습니다. 이 버그를 해결하려면 "convert2rhel_centos7" 활성화 키에서 이 리포지토리를 재정의해야 합니다.
변환 실행
중요: 변환을 실행하기 전에 후보 호스트를 최신 상태로 유지하고 최신 커널로 재부팅해야 합니다.
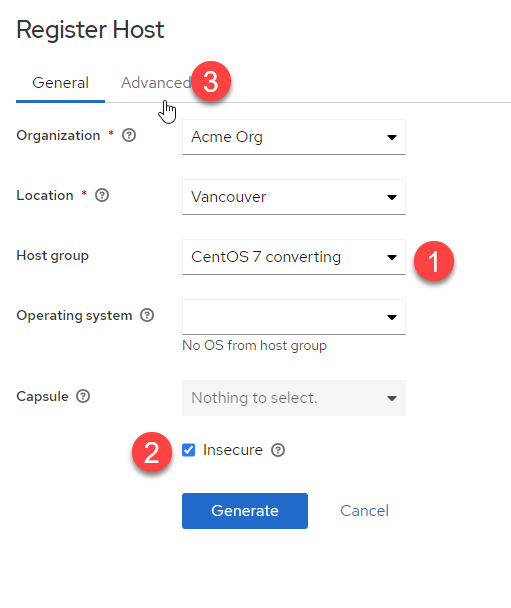
먼저 변환할 호스트를 등록해야 합니다. 이 경우 CentOS7 호스트를 변환합니다. Hosts(호스트) > Register Host(호스트 등록)를 클릭합니다.

테스트 CentOS 호스트에서 Satellite 서버의 인증 기관 파일을 복사하지 않았습니다. 여기에서 이 작업을 수행하는 방법에 대해 자세히 알아볼 수 있습니다.
호스트 등록 메뉴에서 1) "CentOS 7 converting(CentOS 7 변환 중)" 호스트 그룹, 2) "Insecure(비보안)", 3) "Advanced(고급)"를 차례로 선택합니다. "비보안" 옵션을 사용하면 자체 서명된 인증서를 확인하지 않고 처음에 스크립트를 실행할 수 있습니다. 이후의 통신은 완전히 보호됩니다. "비보안" 방법을 사용하지 않으려면 여기에서 인증서 가져오기에 대한 자세한 내용을 읽어보세요.
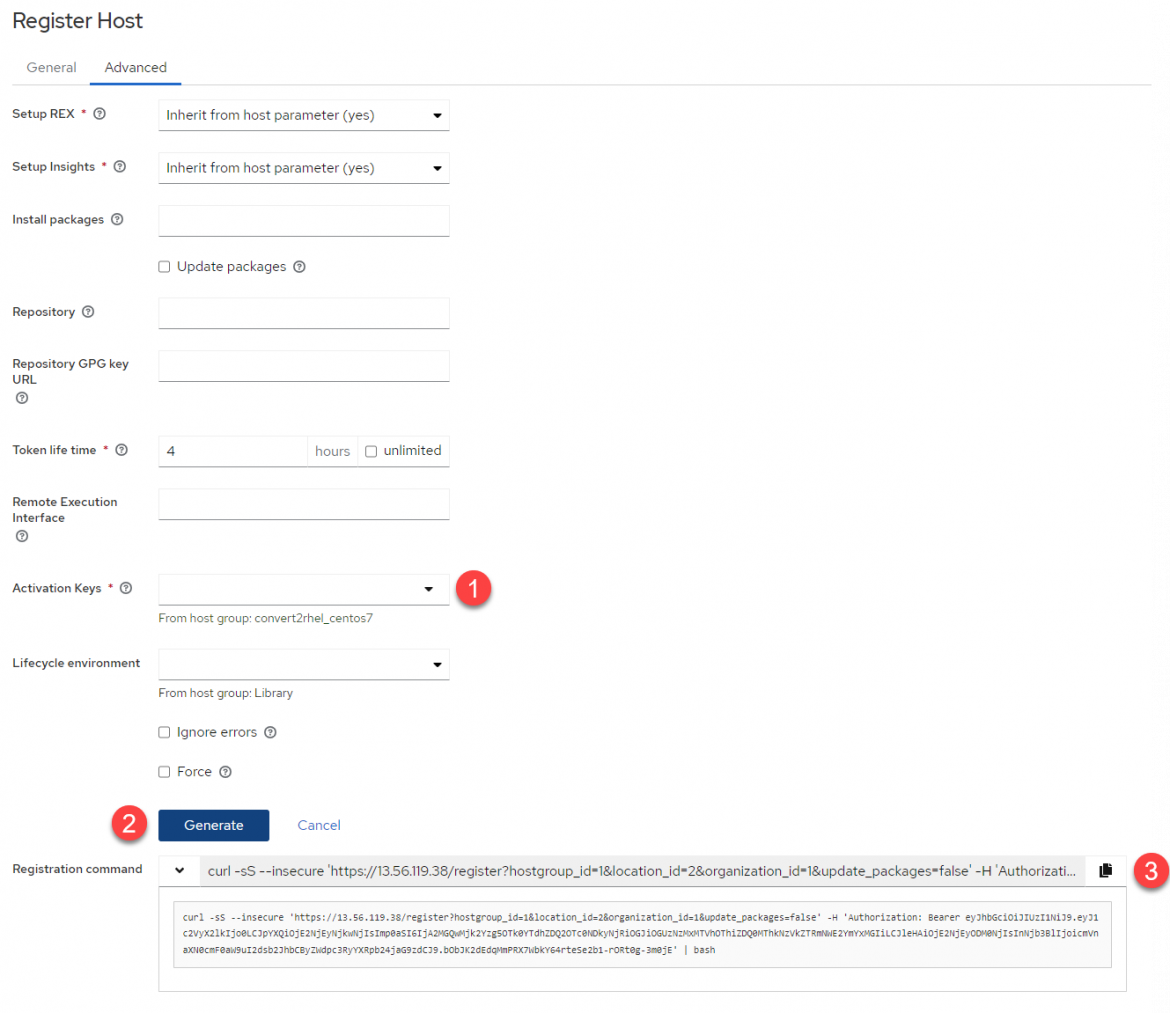
다음으로 "Advanced(고급)"를 클릭합니다.
"Register Host(호스트 등록)" 메뉴의 "Advanced(고급)" 컨텍스트에서 다음 태스크를 수행합니다.
-
"Activation Keys(활성화 키)"가 호스트 그룹 "convert2rhel_centos7"에서 상속되는지 확인합니다. 여기에서는 아무 것도 클릭할 필요가 없습니다.
-
"Generate(생성)"를 클릭합니다. 그러면 CentOS 호스트의 CLI에 복사하여 붙여넣을 cURL 스크립트가 생성됩니다.
-
Copy(복사) 버튼을 클릭하여 cURL 스크립트를 복사합니다.
이제 후보 호스트 중 하나에 로그인합니다. 호스트의 올바른 로캘을 내보냅니다.
export LANG=en_US.UTF-8
cURL 스크립트를 붙여넣고 실행합니다. 다음은 몇 가지 출력 예시입니다.
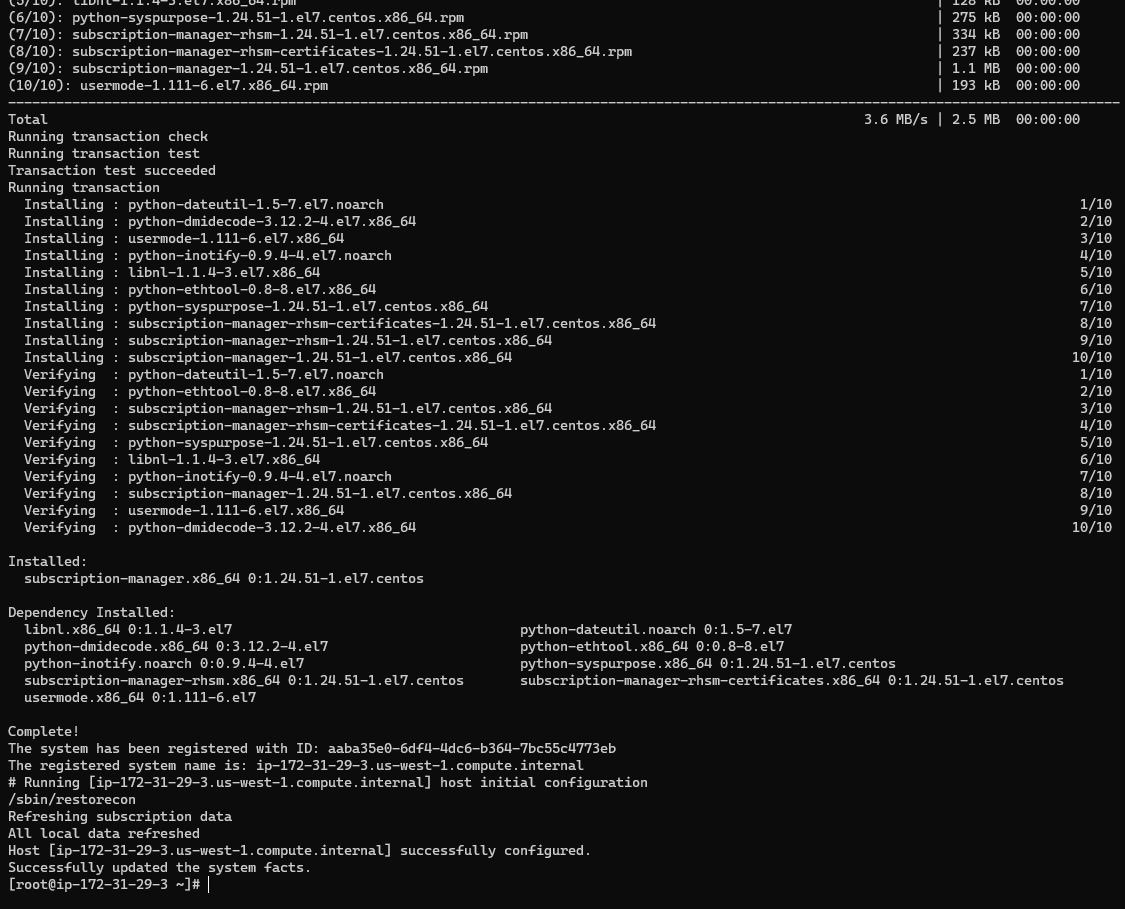
모든 후보 호스트에 대해 이 작업을 반복합니다.
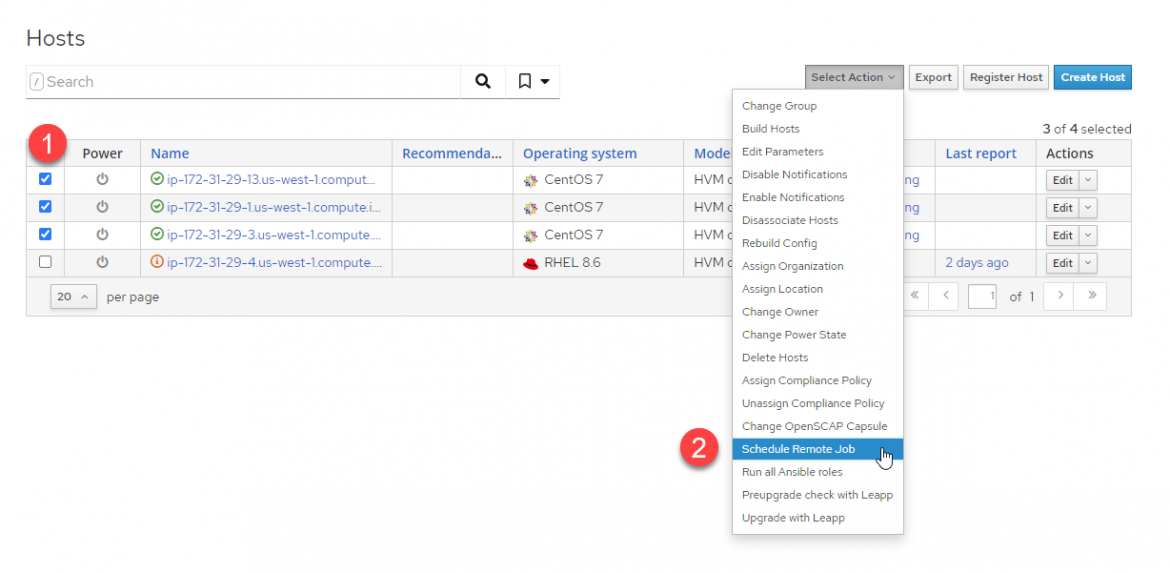
Hosts(호스트) 메뉴에 Satellite에 등록된 모든 CentOS 호스트가 표시됩니다.

Convert2RHEL 작업을 시작하려면 다음 태스크를 수행합니다.
-
후보 호스트를 선택합니다.
-
"Select Action(작업 선택)"을 클릭하고 "Schedule Remote Job(원격 작업 예약)"을 선택합니다.
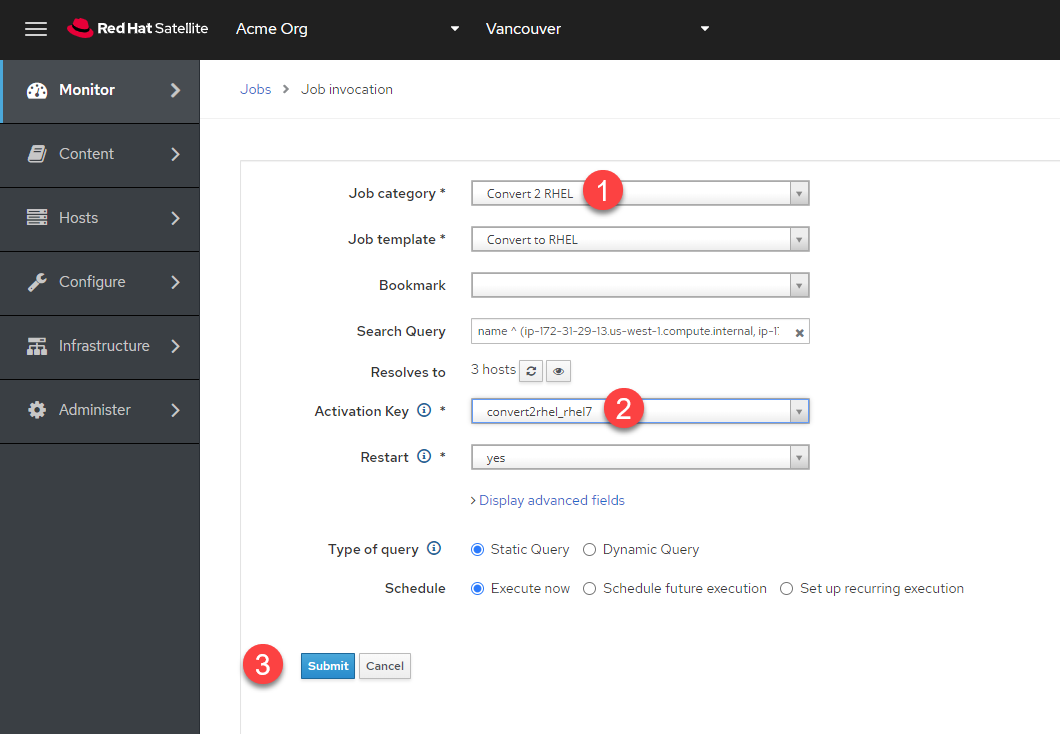
Job invocation(작업 호출) 메뉴에서 다음 태스크를 수행합니다.
-
"Job category(작업 카테고리)" 드롭다운에서 "Convert 2 RHEL"을 선택합니다.
-
"Activation Key(활성화 키)" 드롭다운에서 "convert2rhel_rhel7"을 선택합니다.
-
"Submit(제출)"을 클릭하여 대량 Convert2RHEL 작업을 시작합니다.
호스트를 클릭하여 각 호스트에서 작업의 실시간 상태를 보도록 선택할 수 있는 "Job Overview(작업 개요)" 메뉴로 리디렉션됩니다.

다음은 작업의 실시간 보기입니다.
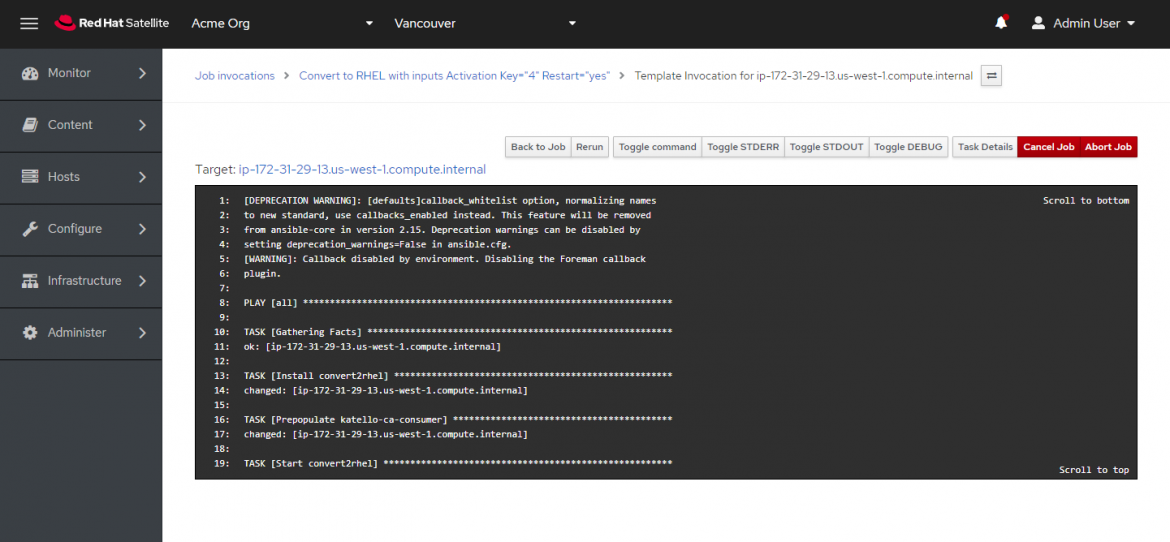
최종 결과, 모든 호스트가 한 번에 RHEL로 변환되었습니다!

자세한 내용은 여기에서 공식 Convert2RHEL 설명서를 참조하세요.
저자 소개
As a Senior Principal Technical Marketing Manager in the Red Hat Enterprise Linux business unit, Matthew Yee is here to help everyone understand what our products do. He joined Red Hat in 2021 and is based in Vancouver, Canada.
채널별 검색
오토메이션
기술, 팀, 인프라를 위한 IT 자동화 최신 동향
인공지능
고객이 어디서나 AI 워크로드를 실행할 수 있도록 지원하는 플랫폼 업데이트
오픈 하이브리드 클라우드
하이브리드 클라우드로 더욱 유연한 미래를 구축하는 방법을 알아보세요
보안
환경과 기술 전반에 걸쳐 리스크를 감소하는 방법에 대한 최신 정보
엣지 컴퓨팅
엣지에서의 운영을 단순화하는 플랫폼 업데이트
인프라
세계적으로 인정받은 기업용 Linux 플랫폼에 대한 최신 정보
애플리케이션
복잡한 애플리케이션에 대한 솔루션 더 보기
오리지널 쇼
엔터프라이즈 기술 분야의 제작자와 리더가 전하는 흥미로운 스토리
제품
- Red Hat Enterprise Linux
- Red Hat OpenShift Enterprise
- Red Hat Ansible Automation Platform
- 클라우드 서비스
- 모든 제품 보기
툴
체험, 구매 & 영업
커뮤니케이션
Red Hat 소개
Red Hat은 Linux, 클라우드, 컨테이너, 쿠버네티스 등을 포함한 글로벌 엔터프라이즈 오픈소스 솔루션 공급업체입니다. Red Hat은 코어 데이터센터에서 네트워크 엣지에 이르기까지 다양한 플랫폼과 환경에서 기업의 업무 편의성을 높여 주는 강화된 기능의 솔루션을 제공합니다.

