
Overview
Red Hat Advanced Cluster Security (RHACS) Central is installed with one administrator user by default. Typically, customers request an integration with existing Identity Provider(s) (IDP). RHACS offers different options for such integration. In this article, 2 IDPs will be configured as an example. First OpenShift Auth and second Red Hat Single Sign On (RHSSO) based on Keycloak
Prerequisites
1. OpenShift 4 Cluster
2. Advanced Cluster Security v3.66+
3. Red Hat SSO Operator installed
WARNING: While RHSSO will be installed during this article, only default and example values are used. These are by no means examples for a production system.
Introduction
Advanced Cluster Security comes with several default roles, which can be assigned to users:
|
System role |
Description |
|
Admin |
This role is targeted for administrators. Use it to provide read and write access to all resources. |
|
Analyst |
This role is targeted for a user who cannot make any changes, but can view everything. Use it to provide read-only access for all resources. |
|
Continuous Integration |
This role is targeted for CI (continuous integration) systems and includes the permission set required to enforce deployment policies. |
|
None |
This role has no read and write access to any resource. You can set this role as the minimum access role for all users. |
|
Sensor Creator |
Red Hat Advanced Cluster Security for Kubernetes uses this role to automate new cluster setups. It includes the permission set to create Sensors in secured clusters. |
|
Scope Manager |
This role includes the minimum permissions required to create and modify access scopes. |
NOTE: It is possible to create custom roles.
Configure RHACS Authentication: OpenShift Auth
NOTE: It is assumed that RHACS is already installed and login to the Central UI is available.
1. Login to your RHACS and select “Platform Configuration” > “Access Control”.
2. From the drop-down menu, Add auth provider select OpenShift Auth.

3. Enter a Name for your provider and select a default role which is assigned to any user who can authenticate.
It is recommended to select the role None, so new accounts will have no privileges in RHACS.
With Rules, you can assign roles to specific users, based on their userid, name, e-mail address, or groups.
For example, the user with the name poweruser gets the role Admin assigned.
Verify authentication with OpenShift Auth
1. Logout from the Central UI and reload the browser.
2. Select from the drop-down OpenShift Auth.

3. Try to login with a valid OpenShift user.
Depending on the Rules that have been defined during previous steps, the appropriate permissions should be assigned.
For example: If you login as user poweruser, the role Admin is assigned.
Configure Red Hat single sign on
The following steps will create some basic example objects to an existing RHSSO or Keycloak to test the authentication at RHACS.
Skip to step #5 if you have Keycloak already up and running and would like to reuse an existing client.
The RHSSO operator (or Keycloak) is installed at the namespace single-sign-on.
1. Create an instance of Keycloak:
apiVersion: keycloak.org/v1alpha1
|
2. Create a Realm.
This will create a Realm called Basic:
apiVersion: keycloak.org/v1alpha1
|
3. Login into Red Hat SSO.
Get the route to your RHSSO instance:
oc get route keycloak -n single-sign-on --template='{{ .spec.host }}'
|
and log into the Administration Interface.
4. Extract the admin password for Keycloak.
The secret name is built from "credential"<keycloak-instance-name>:
oc extract secret/credential-example-keycloak -n single-sign-on --to=- |
5. Be sure to select your Realm (Basic, in our case), go to Clients, and select a ClientID.
5.1 In this example, we select account:

NOTE: Of course, you can create or use any other Client.
5.2 Enable the option Implicit Flow.
6. Get the Issuer URL from your realm. This is typically your:
https://<KEYCLOAK_URL>/auth/realms/<REALM_NAME>
For example:
https://keycloak-single-sign-on.apps.cluster-29t8z.29t8z.sandbox677.opentlc.com/auth/realms/basic
Create test users
In RHSSO, create two user accounts to test the authentication later.
1. Go to Users and create the users:
1.1 User: acsadmin
1.2 User: user1
You can set any other values for these users. However, be sure to set a password for both, after they have been created.
Configure RHACS Authentication: RHSSO
NOTE: It is assumed that RSACS is already installed and login to the Central UI is available.
1. Login to your RHACS and select “Platform Configuration” > “Access Control”.
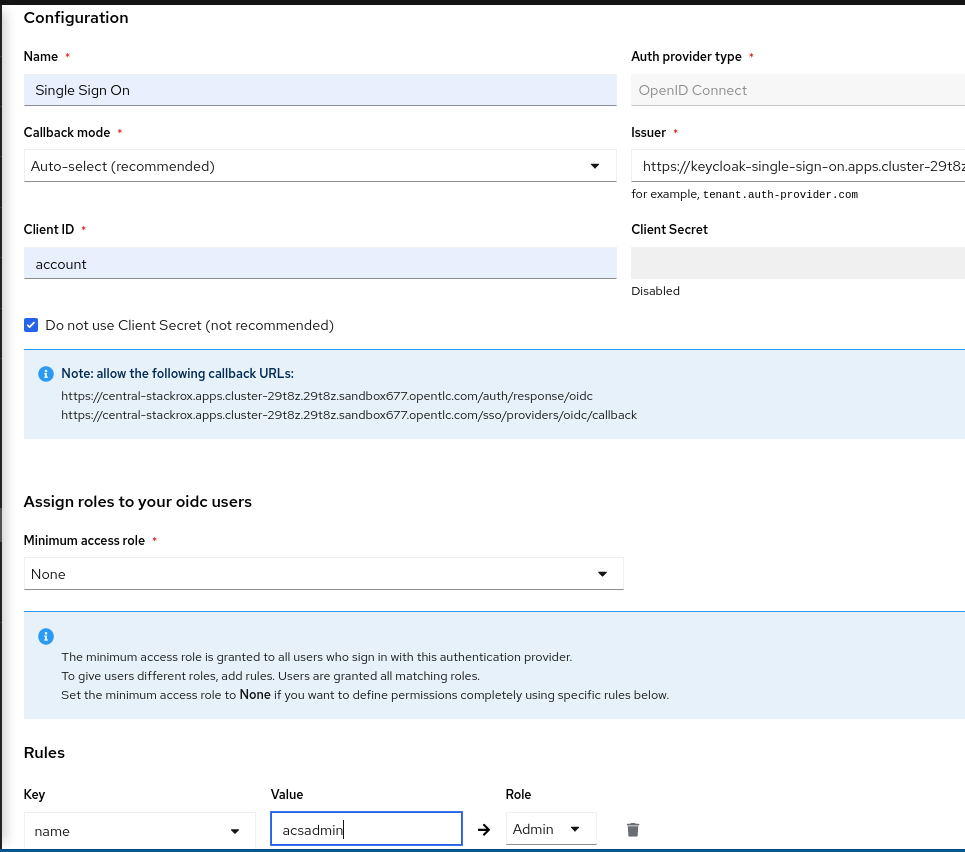
2. From the drop-down menu Add auth provider, select OpenID Connect.
2.1 Enter a “Name” for your provider, that is,. “Single Sign On”.
2.2 Leave the “Callback Mode” to the “Auto-Select” setting.
2.3 Enter your Issuer URL.
2.4 As Client ID, enter account (or the ClientID you would like to use).
2.5 Leave the Client Secret empty and select the checkbox Do not use Client Secret, which is good enough for our tests.
Remember the two callback URLs from the blue box. They must be configured in Keycloak.
2.6 Select a default role that is assigned to any user who can authenticate.
It is recommended to select the role None, so new accounts will have no privileges in RHACS.
2.7 With Rules, you can assign roles to specific users, based on their userid, name, e-mail address, or groups.
2.8 For example, the user with the name acsadmin (which had been created previously in our RHSSO) gets the role Admin assigned.
The final settings are depicted in the following image:
Continue RHSSO configuration
What is left to do is the configuration of redirect URLs. These URLs are shown in the ACS Authentication Provider configuration (see blue field in the image above)
1. Log back into RHSSO and select “Clients'' > “account”.
2. Into Valid Redirect URLs, enter the two URLs that you saved from the blue box in the RHACS configuration.
Troubleshoot: test login
In RHACS, you can test the login to your SSO.
1. Go to "Platform Configuration" > "Access Control".
2. Click the button "Test login".
A pop-up will appear that asks you to enter SSO credentials. The connection to RHSSO will be validated:

Verify authentication with OpenShift Auth
1. Logout from the Central UI and reload the browser.
2. Select from the drop-down Single Sign On.

3. Try to login with a valid SSO user.
Depending on the Rules that have been defined during previous steps, the appropriate permissions should be assigned.
For example, if you login as user acsadmin, the role Admin is assigned.
저자 소개

유사한 검색 결과
채널별 검색

오토메이션
기술, 팀, 인프라를 위한 IT 자동화 최신 동향

인공지능
고객이 어디서나 AI 워크로드를 실행할 수 있도록 지원하는 플랫폼 업데이트

오픈 하이브리드 클라우드
하이브리드 클라우드로 더욱 유연한 미래를 구축하는 방법을 알아보세요

보안
환경과 기술 전반에 걸쳐 리스크를 감소하는 방법에 대한 최신 정보

엣지 컴퓨팅
엣지에서의 운영을 단순화하는 플랫폼 업데이트

인프라
세계적으로 인정받은 기업용 Linux 플랫폼에 대한 최신 정보

애플리케이션
복잡한 애플리케이션에 대한 솔루션 더 보기

오리지널 쇼
엔터프라이즈 기술 분야의 제작자와 리더가 전하는 흥미로운 스토리
제품
- Red Hat Enterprise Linux
- Red Hat OpenShift Enterprise
- Red Hat Ansible Automation Platform
- 클라우드 서비스
- 모든 제품 보기
툴
체험, 구매 & 영업
커뮤니케이션
Red Hat 소개
Red Hat은 Linux, 클라우드, 컨테이너, 쿠버네티스 등을 포함한 글로벌 엔터프라이즈 오픈소스 솔루션 공급업체입니다. Red Hat은 코어 데이터센터에서 네트워크 엣지에 이르기까지 다양한 플랫폼과 환경에서 기업의 업무 편의성을 높여 주는 강화된 기능의 솔루션을 제공합니다.