
In this article, I will explain how we can easily deploy a traditional WebSphere application on Openshift Container Platform (OCP) on Google Cloud (GCP) and WebSphere application server. Openshift Container Platform (OCP) is a hybrid cloud enterprise Kubernetes application platform.
We will start by installing the Openshift Container Platform in Google Cloud using a simple single command. Following that, we will detail the steps on how a traditional WebSphere application can be deployed on a containerized WebSphere Application Server (WAS) running on OCP with zero code changes.
The steps needed to install Openshift Container Platform in Google Cloud Platform (GCP) and how to deploy the “Hitcount” application on the WebSphere Application Server are listed below
Preparatory Steps:
- Download OpenShift installer binary and OpenShift Command line client (oc)
- Pull secret to install OCP
- GCP - Google Cloud account, CLI tool, and a billing account
- DNS domain
- SSH key
Preparatory steps for openshift-install:
- Openshift binaries and pull secrets can be downloaded using this process. You can sign in to https://www.openshift.com/try and, select the self-managed option to get both the pull secret code and the required binaries for install and openshift CLI tools.
Obtain the pull secret from https://cloud.redhat.com/openshift/install/gcp/installer-provisioned.

- Specific versions of openshift-install binary and tools
To install a specific version of OCP, you will need the corresponding installer programs that can be executed from a laptop or a server. Use this link https://mirror.openshift.com/pub/openshift-v4/clients/ocp/ to choose the version; for example, to install container version 4.7.5, download executables from the following https://mirror.openshift.com/pub/openshift-v4/clients/ocp/4.7.5/
Download the file openshift-install-<os name>.... and unpackage the file to get the installer file “openshift-install” . Download and extract the install program for your operating system and place the file in the directory where you will store the installation configuration files.
For example: openshift-install-mac-4.7.5.tar.gz is the installer for the 4.7.5 to run on Mac OS
- Download the OpenShift command-line tools and add them to your PATH.
Download the file openshift-client-<os name>.... And unpackage the file to get oc and kubectl command line utilities.
For example: openshift-client-mac-4.7.5.tar.gz contains the client tools oc, kubectl
Preparatory steps for GCP:
- Google cloud account - cloud.google.com to get access to a Google GCP Account
- Install Google cloud SDK gcloud CLI tool - google-cloud-sdk from cloud.google.com/sdk/docs
- Create project in GCP from Google cloud console - eg. ocp4-on-gcloud-rh001-
- Initialize gcloud tool by running “gcloud init” setting the project name, compute region/zone eg. us-central1-a
- We need to enable the required services APIs for the project to allow the creation of required cloud resources:
- Since we will be using Installer provisioned infrastructure (IPI) to install OpenShift, you need to make sure there is enough availability of the following resources for the region. In Google console IAM & Admin menu option:
- DNS Domain will be required to host the OCP container.
- SSH key readiness - ssh-keygen -t ed25519 -N '' -f ~/.ssh/rsa_key_1
Or from CLI tool
export gcp_project = ocp4-on-gcloud-rh001
gcloud projects create ${gcp_project}
gcloud config set project ${gcp_project}
gcloud services enable compute..googleapis.com --project ${gcp_project}
gcloud services enable cloudapis.googleapis.com --project ${gcp_project}
gcloud services enable cloudresourcemanager.googleapis.com --project ${gcp_project}
gcloud services enable dns.googleapis.com --project ${gcp_project}
gcloud services enable iam.googleapis.com --project ${gcp_project}
gcloud services enable iamcredentials.googleapis.com --project ${gcp_project}
gcloud services enable servicemanagement.googleapis.com --project ${gcp_project}
gcloud services enable serviceusage.googleapis.com --project ${gcp_project}
gcloud services enable storage-api.googleapis.com --project ${gcp_project}
gcloud services enable storage-component.googleapis.com --project ${gcp_project}
gcloud services enable cloudbilling.googleapis.com --project ${gcp_project}
Link billing to the project:
gcloud alpha billing projects link ${gcp_project} --billing-account $(gcloud alpha billing account list | tail -l | awk ‘{print $1}’)
Note: When it is created in the console it will be automatically associated to the billing account
Verify GCP account is tied to a billing account by checking the Billing menu on the GCP console.
Service account is responsible for creating resources in google, so create a service account and attach it as a owner to the project:
export gcp_sa=ocp4-sa
gcloud iam service-accounts create ${gcp_sa}
gcloud projects add-iam-policy-binding ${gcp_project} --member "serviceAccount:${gcp_sa}@${gcp_project}.iam.gserviceaccount.com" --role "roles/owner"
gcloud iam service-accounts keys create ${HOME}/.gcp/osServiceAccount.json --iam-account ${gcp_sa}@${gcp_project}.iam.gserviceaccount.com

Edit quota and make a request for the Persistent Disk SSD (GB) for the region (for example, . us-central-1) from 500 GB to 950 GB. Similarly request CPUs increase from 24 to 32. Technically It could take a few hours, but we have noticed the requests get fulfilled in a few minutes.
DNS Domain:
This can be bought from the GCP itself or needs to be configured in GCP
(for example, synergyrh.com) or it can be subdomain like xyz.sandbox.abc.com. This can be bought directly from Google or from another DNS provider.


SSH key:
Have a key pair ready that can be used for debugging or recovery purposes
This will be used during installation, under a directory named .ssh from the main installation directory.
Openshift Installation:
We will be using Installer provisioned infrastructure option(IPI) with the following simple command: openshift-install create cluster --dir=./ocpproject/
You can choose any directory name instead of ocpproject.
Platform: choose gcp
Project ID
bradhak@abradhak-mac ~ % openshift-install create cluster --dir=./ocpproject/
? SSH Public Key /Users/abradhak/.ssh/rsa_key_1.pub
? Platform gcp
INFO Credentials loaded from file "/Users/abradhak/.gcp/osServiceAccount.json"
? Project ID ocp4-on-gcloud-rh001 (ocp4-on-gcloud-rh001)
? Region us-central1
? Base Domain synergyrh.com
? Cluster Name ocp4test
? Pull Secret [? for help] ***************************************************************
Note: Output will look something like this
INFO Creating infrastructure resources...     ****************************************INFO Waiting up to 20m0s for the Kubernetes API at https://api.ocp4test.synergyrh.com:6443... ********************
INFO Waiting up to 30m0s for bootstrapping to complete...
**INFO Destroying the bootstrap resources...
********INFO Waiting up to 40m0s for the cluster at https://api.ocp4test.synergyrh.com:6443 to initialize...
**INFO Waiting up to 10m0s for the openshift-console route to be created... ***INFO Install complete!
***INFO To access the cluster as the system:admin user when using 'oc', run 'export KUBECONFIG=/Users/abradhak/ocpproject/auth/kubeconfig'
**INFO Access the OpenShift web-console here: https://console-openshift-console.apps.ocp4test.synergyrh.com ****INFO Login to the console with user: "kubeadmin", and password: "Pev…...-Gens4" ******************************************************************************INFO Time elapsed: 43m4s
You can try some sample oc commands following the installation completion by executing
export KUBECONFIG=/Users/abradhak/ocpproject/auth/kubeconfig
oc get nodes

Application Deployment:
Log in to the openshift web console as seen in the output above (https://console-openshift-console.apps.ocp4test.synergyrh.com ) using kubeadmin and the password obtained from the installation logs
You can retrieve it by executing the below:
cat .openshift_install.log
Create a project in Openshift from the developer’s mode:

We will be using the Docker build strategy to build the application image.
Let us review the GitHub repo (https://github.com/gskumar1010/TA-klp-demo).
It has a Docker file, has the application’s .ear file and the WebSphere server’s configuration files (analyzed and generated using IBM Transformation advisor).
Dockerfile

# Install WebSphere application server from universal base image
FROM ibmcom/WebSphere-traditional:8.5.5.17-ubi
# Copy the application package ear file to the container working directory
COPY --chown=was:root defaultapplication.ear /work/config/defaultapplication.ear
# put app and scripts and properties in /work/config
# put external library (e.g db driver) in /work/config/lib
COPY --chown=was:root ./src/config /work/config
COPY --chown=was:root ./lib /work/config/lib
# Start the application server
RUN /work/configure.sh
The main point to be noted is there is “zero code change” required to migrate an existing WebSphere application to a container based deployment.
Building and Deploying Hitcount Application
Select the import from Docker file option and populate the following fields:
Git Repo URL - https://github.com/gskumar1010/TA-klp-demo
Use an application name and name as you may prefer (for example, ta-ark-demo-app).
Select the resource type to be generated as “Deployment Config,” and click on the Create button. This will start building and deploying the application to the OCP:

You can see the build logs under Builds -> Build details as seen below:


Now, let us review the topology view, as you can see the build success denoted by the green arrow.
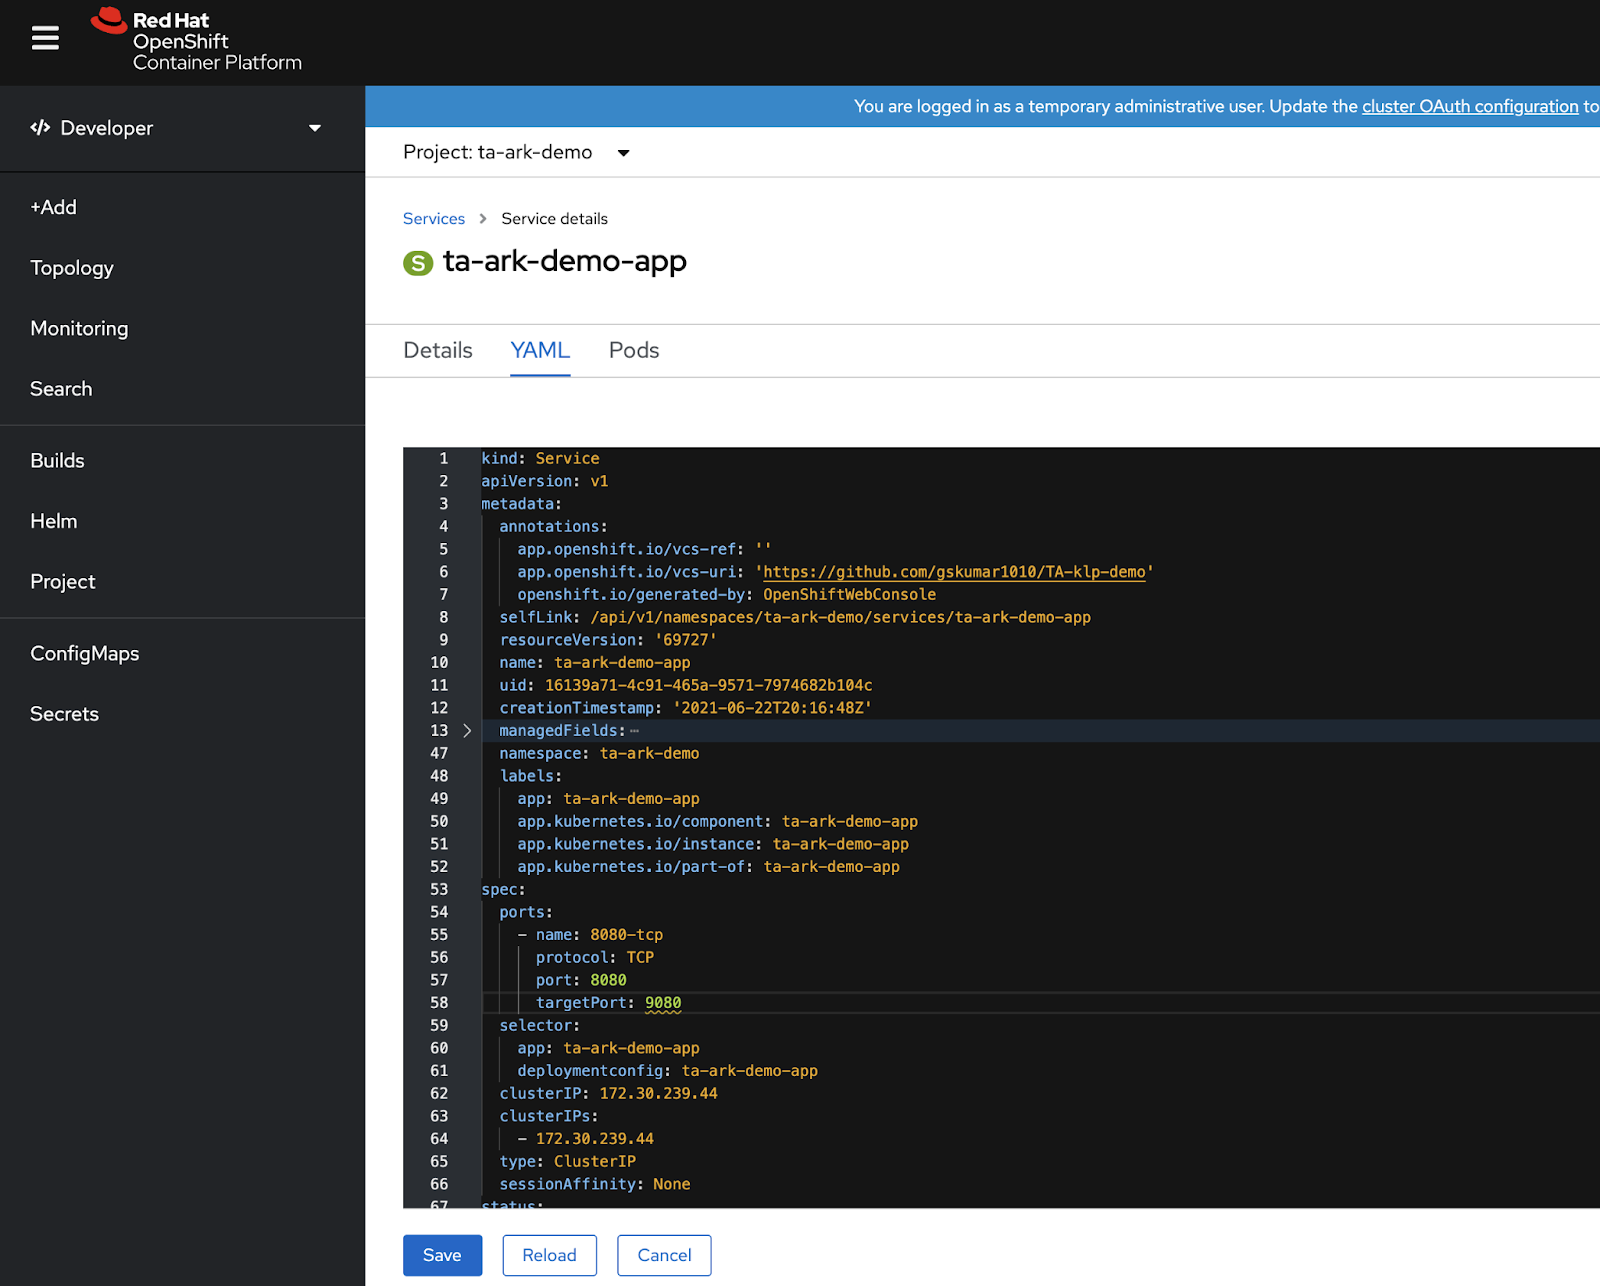
As seen in the below screen capture, modify the OpenShift Service’s port, target port, and name to use port 9080 instead of the default 8080. Click on the service and YAML tab to get to the below screen:

The application can be tested using the route location and adding the application name (hitcount)
http://ta-ark-demo-app-ta-ark-demo.apps.ocp4test.synergyrh.com/hitcount.
Select the inputs as specified to test the application a few times by using both Google Chrome and an alternate browser (Safari or Firefox) to verify the application.

Conclusion:
Rehosting a hitcount application on to OpenShift without making any code changes was demonstrated above. This is an indicator that other traditional WebSphere apps can be rehosted on OpenShift with zero application changes. Even bigger and complex IBM WebSphere applications can follow a similar approach to rehost, re-platform, and containerize in OpenShift on GCP and on other infrastructure easily and with zero application changes. Take a few minutes to check out the associated short videos in the reference section below.
References:
OpenShift Install:- Cluster installer main links: https://docs.openshift.com/container-platform/4.7/welcome/index.html
- On GCP: https://docs.openshift.com/container-platform/4.7/installing/installing_gcp/installing-gcp-default.html
We also created a series of videos demonstrating the deployment of the traditional WebSphere JEE application to a OCP cluster in Amazon Web Services (AWS), Microsoft Azure, Google Cloud Platfom(GCP), and on-premises VMWare VSphere.
- Rehosting Traditional WebSphere on OpenShift on AWS: https://www.youtube.com/watch?v=cRseDZ8xVac
- Rehosting Traditional WebSphere on OpenShift on Azure: https://www.youtube.com/watch?v=npRxP68LRKk
- Rehosting Traditional WebSphere on OpenShift on GCP: https://www.youtube.com/watch?v=z884QaH_yAE
- Rehosting Traditional WebSphere on OpenShift on-prem: https://www.youtube.com/watch?v=G_Xed1lWzQI
- Openshift 4.2 on Google cloud - https://www.youtube.com/watch?v=v17Taqza3ZU
- How to deploy tWAS on OpenShift for the sample above: https://github.com/gskumar1010/TA-klp-demo
- Building a tWAS application Image: https://github.com/WASdev/ci.docker.WebSphere-traditional
저자 소개

Abay Radhakrishnan has more than 30 years of experience in the consulting, IT and software fields with focus on emerging technologies. He plays a unique combination of an enterprise architect and cloud strategy and solutions architect. As a technical management personnel, he has deep experience in defining, architecting, managing and implementing large-scale enterprise architectures and solutions.
채널별 검색

오토메이션
기술, 팀, 인프라를 위한 IT 자동화 최신 동향

인공지능
고객이 어디서나 AI 워크로드를 실행할 수 있도록 지원하는 플랫폼 업데이트

오픈 하이브리드 클라우드
하이브리드 클라우드로 더욱 유연한 미래를 구축하는 방법을 알아보세요

보안
환경과 기술 전반에 걸쳐 리스크를 감소하는 방법에 대한 최신 정보

엣지 컴퓨팅
엣지에서의 운영을 단순화하는 플랫폼 업데이트

인프라
세계적으로 인정받은 기업용 Linux 플랫폼에 대한 최신 정보

애플리케이션
복잡한 애플리케이션에 대한 솔루션 더 보기

오리지널 쇼
엔터프라이즈 기술 분야의 제작자와 리더가 전하는 흥미로운 스토리
제품
- Red Hat Enterprise Linux
- Red Hat OpenShift Enterprise
- Red Hat Ansible Automation Platform
- 클라우드 서비스
- 모든 제품 보기
툴
체험, 구매 & 영업
커뮤니케이션
Red Hat 소개
Red Hat은 Linux, 클라우드, 컨테이너, 쿠버네티스 등을 포함한 글로벌 엔터프라이즈 오픈소스 솔루션 공급업체입니다. Red Hat은 코어 데이터센터에서 네트워크 엣지에 이르기까지 다양한 플랫폼과 환경에서 기업의 업무 편의성을 높여 주는 강화된 기능의 솔루션을 제공합니다.