
Automation helps increase efficiency, it saves time, and it improves consistency. This is why Red Hat Enterprise Linux (RHEL) includes features that help you automate many tasks. RHEL system roles is a collection of Ansible content that helps you provide consistent workflows and streamlined execution of manual tasks. Using the Podman system role, you can deploy rootless containers across several RHEL systems at scale, deploy a container on a local RHEL workstation for testing, and leverage systemd to keep your containers running.
Overview of Kubernetes YAML
To use the Podman system role to deploy a container, you must first specify the attributes of the container. This includes what container image to use, which network ports to expose, persistent storage, and more.
Rather than creating a new format for defining this information, the Podman system role utilizes Kubernetes YAML. Many people are already familiar with Kubernetes YAML, and using it eases the transition between Podman and Kubernetes-based solutions like Red Hat OpenShift.
For more information on the integration of Kubernetes YAML with Podman, see How to run Kubernetes workloads in systemd with Podman. Also refer to the manual page for podman-kube-play, which includes information on which Kubernetes YAML fields are supported by Podman.
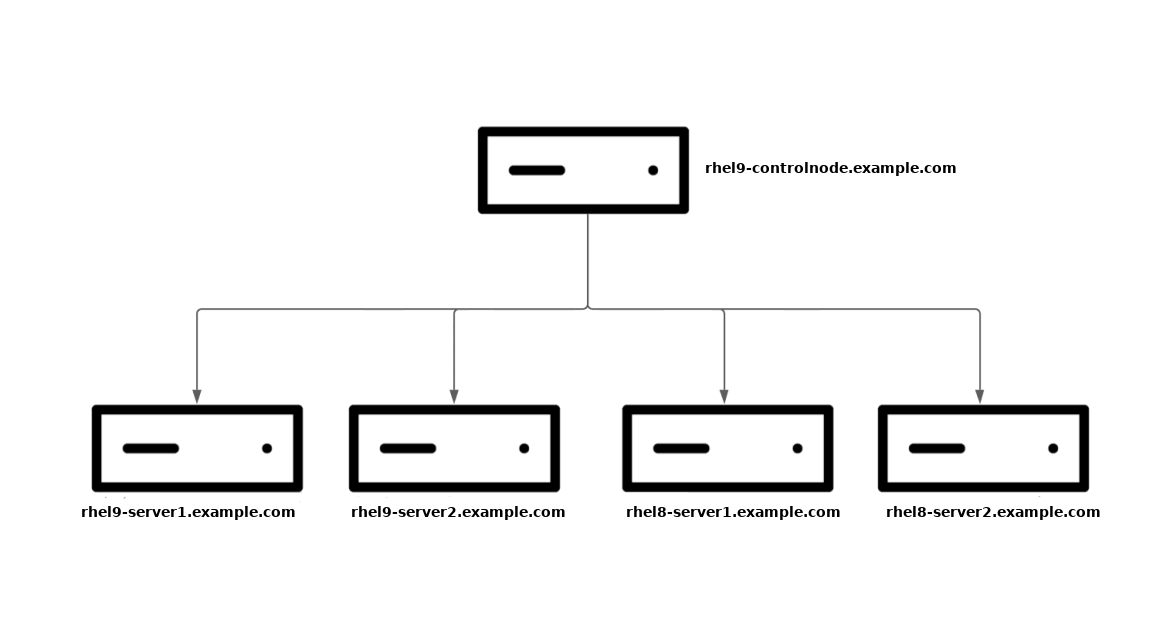
Environment overview
In my lab environment, I have a control node system named rhel9-controlnode.example.com and four managed nodes: rhel9-server1.example.com, rhel9-server2.example.com, rhel8-server1.example.com, and rhel8-server2.example.com. Three servers are running RHEL 9.2, and two servers are running RHEL 8.8.
I want to deploy a container across all four of the managed nodes, and to manage it with systemd so that it automatically starts at boot, with the following configuration:
- uses Red Hat ubi8/httpd-24 container image, which includes the Apache HTTP server
- runs rootless, using a standard user account
- maps port 8080 on the host to port 8080 within the container, accessible through the firewall so that it can be accessed remotely
- binds a mount from /home/brian/ubi-httpd-24-html on the host to /var/www/html within the container
In addition, I want the RHEL web console (including the Podman component of the web console) installed on each of the four managed nodes so I can easily validate that the container was properly deployed. I'll use the Cockpit system role to automate the deployment of the RHEL web console.
Create a Kubernetes YAML file
Start by defining the Kubernetes YAML file on the rhel9-controlnode.example.com host. Save the file as ubi8-httpd-24.yml and paste these contents into it:
apiVersion: v1
kind: Pod
metadata:
  name: ubi8-httpd-24
spec:
  containers:
    - name: ubi8-httpd-24
      image: registry.access.redhat.com/ubi8/httpd-24
      ports:
        - containerPort: 8080
          hostPort: 8080
      volumeMounts:
        - mountPath: /var/www/html:Z
          name: ubi8-httpd-24-html
  volumes:
    - name: ubi8-httpd-24-html
      hostPath:
        path: /home/brian/ubi8-httpd-24-html
Create the inventory file
Next, create an inventory file named inventory.yml on the rhel9-controlnode.example.com host. This file lists the four managed nodes to be configured, and it defines the role variables specifying the configuration that the Podman and Cockpit system roles should implement.
all:
  hosts:
    rhel9-server1.example.com:
    rhel9-server2.example.com:
    rhel8-server1.example.com:
    rhel8-server2.example.com:
  vars:
    #podman system role variables:
    podman_firewall:
      - port: 8080/tcp
        state: enabled
    podman_create_host_directories: true
    podman_host_directories:
      "/home/brian/ubi8-httpd-24-html":
        owner: brian
        group: brian
        mode: "0755"
    podman_kube_specs:
      - state: started
        run_as_user: brian
        run_as_group: brian
        kube_file_src: ubi8-httpd-24.yml

    #cockpit system role variables:
    cockpit_packages:
      - cockpit-podman
    cockpit_manage_firewall: true
At the top of the inventory file, there's a list of the four managed nodes.
The vars section defines variables for the Podman system role. The podman_firewall variable specifies that port 8080/tcp is open on the host firewall (the Kubernetes YAML file specified that the host port 8080 gets mapped to the container port 8080).
The podman_create_host_directories ensures that the role creates the /home/brian/ubi8-httpd-24-html directory, with the brian:brian owner and group and 0755 permissions, specified in the Kubernetes YAML file.
The podman_kube_specs variable specifies that the container is run as the brian:brian user and group, and uses the ubi8-httpd-24.yml file as the source of Kubernetes YAML.
At the bottom of the file, there are variables for the Cockpit system role. The cockpit_packages variable ensures that the cockpit-podman package is installed, and the cockpit_manage_firewall variable ensures that the RHEL web console port (9090/tcp) is open in the firewall.
If you're using Ansible automation controller as your control node, this Inventory can be imported into Red Hat Ansible Automation Platform using an SCM project or using the awx-manage Utility, as specified in the documentation.
Create the playbook
The last file required is an Ansible Playbook to call the RHEL system roles. Name this file system_roles.yml on the rhel9-controlnode.example.com host:
- name: Run podman RHEL system role
  hosts: all
  roles:
    - redhat.rhel_system_roles.podman

- name: Run cockpit RHEL system role
  hosts: all
  roles:
    - redhat.rhel_system_roles.cockpit
It's a simple playbook that just calls the Podman system role, and then the Cockpit system role.
If you're using Ansible automation controller as your control node, you can import this Ansible playbook into Red Hat Ansible Automation Platform. It's common to use Git repos to store Ansible playbooks. Ansible Automation Platform stores automation in units called Jobs, which contain the playbook, credentials, and inventory.
Run the playbook
At this point, everything is in place. Use the ansible-playbook command to run the playbook from the rhel9-controlnode.example.com host (which already has rhel-system-roles and ansible-core packages installed). The -b flag prompts Ansible to escalate privileges, and the -i option provides inventory.yml as the Ansible inventory.
$ ansible-playbook -i inventory.yml -b system_roles.yml
If you're using Ansible automation controller as your control node, you can launch the job from the automation controller web interface.
Validate that the playbook completed successfully:
PLAY RECAP *******************************************************
rhel8-server1.example.com : ok=68 unreachable=0 failed=0 skipped=54...
rhel8-server2.example.com : ok=68 unreachable=0 failed=0 skipped=54...
rhel9-server1.example.com : ok=68 unreachable=0 failed=0 skipped=54...
rhel9-server2.example.com : ok=68 unreachable=0 failed=0 skipped=54...
Validating the configuration
Next, validate that the Podman system role deployed the configuration as expected. Each of the four hosts should have the same configuration, so pick one to spot check, and open a web browser to the host on port 9090 (the default port for the RHEL web console) and log in.
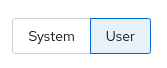
Start by clicking on Services in the web console menu. Then, in the upper right corner, click on User to see user level systemd services.
Type httpd in the search box.
The Podman system role created a new user level systemd service for the ubi8-httpd-24 container, which is running:

Click on the service name to see more information about the service.
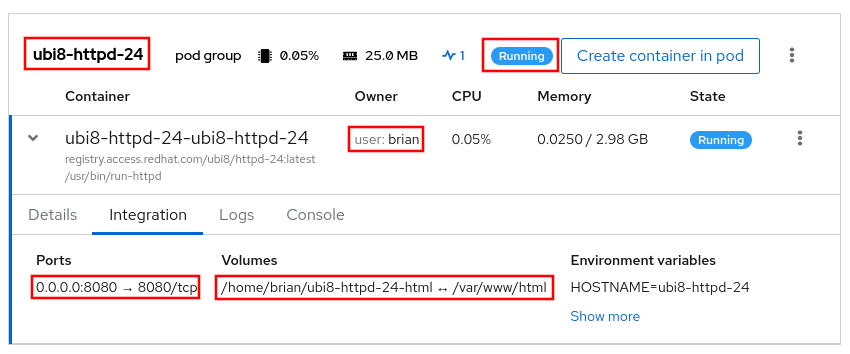
You can validate that the cockpit-podman package is installed by looking for Podman containers in the menu of the web console.

Click on Podman containers in the menu, and then click on the Start Podman button as required. The ub8-httpd-24 container is running on the system using a standard user account (in my case, brian). Port 8080 on the host is mapped to port 8080 within the container, and there's a bind mount from the host directory /home/brian/ubi8-httpd-24-html to the /var/www/html directory within the container:
Next, click on Terminal in the web console menu. Change to the /home/brian/ubi8-httpd-24-html directory, and then create an index.html file.
[rhel9-server1]$ cd /home/brian/ubi8-httpd-24-html/
[rhel9-server1]$ echo 'Hello world!' > index.html
To test this, connect to the rhel9-server1.example.com host on port 8080. You see the content of the index.html file:
$ curl rhel9-server1.example.com:8080
Hello world!
As a final test, validate that the systemd service starts the container at boot by rebooting the rhel9-server1.example.com host. Following the reboot, the container is automatically started and you're still able to connect to rhel9-server1.example.com on port 8080 to access the content you put in index.html.
Conclusion
The Podman system role helps you automate the configuration of Podman across your RHEL environment, more consistently and at scale. That's not the only system role Red Hat offers. There are many RHEL system roles that can help automate other important aspects of your RHEL environment. To explore additional roles, review the list of available RHEL system roles and start managing your RHEL servers in a more efficient, consistent and automated manner today.
Want to learn more about the Red Hat Ansible Automation Platform? Check out our e-book the automation architect's handbook.
Sobre o autor

Brian Smith is a Product Manager at Red Hat focused on RHEL automation and management. He has been at Red Hat since 2018, previously working with Public Sector customers as a Technical Account Manager (TAM).
Navegue por canal

Automação
Últimas novidades em automação de TI para empresas de tecnologia, equipes e ambientes

Inteligência artificial
Descubra as atualizações nas plataformas que proporcionam aos clientes executar suas cargas de trabalho de IA em qualquer ambiente

Nuvem híbrida aberta
Veja como construímos um futuro mais flexível com a nuvem híbrida

Segurança
Veja as últimas novidades sobre como reduzimos riscos em ambientes e tecnologias

Edge computing
Saiba quais são as atualizações nas plataformas que simplificam as operações na borda

Infraestrutura
Saiba o que há de mais recente na plataforma Linux empresarial líder mundial

Aplicações
Conheça nossas soluções desenvolvidas para ajudar você a superar os desafios mais complexos de aplicações

Programas originais
Veja as histórias divertidas de criadores e líderes em tecnologia empresarial
Produtos
- Red Hat Enterprise Linux
- Red Hat OpenShift
- Red Hat Ansible Automation Platform
- Red Hat Cloud Services
- Veja todos os produtos
Ferramentas
- Treinamento e certificação
- Minha conta
- Suporte ao cliente
- Recursos para desenvolvedores
- Encontre um parceiro
- Red Hat Ecosystem Catalog
- Calculadora de valor Red Hat
- Documentação
Experimente, compre, venda
Comunicação
- Contate o setor de vendas
- Fale com o Atendimento ao Cliente
- Contate o setor de treinamento
- Redes sociais
Sobre a Red Hat
A Red Hat é a líder mundial em soluções empresariais open source como Linux, nuvem, containers e Kubernetes. Fornecemos soluções robustas que facilitam o trabalho em diversas plataformas e ambientes, do datacenter principal até a borda da rede.
Selecione um idioma
Red Hat legal and privacy links
- Sobre a Red Hat
- Oportunidades de emprego
- Eventos
- Escritórios
- Fale com a Red Hat
- Blog da Red Hat
- Diversidade, equidade e inclusão
- Cool Stuff Store
- Red Hat Summit