
This blog post details an example of using Kubeflow and its MPI operator on top of OpenShift. You can find the supporting materials for the blog post in this repository.
Background
The growing adoption of Kubernetes provides a new opportunity to shed legacy HPC infrastructures. Kubernetes is effectively a general purpose scheduling system for containers. As many MPI-based workloads are already written on Linux, they can be easily containerized. The Kubeflow project has an early-stage operator that handles MPI applications.
OpenFOAM is an application suite used for computational fluid dynamics (CFD) analysis. It is capable of processing large jobs in parallel using MPI. These jobs frequently involve large numbers of processors (CPUs). For an organization with a large Kubernetes cluster at its disposal, making use of these large processor pools to perform MPI jobs in their spare time seems logical. Further, in cloud-based environments like AWS (where this example is designed to run), organizations can make use of the autoscaling features inside Kubernetes to simply create the capacity required to fulfill the MPI job's requirements.
Deeper descriptions of MPI, workers, processors, and etc. is outside of the scope of this example. Knowledge of CFD and OpenFOAM is also outside of the scope of this example. Some understanding of both MPI and OpenFOAM is assumed, but not required. A solid grasp of Kubernetes and, to a degree, OpenShift, is assumed.
Base Requirements and Prerequisites
This example was constructed on an OpenShift 4.9 cluster using the Kubeflow MPI Operator version 0.3. It also makes use of an OpenShift Data Foundation (ODF) CephFS deployment to provide the RWX storage necessary for each of the MPI workers to access the OpenFOAM data.
OpenFOAM v9 was used along with some of its parallel processing tutorial examples. Additionally, a more complicated real-world example of aerodynamic CFD analysis of vehicles was graciously provided by Morlind Engineering. As of the creation of this example, ODF does not have any non-replicated mode and, as such, requires at least 3 OpenShift (Kubernetes) nodes to be able to be properly installed.
The following subsections detail the steps to prepare to run the damBreak example.
OpenShift
OpenShift 4.9 was installed using the Installer-Provisioned Infrastructure (IPI) method against an Amazon Web Services (AWS) environment using m5a.4xlarge instance types for the OpenShift worker nodes.
It is assumed that you will also grab the oc command-line client, and that you will be logged into your cluster as some user with cluster-admin privileges.
OpenShift Data Foundation
OpenShift Data Foundation was installed via the OperatorHub within OpenShift as a user with cluster-admin privileges:
- Click Operators -> OperatorHub in the left-hand navigation of the Administrator perspective.
- Find the OpenShift Data Foundation operator tile and click it.
- Click Install
- Leave all of the default options and click Install again.
The Operator provides the capability for instaling the ODF solution. If you want to learn more about Operators, you can learn more from the Operator Pattern documentation.
Once the Operator is installed:
- Click on Operators -> Installed Operators in the left-hand navigation of the Administrator perspective.
- Find the
openshift-storageproject at the top in the drop-down menu. - Click on the OpenShift Data Foundation Operator.
- Click on the blue Create StorageSystem button.
- Click Next on the first screen.
- Select at least 3 nodes and click Next on the second screen.
- Click Next on the third screen.
- Finally, click Create StorageSystem on the last screen.
Occasionally you may get a 404 error in the OpenShift web console if you have not sufficiently refreshed the page (eg: Ctrl+F5) and certain content is either cached or not cached. Go ahead and do a hard browser refresh at this time.
- Click on Storage -> OpenShift Data Foundation in the left-hand navigation of the Administrator perspective.
- Click on the Storage Systems tab.
You now will want to wait until the StorageSystem status reports as ready. The ODF operator is currently provisioning all of the resources it needs to be able to provide a CephFS cluster on top of the gp2 storage volumes (which themselves are on top of AWS EC2 EBS).
Cluster Autoscaling
Whether or not you want to auto-scale your cluster is up to you. It is trivial in most Kubernetes environments to add additional nodes to your cluster to support your desired workload. The big example at the end of this tutorial will consume 512 cores across many pods. You will need sufficient nodes in your cluster to accommodate the cores you want to run.
In OpenShift you use a ClusterAutoscaler that enables auto scaling at the cluster level, and then you create MachineAutoScalers for the MachineSets you want to enable scaling. For more details on autoscaling OpenShift clusters, check the documentation.
As the configuration of autoscaling involves some details that are highly specific to your deployed cluster, sample YAML files are not included.
Kubeflow MPI Operator
The Kubeflow MPI Operator needs to be installed. The installation process also creates a CustomResourceDefinition for an mpijob object, which is how you will define the MPI job that you want the cluster to run.
You will want to clone the MPI Operator repository somewhere. From the MPI Operator repository clone folder:
git checkout v0.3.0oc create -f deploy/v2beta1/mpi-operator.yaml
This will create a namespace with all of the required elements to deploy the operator. Wait for the pod for the MPI Operator to be deployed and ready before continuing.
MPI Job
The following sections detail getting the MPI data into the cluster and then running the example MPI job. It is recommended that you deploy the following assets into their own namespace (Project, in OpenShift parlance). For this example we will refer to the cfd Project.
CFD Project
Create a new Project in OpenShift called cfd. You can do this using the oc CLI or the web console.
Security Context Constraints (SCC)
OpenShift layers additional security features and defaults on top of vanilla Kubernetes. One of these things is SCCs. You can learn about Security Context Constraints here. By default, OpenShift does not allow containers to run as specific users/UIDs, and it randomizes them. While OpenSSH (for MPI) and OpenFOAM can be made to work with completely randomized UIDs, it's a lot of effort, and, for this example, it was decided to relax the SCC defaults to allow AnyUID:
oc adm policy add-scc-to-user anyuid -z default -n cfd
The above command allows the default ServiceAccount to use the anyuid SCC when it deploys Pods. This means that our OpenFOAM pod, which wants to be user 98765, can be.
Persistent Volume Claim
You will need some storage to attach the file manager and the CFD workers to. Be sure to create the following file in the Project you created:
oc create -f manifests/filemanager-pvc.yaml -n cfd
This PVC assumes that you used the default storage class names when you deployed OpenShift Data Foundation.
Check the status of the PVC to make sure that it is successfully bound.
Tiny File Manager
There are supporting manifests in the manifests folder for deploying a PHP-based file manager program, Tiny File Manager, and a corresponding volume claim. The PersistentVolumeClaim will grab a small amount of RWX storage, and you can then upload the damBreak example from the examples folder in order to do your pre-processing.
A separate repository has a Containerfile which can be used to build the Tiny File Manager into a RHEL8 UBI-based Apache and PHP S2I image. Although Source-to-Image (S2I) was not used to build the resulting container, the RHEL8 UBI Apache S2I image already has the proper security modifications in order to easily be used in an OpenShift environment. You can find more information about the S2I image here. The image is also hosted on Quay.io: https://quay.io/repository/openshiftdemos/tinyfilemanager-php-ubi
You can deploy the file manager with the following:
oc create -f manifests/filemanager-assets.yaml -n cfd
This will also create a Service and a Route so that you can access the file manager outside the cluster. Check the URL for the Route. Note that HTTPS is not enabled for this route. The effective URL to use is (make sure to check your own base FQDN):
The default username and password for Tiny File Manager is used:
admin / admin@123
- In the Tiny File Manager, click into the
storagefolder - Click the
Uploadbutton at the top right. - Drag the local
damBreakfolder (from this repository) into the file manager window to upload it recursively
That's it!
OpenFOAM MPI Launcher/Worker Container Image
Podman was used locally to build the OpenFOAM container image to go with the MPI operator. You can find its Containerfile and supporting files in this repository. The image is also currently being hosted on Quay.io: https://quay.io/repository/openshiftdemos/kubeflow-mpi-openfoam
The MPI operator uses a concept of a Launcher pod (which is where mpirun originates) and Worker pods, which are the targets of the mpirun command. There is no reason that both the Launcher and the Worker cannot be the same container image. This tutorial uses the same container image for both.
OpenFOAM's CFD analysis process involves several steps. You can actually perform some of the pre- and post-processing steps inside a running container using rsh or exec. However, you can also include the steps in your pre- and post-processing in a script, and then mount that script into the Launcher pod and make that script be the entry execution point of the Launcher. We have staged precisely that scenario for you in the subsequent steps.
OpenFOAM MPI Script ConfigMap
An easy way to mount files into a container in Kubernetes is using a ConfigMap. The sequence of steps in performing the damBreak MPI job is contained in a bash script in the dambreak-configmap.yaml file. Go ahead and create this ConfigMap:
oc create -f manifests/dambreak-configmap.yaml -n cfd
OpenFOAM MPI Job
At this point you are ready to run your OpenFOAM MPI job. Take a look at the mpijob-dambreak-example.yaml manifest to see the structure of an mpijob. The MPI Operator repository provides more details. To paraphrase, our mpijob has 4 worker Replicas, and our mpirun command specifies 4 processors. Both the Launcher and the Worker are both using our OpenFOAM image, and the rest of the arguments to mpirun come from the OpenFOAM project. Go ahead and create the mpijob manifest now:
oc create -f manifests/mpijob-dambreak-example.yaml -n cfd
When you look at the Pods that are subsequently created, you will notice that the launcher reports an Error state and ends up in a CrashLoopBackoff. This is because of this issue which is related to how OpenShift handles DNS resolution of service names.
Eventually the launcher should get into Running state. If you check its logs, you will see a lot of this:
smoothSolver:  Solving for alpha.water, Initial residual = 0.00193684, Final residual = 3.40587e-09, No Iterations 3
Phase-1 volume fraction = 0.124752  Min(alpha.water) = -2.76751e-09  Max(alpha.water) = 1
MULES: Correcting alpha.water
MULES: Correcting alpha.water
Phase-1 volume fraction = 0.124752  Min(alpha.water) = -2.76751e-09  Max(alpha.water) = 1
DICPCG:  Solving for p_rgh, Initial residual = 0.0343767, Final residual = 0.0016133, No Iterations 5
time step continuity errors : sum local = 0.000480806, global = -4.75907e-08, cumulative = 7.68955e-05
DICPCG:  Solving for p_rgh, Initial residual = 0.00181566, Final residual = 8.38192e-05, No Iterations 33
time step continuity errors : sum local = 2.42908e-05, global = 3.04705e-06, cumulative = 7.99426e-05
DICPCG:  Solving for p_rgh, Initial residual = 0.000251337, Final residual = 8.59604e-08, No Iterations 109
time step continuity errors : sum local = 2.49879e-08, global = -9.43014e-10, cumulative = 7.99416e-05
ExecutionTime = 22.2 s  ClockTime = 23 s

Courant Number mean: 0.076648 max: 1.01265
Interface Courant Number mean: 0.00417282 max: 0.936663
deltaT = 0.0010575
Time = 0.11616
It's working!
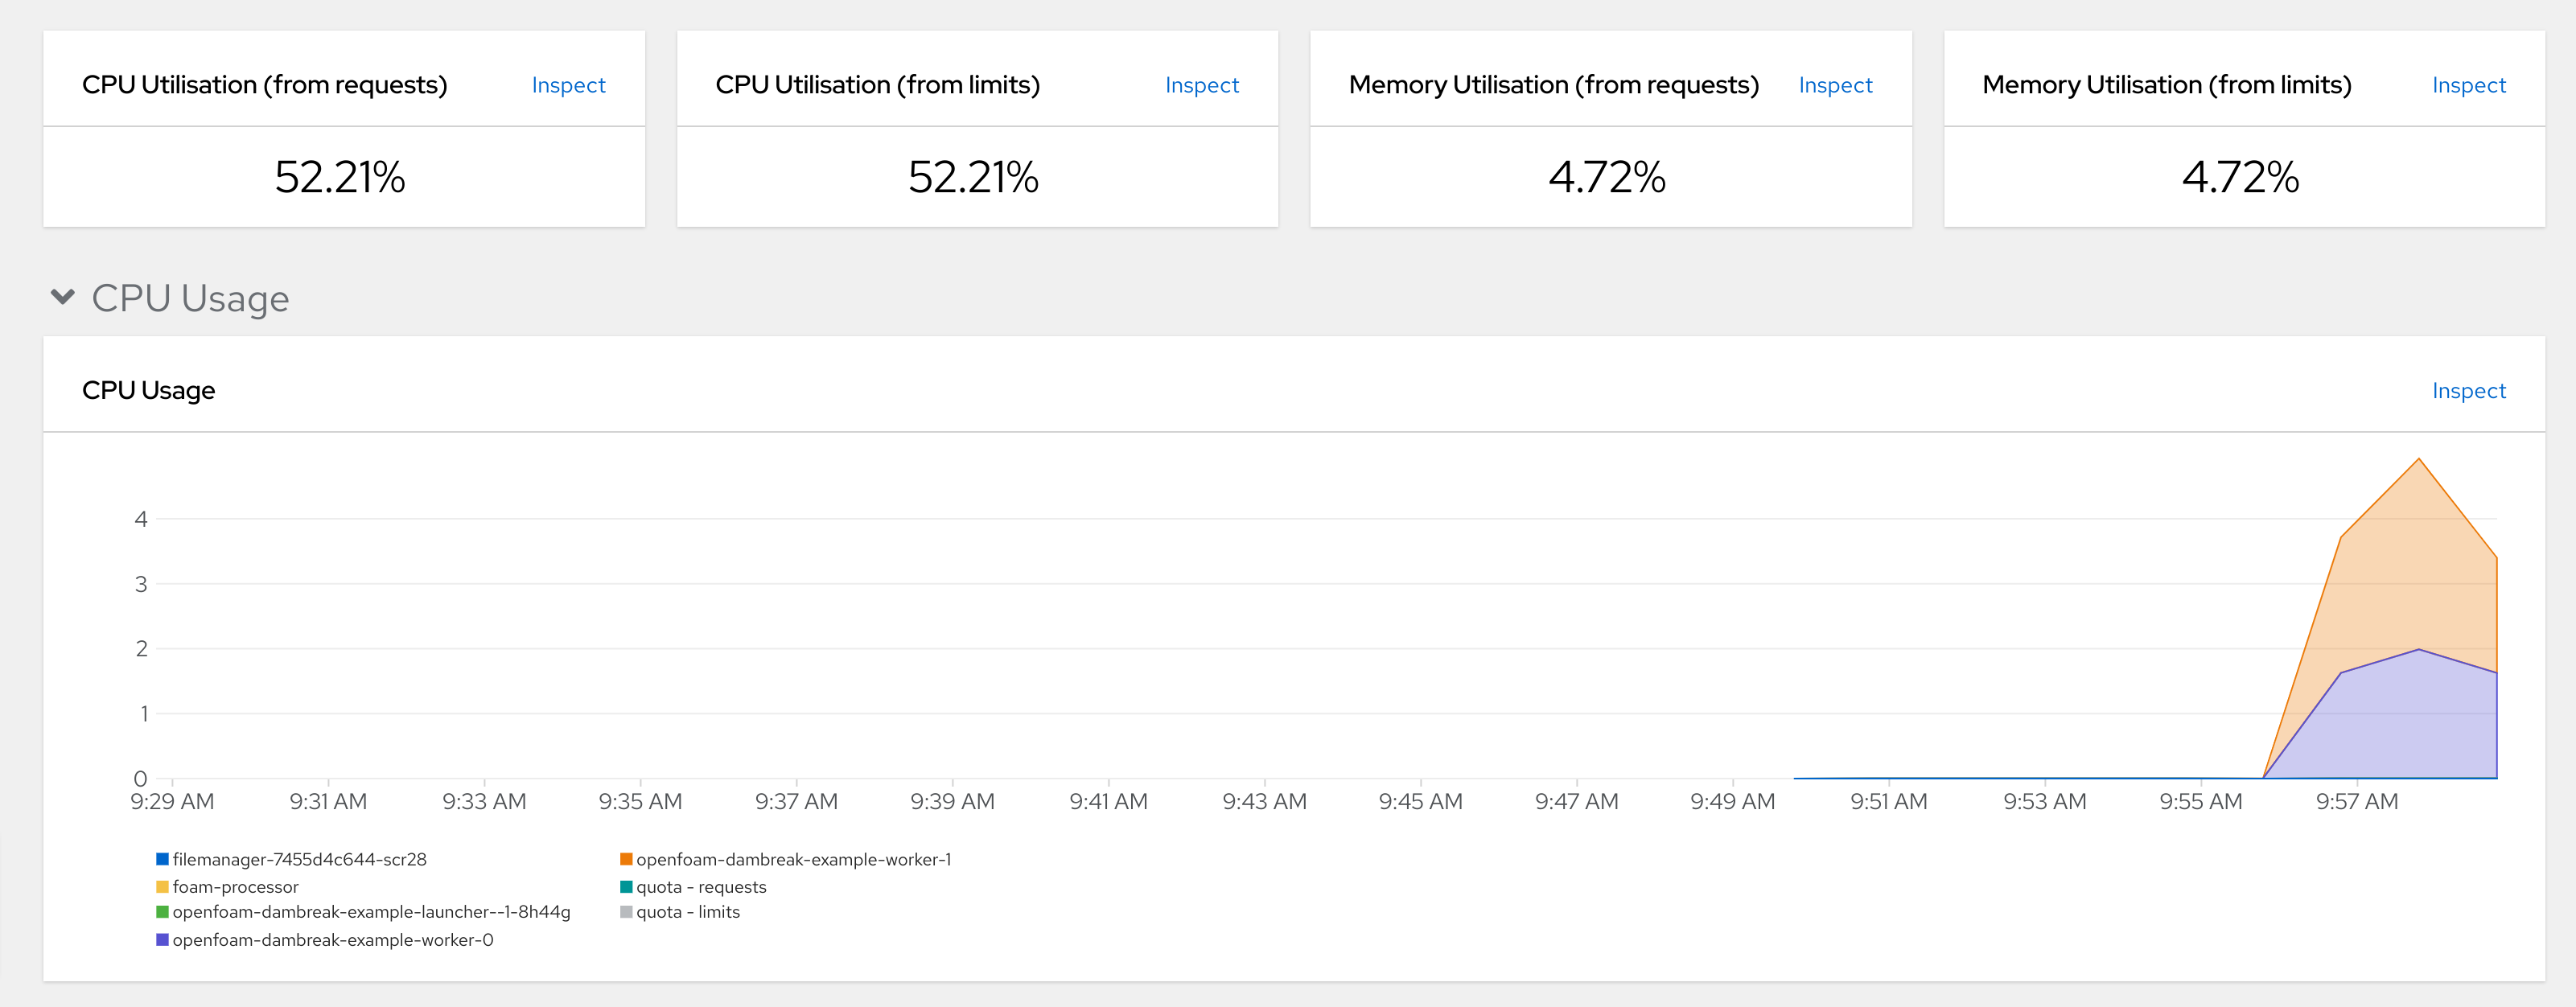
With four processors on an m5a.4xlarge instance type, this job takes 800 seconds or less depending on how fast your cluster is able to fetch the container images, and other factors.
An example picture from OpenShift's metrics dashboard shows the project in action:
Slots per Worker
In our example we used a replica count of 2 on the Workers, but specified -np 4 for mpirun. How does this work? In the MPI job we have specified slotsPerWorker: 2 which causes the MPI operator to configure the MPI hosts file to specify that each worker has 2 slots, or processors. The MPI job further includes a limit/request for 2 CPUs for each Worker pod. If you were to rsh or exec sh into one of the worker pods and execute top, you would see that two cores are being used:
...
    152 openfoam  20   0  312992  98708  80856 R  96.7   0.2   3:09.63 interFoam
    151 openfoam  20   0  313084  98752  80780 R  96.3   0.2   3:08.58 interFoam
...
Depending on the nature of your environment, you may wish to run more slotsPerWorker in order to reduce the total number of Pods that get scheduled by the MPI operator. There are varying support limits for the number of pods-per-node depending on your Kuberetes distribution. OpenShift currently supports 250 pods per node and this is the default limit. If you were running your environment directly on very large hardware with a huge number of cores, having slotsPerWorker: 1 could result in attempting to schedule too many pods on your nodes and the resulting MPI job would fail.
Also, attempting to schedule very large numbers of pods simultaneously can result in system instability. On the flip side, trying to fit larger Pods that require more cores can also be challenging if your MPI job is running in an otherwise busy Kubernetes cluster. Lastly, each Pod is making a connection to the storage system, which results in higher throughput (on the network) and more disk access. Too many Pods will eventually decrease performance as the storage subsystem starts to become a limiting factor. Finding a good balance of slots versus Pod size versus total Pods will be dependent on your environment.
Other Examples
There are two other examples and corresponding manifests included in this repository.
Motorbike
The motorbike example is included with the OpenFoam project, just like the dam break example.

It is configured for 12 total processors with 2 slots per worker and 6 pods. It took about 8 minutes in our environment, and you can also see the dam break job that took place right before it:

Morlind Engineering Wing
Morlind Engineering was kind enough to lend us a model and some other relevant OpenFOAM files for one of their race car airfoils:

There are example manifests included for this job as well. While it is currently set up for 512 processors, with 2 slots per worker and 256 pods, this is not an optimal configuration. The job took about 5 hours in our example environment, which is not great compared to Morlind's own physical server cluster running OpenFOAM with only half the processors. This is likely due to storage throughput, poor subdivision of the job, and lots of small jobs.
With some care and tweaking, you could easily find different Amazon instance types with faster storage, better CPUs, and different slots-per-worker and pod count configurations that would dramatically improve performance.
Using something much larger, such as an EC2 c6i.24xlarge compute-optimized instance, would likely offer better results. This instance type has 96 cores, and would allow you to run your job with 90+ slots-per-worker (leaving some headroom for OpenShift's node processes) across 3 pods / 3 nodes which would be a minimum of 270 cores.
Additionally, OpenShift Data Foundations is running on non-storage-optimized hosts with basic GP2 storage. This likely also leaves room for improvement.
Sobre o autor

Mais como este
Navegue por canal

Automação
Últimas novidades em automação de TI para empresas de tecnologia, equipes e ambientes

Inteligência artificial
Descubra as atualizações nas plataformas que proporcionam aos clientes executar suas cargas de trabalho de IA em qualquer ambiente

Nuvem híbrida aberta
Veja como construímos um futuro mais flexível com a nuvem híbrida

Segurança
Veja as últimas novidades sobre como reduzimos riscos em ambientes e tecnologias

Edge computing
Saiba quais são as atualizações nas plataformas que simplificam as operações na borda

Infraestrutura
Saiba o que há de mais recente na plataforma Linux empresarial líder mundial

Aplicações
Conheça nossas soluções desenvolvidas para ajudar você a superar os desafios mais complexos de aplicações

Programas originais
Veja as histórias divertidas de criadores e líderes em tecnologia empresarial
Produtos
- Red Hat Enterprise Linux
- Red Hat OpenShift
- Red Hat Ansible Automation Platform
- Red Hat Cloud Services
- Veja todos os produtos
Ferramentas
- Treinamento e certificação
- Minha conta
- Suporte ao cliente
- Recursos para desenvolvedores
- Encontre um parceiro
- Red Hat Ecosystem Catalog
- Calculadora de valor Red Hat
- Documentação
Experimente, compre, venda
Comunicação
- Contate o setor de vendas
- Fale com o Atendimento ao Cliente
- Contate o setor de treinamento
- Redes sociais
Sobre a Red Hat
A Red Hat é a líder mundial em soluções empresariais open source como Linux, nuvem, containers e Kubernetes. Fornecemos soluções robustas que facilitam o trabalho em diversas plataformas e ambientes, do datacenter principal até a borda da rede.
Selecione um idioma
Red Hat legal and privacy links
- Sobre a Red Hat
- Oportunidades de emprego
- Eventos
- Escritórios
- Fale com a Red Hat
- Blog da Red Hat
- Diversidade, equidade e inclusão
- Cool Stuff Store
- Red Hat Summit