In the previous post the internals of the vDPA kernel framework were covered. Putting the theory aside, the proof is in the pudding so now it’s time to get our hands dirty and try vDPA out. The obvious issue is the vDPA is a HW based feature requiring vendor NICs that support it. So how can we test vDPA when we don’t have such cards? What can we use instead of real hardware?
|
Please note: If your kernel version is newer than v5.19-rc1, please refer to the updated version of this article. |
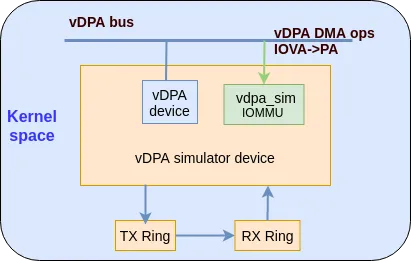
The answer is a vDPA simulator. The vDPA simulator is a software test device with an IOMMU that is “emulated on a chip.” The vDPA device simulator will loopback TX traffic to its RX. The main use cases for the simulated device are feature testing, prototyping and development. With this simulated device, you can set up your own vDPA test/development environment in minutes!
The following diagram shows the building blocks of a vDPA simulator device:

We can use two types of vDPA bus to set up the environment: vhost_vdpa bus driver and virtio_vdpa bus driver. For additional information on these bus drivers refer to (vDPA bus drivers for kernel subsystem interactions).
So in this blog, these are two different scenarios. For use case A: vhost_vdpa will work as a network backend for VM with guest kernel virtio-net driver. For use case B: virtio_vdpa bus will work as a virtio device.
General Requirements
In order to run the vDPA setups the following requirements are mandatory:
-
A computer(Physical machine, VM, container) running a Linux distribution. This guide is focused on Fedora 32, however the commands should not change significantly for other Linux distros
-
A user with
sudopermissions -
About 25GB of free space in your home directory
-
At least 8GB of RAM
-
Your kernel should be 5.4 or above
Use Case A: Experimenting with vhost_vdpa bus driver
Overview of the datapath
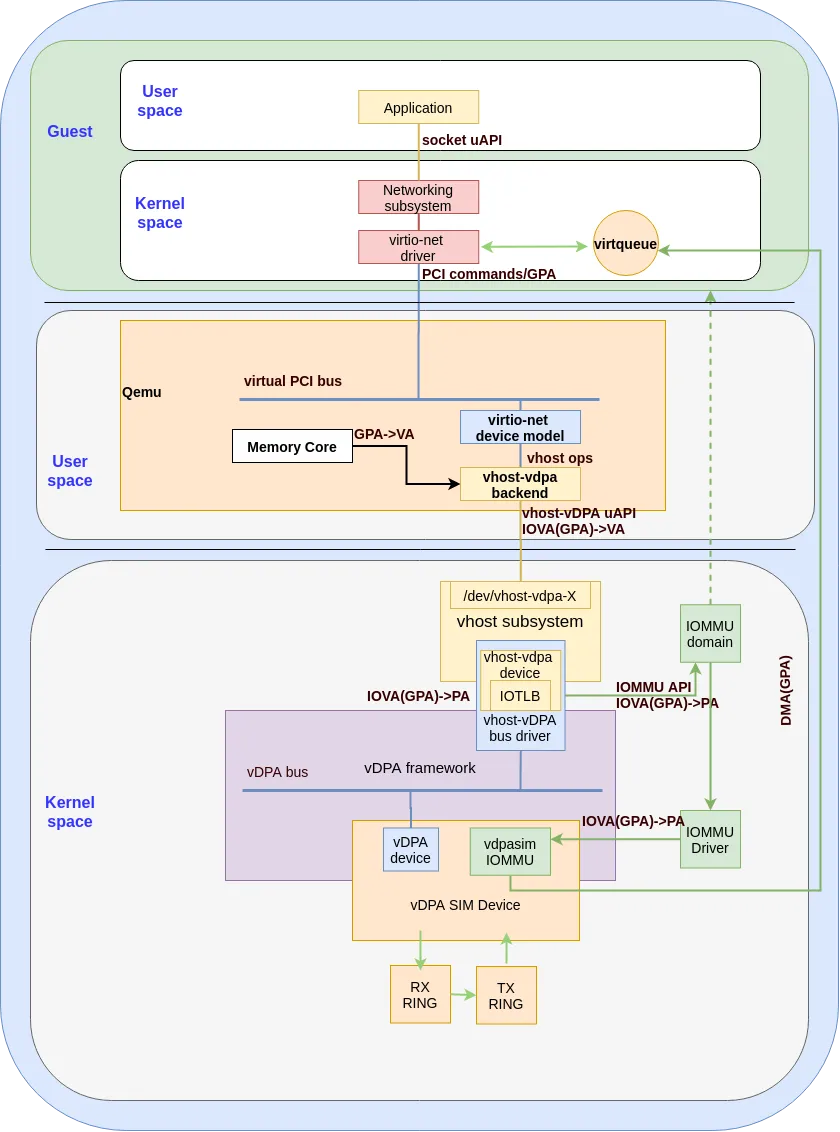
The vhost vDPA bus driver connects the vDPA bus to the vhost subsystem and presents a vhost char device to userspace. The vhost-vdpa device could be used as a network backend for VMs with the help of QEMU. For more information see the following blog.
We will use QEMU and a VM to set up this environment.
The following diagram shows the datapath for this solution:

Setting up your environment
Creating a VM
1. Download the latest Fedora-Cloud-Base image: The website for Fedora's Cloud Base Images is https://alt.fedoraproject.org/cloud/. If the download link below is not available, please refer to this website and get a new one:
[user@host ~]# wget https://download.fedoraproject.org/pub/fedora/linux/releases/32/Cloud/x86_64/images/Fedora-Cloud-Base-32-1.6.x86_64.qcow2
2. Prepare the qcow2 image: Use the cleaning command install the related package and change the password to your own:
[user@host ~]# sudo virt-sysprep --root-password password:changeme --uninstall cloud-init --network --install ethtool,pciutils,kernel-modules-internal --selinux-relabel -a Fedora-Cloud-Base-32-1.6.x86_64.qcow2
Compile the kernel
For some linux distros, the vDPA kernel framework was not enabled by default, we need to download the linux source code and compile it. Below are the steps to compile the linux kernel. (The kernel version should be 5.4 or above)
You can get more information about how to compile linux kernels from how-to-compile-linux-kernel. You can skip this part if you are familiar with it.
[user@host ~]# git clone git://git.kernel.org/pub/scm/linux/kernel/git/torvalds/linux.git
[user@host ~]# cd linux
[user@host ~]# git checkout v5.8
[user@host ~]# cp /boot/config-$(uname -r) .config
[user@host ~]# vim .config
      (please refer to the note about enabling the vDPA kernel framework)
[user@host ~]# make -j
[user@host ~]# sudo make modules_install
[user@host ~]# sudo make install
And reboot to the newly installed kernel.
Note: We need to set the following lines in the .config file to enable vDPA kernel framework:
CONFIG_VIRTIO_VDPA=m
CONFIG_VDPA=y
CONFIG_VDPA_SIM=m
CONFIG_VHOST_VDPA=m
Note: If you prefer to use make menuconfig, you can find these options under section Device Drivers, named DPA drivers, Virtio drivers and VHOST drivers as kernel 5.8.
Compile and install QEMU
1. Download the qemu code: The support for vhost-vdpa backend was merged in v5.1.0 thus you should use that version or above:
[user@host ~]# git clone https://github.com/qemu/qemu.git
2. Compile the qemu: Follow the commands below (see the README.rst in qemu for more information):
[user@host ~]# cd qemu/
[user@host ~]# git checkout v5.1.0-rc3
[user@host ~]# mkdir build
[user@host ~]# cd build/
[user@host ~]#../configure --enable-vhost-vdpa --target-list=x86_64-softmmu
[user@host ~]# make
Configuring the host
1. Load all the related kmod: You should now load the kmod with the following commands:
[user@host ~]# modprobe vdpa
[user@host ~]# modprobe vhost_vdpa
[user@host ~]# modprobe vdpa_sim
2. Verify vhost_vdpa is loaded correctly: Ensure the bus driver is indeed vhost_vdpa using the following commands:
[user@host ~]# ls -l  /sys/bus/vdpa/drivers
drwxr-xr-x 2 root root 0 Sep  5 16:54 vhost_vdpa
#ls -l /sys/bus/vdpa/devices/vdpa0/
total 0
lrwxrwxrwx. 1 root root    0 Sep 21 12:24 driver -> ../../bus/vdpa/drivers/vhost_vdpa
drwxr-xr-x. 2 root root    0 Sep 21 12:25 power
lrwxrwxrwx. 1 root root    0 Sep 21 12:25 subsystem -> ../../bus/vdpa
-rw-r--r--. 1 root root 4096 Sep 21 12:24 uevent
drwxr-xr-x. 3 root root    0 Sep 21 12:25 vhost-vdpa-0
[user@host ~]# ls -l /dev/ |grep vdpa
crw-------   1 root root    239,   0 Sep  5 16:54 vhost-vdpa-0
3. Set the ulimit -l unlimited: ulimit -l means the maximum size that may be locked into memory. In this case we need to set it to unlimited, since vhost-vDPA needs to lock pages for making sure the hardware DMA works correctly:
[user@host ~]# ulimit -l unlimited
if you forget to set this, you may get the error message from qemu similar to this:
qemu-system-x86_64: failed to write, fd=12, errno=14 (Bad address)
qemu-system-x86_64: vhost vdpa map fail!
qemu-system-x86_64: vhost-vdpa: DMA mapping failed, unable to continue
4. Launch the guest VM: The device /dev/vhost-vdpa-0 is the vDPA device we can use. This is a simple example of using QEMU to launch a VM with vhost_vdpa:
[user@host ~]# sudo x86_64-softmmu/qemu-system-x86_64 \
 -hda Fedora-Cloud-Base-32-1.6.x86_64.qcow2 \
 -netdev type=vhost-vdpa,vhostdev=/dev/vhost-vdpa-0,id=vhost-vdpa1 \
 -device virtio-net-pci,netdev=vhost-vdpa1,mac=00:e8:ca:33:ba:05,\
 disable-modern=off,page-per-vq=on \
 -enable-kvm \
 -nographic \
 -m 2G \
 -cpu host \
 2>&1 | tee vm.log
5. Verify the port was created successfully: After the guest boots up, we can then login in to it. We should verify that the port has been bounded successfully to the virtio driver. This is since the backend of the virtio_net driver is vhost_vdpa and if something went wrong the driver will not be created.
guest login: root
Password:
Last login: Tue Sep 29 12:03:03 on ttyS0
[root@guest ~]# ip -s link show eth0
2: eth0: <BROADCAST,MULTICAST,UP,LOWER_UP> mtu 1500 qdisc fq_codel state UP mode DEFAULT gro0
 link/ether fa:46:73:e7:7d:78 brd ff:ff:ff:ff:ff:ff
RX: bytes  packets  errors  dropped overrun mcast
12006996   200043   0       0       0       0
TX: bytes  packets  errors  dropped carrier collsns
12006996   200043   0       0       0       0
[root@guest ~]# ethtool -i eth0
**driver: virtio_net**
version: 1.0.0
firmware-version:
expansion-rom-version:
bus-info: 0000:00:04.0
supports-statistics: yes
supports-test: no
supports-eeprom-access: no
supports-register-dump: no
supports-priv-flags: no
[user@guest ~]# lspci |grep 00:04.0
00:04.0 Ethernet controller: Red Hat, Inc. Virtio network device
Running traffic with vhost_vdpa
Now that we have a vdpa_sim port with the loopback function. we can generate traffic using pktgen to verify it. Pktgen is a packet generator integrated with Linux kernel. For more information please refer to the pktgen doc and sample test script.
[root@guest ~]# ip -s link show eth0
2: eth0: <BROADCAST,MULTICAST,UP,LOWER_UP> mtu 1500 qdisc fq_codel state UP mode DEFAULT gro0
    link/ether fa:46:73:e7:7d:78 brd ff:ff:ff:ff:ff:ff
    RX: bytes  packets  errors  dropped overrun mcast
    18013078   300081   0       0       0       0
    TX: bytes  packets  errors  dropped carrier collsns
    18013078   300081   0       0       0       0
[root@guest ~]# ./pktgen_sample01_simple.sh -i eth0 -m 00:e8:ca:33:ba:05
                (you can get this script from sample test script)
[root@guest ~]# ip -s link show eth0
2: eth0: <BROADCAST,MULTICAST,UP,LOWER_UP> mtu 1500 qdisc fq_codel state UP mode DEFAULT gro0
    link/ether fa:46:73:e7:7d:78 brd ff:ff:ff:ff:ff:ff
    RX: bytes  packets  errors  dropped overrun mcast
    24013078   400081   0       0       0       0
    TX: bytes  packets  errors  dropped carrier collsns
    24013078   400081   0       0       0       0
You can see the RX packets are increasing together with TX packets which means that vdpa_sim is working as expected.
Use Case B: Experimenting with virtio_vdpa bus driver
Overview of the datapath
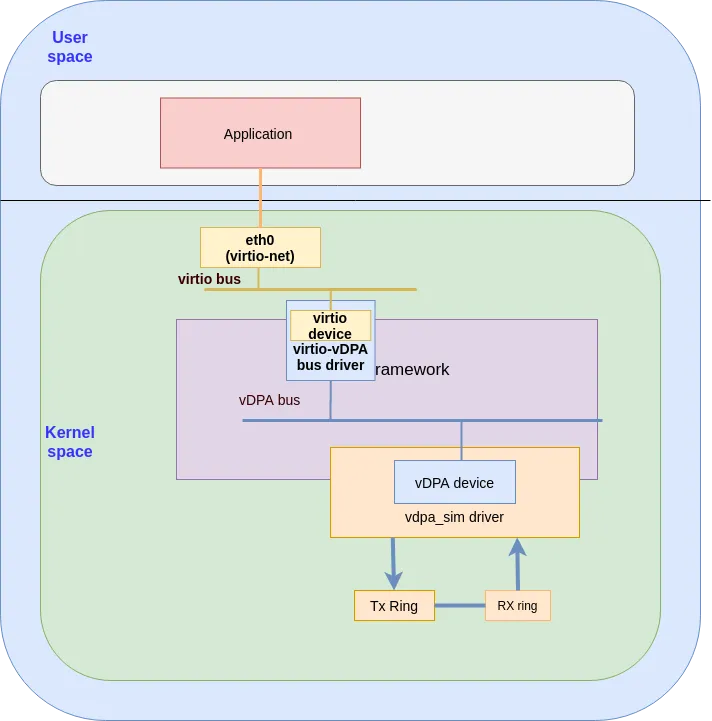
The virtio_vdpa driver is a transport implementation for kernel virtio drivers on top of vDPA bus operations. The virtio_vdpa driver will create a virtio device in the virtio bus. For more information on the virtio_vdpa bus see here.
The following diagram shows the datapath for virtio-vDPA using a vdpa_sim (the vDPA simulator device):

Setting up your environment
1. Load the modules
[user@host ~]# modprobe vdpa
[user@host ~]# modprobe virtio_vdpa
[user@host ~]# modprobe vdpa_sim
Note: if the vDPA related modules are not compiled then follow the instructions in Use Case A vhost_vpda bus driver to compile them.
2. Verify virtio_vdpa loads correctly
[user@host ~]# lsmod |grep vdpa_sim
vdpa_sim               16384  0
vringh                 28672  1 vdpa_sim
vhost_iotlb            16384  2 vdpa_sim,vringh
vdpa                   16384  2 vdpa_sim,virtio_vdpa
3. Verify the driver is bounded to virtio-vdpa correctly
[user@host ~]# ls -l /sys/bus/vdpa/devices/vdpa0/
total 0
lrwxrwxrwx 1 root root 0 June  23 11:19 driver -> ../../bus/vdpa/drivers/virtio_vdpa
drwxr-xr-x 2 root root 0 June 23 11:19 power
lrwxrwxrwx 1 root root 0 June  23 11:19 subsystem -> ../../bus/vdpa
-rw-r--r-- 1 root root 4096 June  23 11:19 uevent
drwxr-xr-x 4 root root 0 June  23 11:19 virtio0
4. Switching from a vhost_vdpa to virtio_vdpa if needed
If in step 4 you see that the interface is bounded to vhost_vdpa instead of virtio_vdpa we need to switch it to virtio_vdpda using the following instructions:
[user@host ~]# echo vdpa0 > /sys/bus/vdpa/drivers/vhost_vdpa/unbind
[user@host ~]# echo vdpa0 > /sys/bus/vdpa/drivers/virtio_vdpa/bind
[user@host ~]# ls -l /sys/bus/vdpa/devices/vdpa0/
total 0
lrwxrwxrwx 1 root root 0 June  23 11:19 driver -> ../../bus/vdpa/drivers/virtio_vdpa
drwxr-xr-x 2 root root 0 June 23 11:19 power
lrwxrwxrwx 1 root root 0 June  23 11:19 subsystem -> ../../bus/vdpa
-rw-r--r-- 1 root root 4096 June  23 11:19 uevent
drwxr-xr-x 4 root root 0 June  23 11:19 virtio0
You should get the same output for the ls command as shown in this example.
5. Verify the bus-info
Now we want to confirm that everything is configured properly and for that we want to ensure our port uses a bus-info of type vdpa:
[user@host ~]# ip -s link show eth0
6: eth0: <BROADCAST,MULTICAST,UP,LOWER_UP> mtu 1500 qdisc fq_codel state UP mode DEFAULT gro0
    link/ether f6:8c:ea:ac:e6:8d brd ff:ff:ff:ff:ff:ff
    RX: bytes  packets  errors  dropped overrun mcast
    137438     803      0       0       0       0
    TX: bytes  packets  errors  dropped carrier collsns
    137438     803      0       0       0       0
[user@host ~]# dnf install ethtool
[user@host ~]# ethtool -i eth0
driver: virtio_net
version: 1.0.0
firmware-version:
expansion-rom-version:
bus-info: vdpa0
supports-statistics: yes
supports-test: no
supports-eeprom-access: no
supports-register-dump: no
supports-priv-flags: no
Running traffic on the virtio_vdpa
Now that we have a vdpa_sim port with the loopback function. Just like in Use Case A: vhost-vdpa, we can generate traffic using pktgen to verify it. If the pktgen was not installed, you can install it by following command.
[user@host ~]# dnf install kernel-modules-internal
For more information please refer to the pktgen doc and sample test script.
Following are the commands and the running logs:
[user@host ~]# ip -s link show eth0
6: eth0: <BROADCAST,MULTICAST,UP,LOWER_UP> mtu 1500 qdisc fq_codel state UP mode DEFAULT gro0
    link/ether f6:8c:ea:ac:e6:8d brd ff:ff:ff:ff:ff:ff
    RX: bytes  packets  errors  dropped overrun mcast
    6227004    101327   0       0       0       0
    TX: bytes  packets  errors  dropped carrier collsns
    6227004    101327   0       0       0       0
[user@host ~]# ./pktgen_sample01_simple.sh -i eth0 -m 00:e8:ca:33:ba:05
               (you can get this script from sample test script)
[user@host ~]# ip -s link show eth0
6: eth0: <BROADCAST,MULTICAST,UP,LOWER_UP> mtu 1500 qdisc fq_codel state UP mode DEFAULT gro0
    link/ether f6:8c:ea:ac:e6:8d brd ff:ff:ff:ff:ff:ff
    RX: bytes  packets  errors  dropped overrun mcast
    12227330   201328   0       0       0       0
    TX: bytes  packets  errors  dropped carrier collsns
    12227330   201328   0       0       0       0
You can see the RX packets are increasing together with TX packets which means the vdpa_sim is working as expected.
Summary
In this blog we’ve guided you on how to set up a vDPA testing environment without using vDPA HW. We’ve covered both the virtio_vdpa bus and the vhost_vdpa bus.
We hope this helped make these concepts more real and grounded them in actual Linux tooling.
To keep up with the virtio-networking community we invite you to sign up to the virtio-networking mailing list. This is a public mailing list, and you can register through the Mailman page.
关于作者
Cindy is a Senior Software Engineer with Red Hat, specializing in Virtualization and Networking.
Experienced Senior Software Engineer working for Red Hat with a demonstrated history of working in the computer software industry. Maintainer of qemu networking subsystem. Co-maintainer of Linux virtio, vhost and vdpa driver.
产品
工具
试用购买与出售
沟通
关于红帽
我们是世界领先的企业开源解决方案供应商,提供包括 Linux、云、容器和 Kubernetes。我们致力于提供经过安全强化的解决方案,从核心数据中心到网络边缘,让企业能够更轻松地跨平台和环境运营。

