
This blog series will look at Jenkins running on OpenShift 3.11 and the various possibilities we have to improve its performance.
Jenkins is an open source automation tool written in Java often used for Continuous Integration / Continuous Delivery. Jenkins also has hundreds of plugins that add features to the platform. Jenkins can be used to build and test your software projects continuously, making it easier for developers to integrate changes to the project, and making it easier for users to obtain a fresh build. At the same time it can improve the quality of the software it builds by running tests against it.
This first post will illustrate the deployment of a Jenkins master instance and a typical workload.
OpenShift on AWS Test Environment
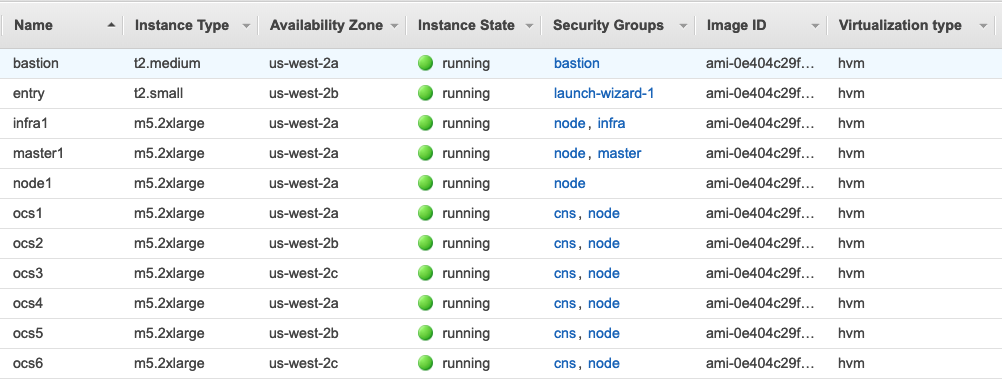
All posts in this series use a Red Hat OpenShift Container Platform on AWS setup that includes 8 EC2 instances deployed as 1 master node, 1 infra node, and 6 worker nodes that also run Red Hat OpenShift Container Storage pods.
The 6 worker nodes are the storage provider and persistent storage consumers (Jenkins). As shown below, the OpenShift Container Storage worker nodes are of instance type m5.2xlarge with 8 vCPUs, 32 GB Mem, and 3x100GB gp2 volumes attached to each node for OCP and one 1TB gp2 volume for OCS storage cluster.
The AWS region us-west-2 has availability zones (AZs) us-west-2a, us-west-2b, and us-west-2c, and the 6 worker nodes are spread across the 3 AZs, 2 nodes in each AZ. This means the OCS storage cluster is stretched across these 3 AZs. Below is a view from the AWS console showing the EC2 instances and how they are placed in the us-east-2 AZs.
Jenkins deployment
We will place our Jenkins instance in a new project called ci. Jenkins is a stateful application, so we need to provide persistent storage to it. The Jenkins template we’re going to use will automatically create a PVC using the default storage class. Therefore we will set the default storage class to be glusterfs-storage.
oc patch storageclass glusterfs-storage -p '{"metadata": {"annotations": {"storageclass.kubernetes.io/is-default-class": "true"}}}'

storageclass.storage.k8s.io/glusterfs-storage patched
oc get sc

NAME                          PROVISIONER AGE

glusterfs-storage (default)   kubernetes.io/glusterfs 32d
Now that the default storageclass is set to glusterfs-storage, we can start deploying Jenkins in a new project called ci:
oc new-project ci

oc new-app -e OPENSHIFT_ENABLE_OAUTH=true -e VOLUME_CAPACITY=10Gi jenkins-persistent
After a few seconds the Jenkins pod will be up and running. It will take another few minutes for the pod to completely initialize the application running inside, therefore it will not be in the READY state until application initialization has completed.
oc get pods

NAME               READY STATUS RESTARTS   AGE

Jenkins-1-deploy   1/1 Running 0          1m

Jenkins-1-fjpgj    0/1 Running 0          1m
Let’s have a quick look at the storage configuration Jenkins is using.
oc get pod jenkins-1-fjpgj -o yaml

...omitted

    volumes:

    - name: jenkins

      persistentVolumeClaim:

        claimName: jenkins

...omitted
Our Jenkins pod makes use of a volume named jenkins, provided through the PVC, also with the name jenkins:
oc get pvc jenkins

NAME      STATUS VOLUME                                     CAPACITY ACCESS MODES STORAGECLASS AGE

jenkins   Bound pvc-701d5de1-7590-11e9-bcaf-02eec490626a   10Gi RWO glusterfs-storage 1d
As requested during the creation of the new application, the size of the persistent storage is 10 GB and it was claimed by the application container using the glusterfs-storage storageclass.
The Jenkins web frontend
Jenkins can be configured through either the API or the web console. Some of the tasks are easier to be done through the web console, so we’ll use it for now. To connect to the web frontend, we need to get the route to the Jenkins pod:
oc get route

NAME      HOST/PORT                               PATH SERVICES PORT TERMINATION     WILDCARD

Jenkins   jenkins-ci.apps.jenkins.thestorsol.com             Jenkins <all> edge/Redirect None
So in this case it is jenkins-ci.apps.jenkins.thestorsol.com. This route will be different for you if you want to test it yourself.
The login credentials are the same as those used for your OpenShift user. After the login we get the Jenkins dashboard. This provides us an overview of what already exists in our instance, in this case the default OpenShift Sample.

First test pipeline
Now that we have a Jenkins instance running, we want to set up an example pipeline. We’re going to use a Maven build, so we need to take care of the Maven installation first. Following ‘Manage Jenkins’ - ‘Global Tool Configuration’ we get to set up ‘Maven’.

M3 is the identifier under which we will refer to the Maven installation from now on.
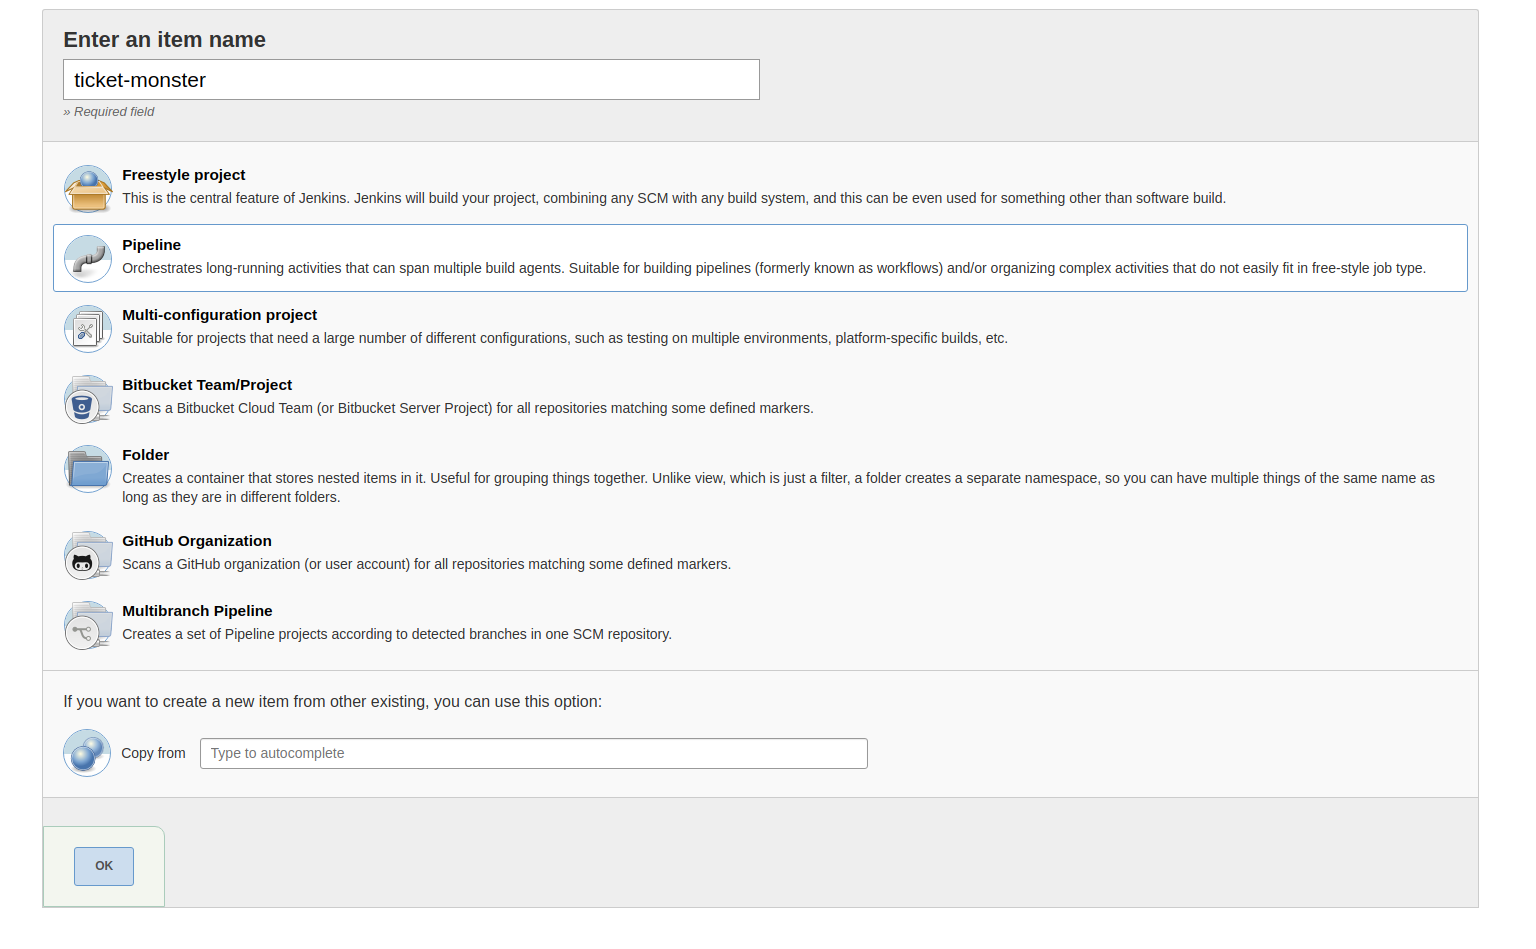
From Jenkins’ main view, we create a new item, called ‘ticket-monster’ and make it a pipeline project.
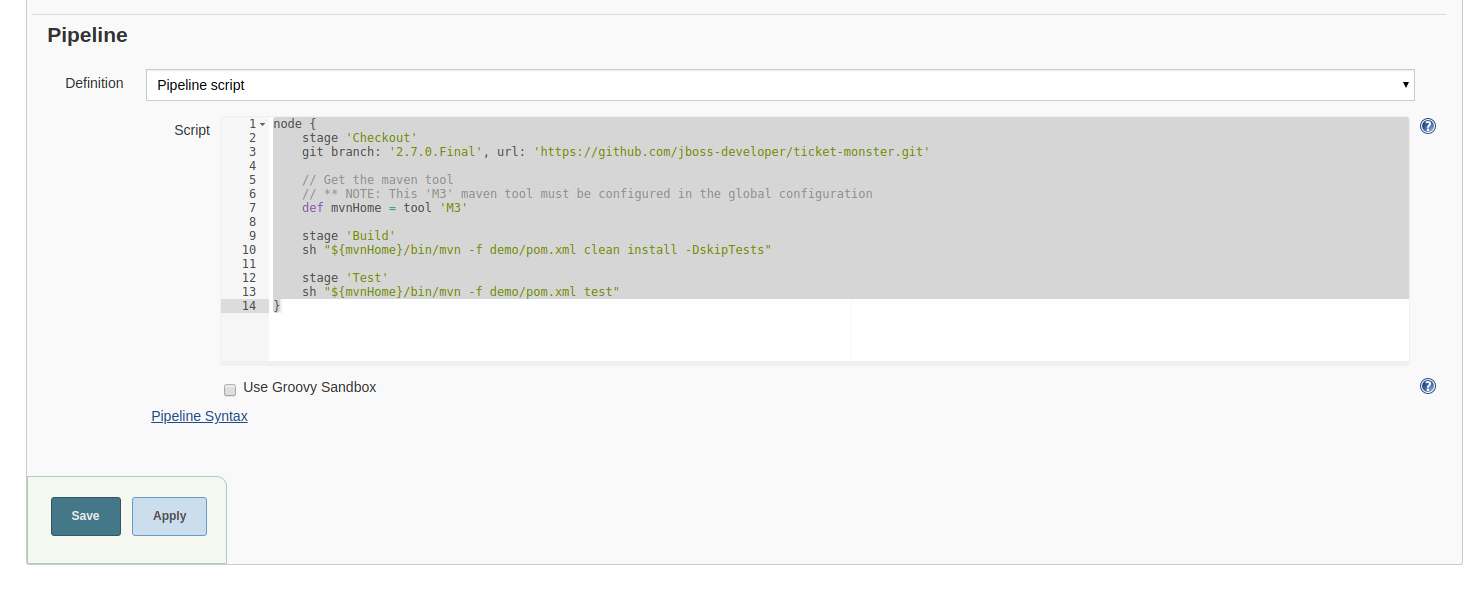
Our project ‘ticket-monster’ will run in 3 stages: Checkout, Build and Test. The following Jenkins-DSL (“Domain-specific language”) script takes care of the 3 steps:
node {
stage 'Checkout'
git branch: '2.7.0.Final', url: 'https://github.com/jboss-developer/ticket-monster.git'
// Get the maven tool
// ** NOTE: This 'M3' maven tool must be configured in the global configuration
def mvnHome = tool 'M3'
stage 'Build'
sh "${mvnHome}/bin/mvn -f demo/pom.xml clean install -DskipTests"stage 'Test'
sh "${mvnHome}/bin/mvn -f demo/pom.xml test"
}
We copy this script into the Pipeline script field and uncheck the “Use Groovy Sandbox” box.
After saving this configuration, we’re ready to run the first build. Back in the ‘ticket-monster’ view, we simply click ‘Build Now’. Right after clicking it, Jenkins will present us with a screen that shows the progress of the build:
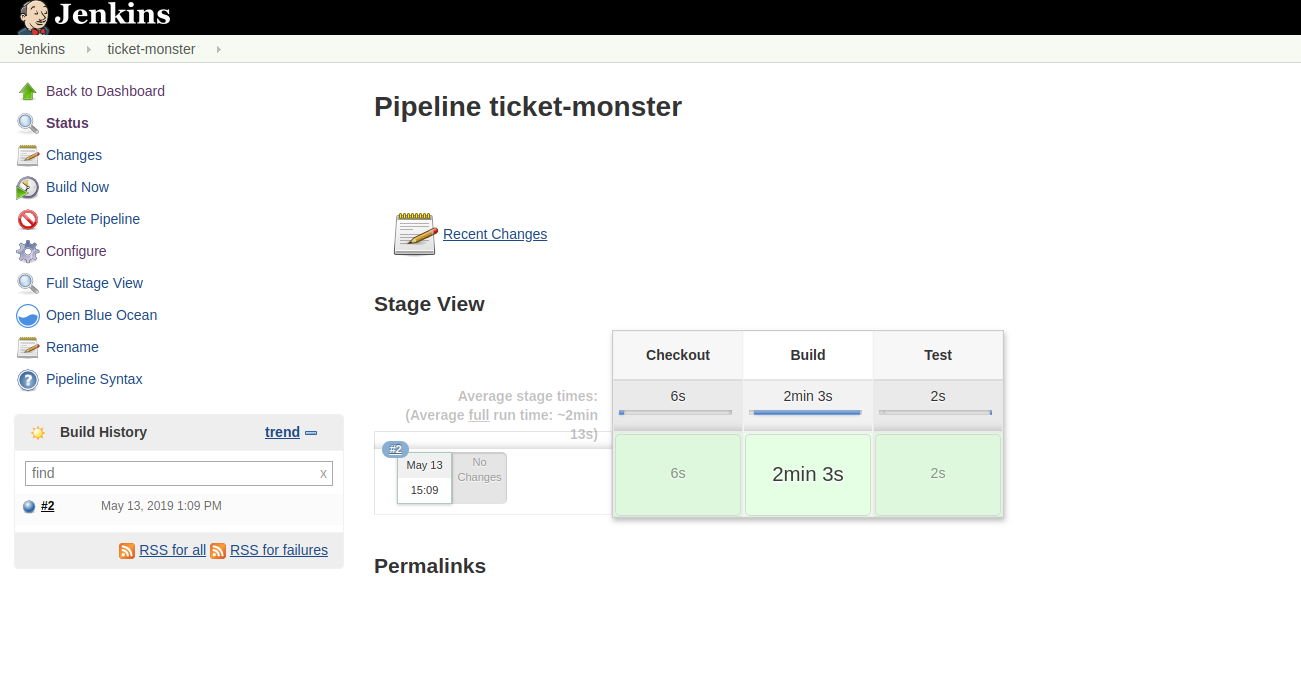
Our first build was run successfully and the three different stages took a bit more than 2 minutes overall. As expected, the build portion took the longest time.
Recap
Over the course of this post we have set up an instance of Jenkins on Red Hat OpenShift, making use of Red Hat Open Container Storage (OCS) to provide Jenkins persistent storage. Once that was done, we implemented a first test pipeline and successfully run a build. This was a very simple and quick build and though it does not necessarily reflect a realistic setup, it illustrates the way Jenkins works.
Outlook
In the next episode of this blog series we will have a closer look at how we can run Jenkins in a master/slave fashion by spinning up child pods that will do the actual work. The idea behind this is to more equally spread the load in the event more than one build job is running at a time, or in case more resources are required dynamically for more complex builds.
저자 소개

Red Hatter since 2018, technology historian and founder of The Museum of Art and Digital Entertainment. Two decades of journalism mixed with technology expertise, storytelling and oodles of computing experience from inception to ewaste recycling. I have taught or had my work used in classes at USF, SFSU, AAU, UC Law Hastings and Harvard Law.
I have worked with the EFF, Stanford, MIT, and Archive.org to brief the US Copyright Office and change US copyright law. We won multiple exemptions to the DMCA, accepted and implemented by the Librarian of Congress. My writings have appeared in Wired, Bloomberg, Make Magazine, SD Times, The Austin American Statesman, The Atlanta Journal Constitution and many other outlets.
I have been written about by the Wall Street Journal, The Washington Post, Wired and The Atlantic. I have been called "The Gertrude Stein of Video Games," an honor I accept, as I live less than a mile from her childhood home in Oakland, CA. I was project lead on the first successful institutional preservation and rebooting of the first massively multiplayer game, Habitat, for the C64, from 1986: https://neohabitat.org . I've consulted and collaborated with the NY MOMA, the Oakland Museum of California, Cisco, Semtech, Twilio, Game Developers Conference, NGNX, the Anti-Defamation League, the Library of Congress and the Oakland Public Library System on projects, contracts, and exhibitions.
채널별 검색

오토메이션
기술, 팀, 인프라를 위한 IT 자동화 최신 동향

인공지능
고객이 어디서나 AI 워크로드를 실행할 수 있도록 지원하는 플랫폼 업데이트

오픈 하이브리드 클라우드
하이브리드 클라우드로 더욱 유연한 미래를 구축하는 방법을 알아보세요

보안
환경과 기술 전반에 걸쳐 리스크를 감소하는 방법에 대한 최신 정보

엣지 컴퓨팅
엣지에서의 운영을 단순화하는 플랫폼 업데이트

인프라
세계적으로 인정받은 기업용 Linux 플랫폼에 대한 최신 정보

애플리케이션
복잡한 애플리케이션에 대한 솔루션 더 보기

오리지널 쇼
엔터프라이즈 기술 분야의 제작자와 리더가 전하는 흥미로운 스토리
제품
- Red Hat Enterprise Linux
- Red Hat OpenShift Enterprise
- Red Hat Ansible Automation Platform
- 클라우드 서비스
- 모든 제품 보기
툴
체험, 구매 & 영업
커뮤니케이션
Red Hat 소개
Red Hat은 Linux, 클라우드, 컨테이너, 쿠버네티스 등을 포함한 글로벌 엔터프라이즈 오픈소스 솔루션 공급업체입니다. Red Hat은 코어 데이터센터에서 네트워크 엣지에 이르기까지 다양한 플랫폼과 환경에서 기업의 업무 편의성을 높여 주는 강화된 기능의 솔루션을 제공합니다.