
Background
In this post, I will discuss how to utilize Azure Key Vault (AKV) with Azure Red Hat OpenShift (ARO) cluster. I will explain the relevant terms and their definitions from the architectural standpoint and how the flow works at a glance, and I will give an example of how to deploy this in the ARO cluster. The objective of this article is to enable you to store and retrieve secrets stored in AKV from your ARO cluster.
Basic Architecture
Container Storage Interface (CSI) is a standardized interface allowing third-party storage providers to integrate their storage systems with Kubernetes. Secrets Store CSI Driver, on the other hand, allows the integration of secrets stores with Kubernetes via a CSI volume. It enables Kubernetes to allow multiple secrets, keys, and certs stored in enterprise-grade external secrets stores as a volume into their pods. Some examples of these external secret stores are Azure Key Vault, HashiCorp Vault, AWS Secrets Manager, and Google Cloud Secret Manager. This driver is installed in the cluster as a daemonset.
Azure Key Vault (AKV) is an Azure-managed centralized repository allowing you to store secrets such as API keys, auth tokens, TLS/SSL certificates, passwords and so forth. It integrates with Azure Active Directory (AD) for authentication and authorization. In addition, AKV provider for Secret Store CSI driver allows for the integration of AKV as a secrets store with a Kubernetes cluster by mounting them into the pods as a CSI volume. This cloud-specific driver is also installed in the cluster as a daemonset along with the Secret Store CSI Driver.
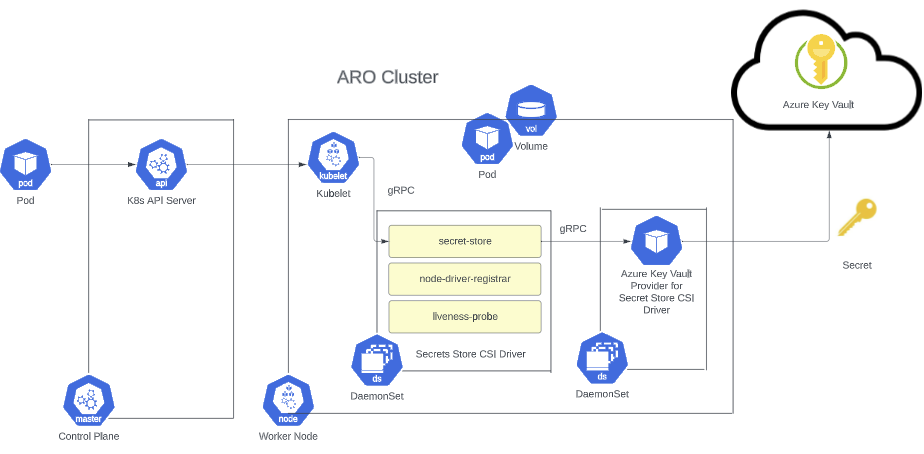
Figure 1. High-level flow
Let's discuss how all of these work at a high level, as shown in the figure above. When a pod is created through the Kubernetes API, it is scheduled onto a node, and the kubelet looks at the pod specification and sees if there is a volume mount request. If there is, it will issue a gRPC call to the Secret Store CSI Driver.
The CSI driver then mounts the volume as tmpfs to the pod and issues another gRPC request to the AKV Provider for Secrets Store CSI Driver. The provider will then reach out to AKV to fetch the secret and send it back to the driver as gRPC response. Lastly, the driver will write the secret into the file system and the pod then starts running.
Deployment
Now let's talk about how to deploy this in conjunction with your existing ARO cluster. Note that this is an example of the deployment and your implementation may vary. This guide is a minor adaptation of the mobb.ninja article.
Prerequisites
The following were set up and installed for the example deployment in this article:
- ARO cluster v4.11
- az CLI v2.49.0
- oc CLI v4.13.0
- helm CLI v3.12.0
Should any of the commands in the following steps not work at your end, you might want to update the version(s) to at least match the one(s) listed above.
Step 1 - Set the Environment Variables
In this scenario I will be using an ARO cluster with the resource group called dsari-rg and location West US, so kindly modify this based on your resource group’s name and location.
export KEYVAULT_RESOURCE_GROUP=${AZR_RESOURCE_GROUP:-"dsari-rg"}
export KEYVAULT_LOCATION=${AZR_RESOURCE_LOCATION:-"westus"}
export KEYVAULT_NAME=secret-store-$(cat /dev/urandom | LC_ALL=C tr -dc 'a-zA-Z0-9' | fold -w 10 | head -n 1)
export AZ_TENANT_ID=$(az account show -o tsv --query tenantId)
Step 2 - Install the Secrets Store CSI Driver
- Make sure you are logged into Azure using az login command.
- Log into your cluster using oc login command.
- Create a new namespace. In this example, I will call it secrets-store-csi-project.
oc new-project secrets-store-csi-project
- Add privileged security context constraints (SCC) policy to the Secret Store CSI Driver.
oc adm policy add-scc-to-user privileged \
system:serviceaccount:secrets-store-csi-project:secrets-store-csi-driver - Add the driver to your helm repo and update it.
helm repo add secrets-store-csi-driver \
  https://kubernetes-sigs.github.io/secrets-store-csi-driver/charts
helm repo update - Install the driver.
helm install -n secrets-store-csi-project csi-secrets-store \
  secrets-store-csi-driver/secrets-store-csi-driver \
  --version v1.3.2 \
--set "linux.providersDir=/var/run/secrets-store-csi-providers" - Finally, check if the pods were created and running.
oc --namespace=secrets-store-csi-project get pods -l "app=secrets-store-csi-driver"
Step 3 - Install the Azure Key Vault Provider for Secrets Store CSI Driver
- Add Azure Key Vault Provider for Secrets Store CSI Driver to the helm repo and update it.
helm repo add csi-secrets-store-provider-azure \
  https://azure.github.io/secrets-store-csi-driver-provider-azure/charts
helm repo update - Install the provider.
helm install -n secrets-store-csi-project azure-csi-provider \
  csi-secrets-store-provider-azure/csi-secrets-store-provider-azure \
  --set linux.privileged=true --set secrets-store-csi-driver.install=false \
  --set "linux.providersDir=/var/run/secrets-store-csi-providers" \
--version=v1.4.1 - Add privileged SCC policy to the provider.
oc adm policy add-scc-to-user privileged \
system:serviceaccount:secrets-store-csi-project:csi-secrets-store-provider-azure
Step 4 - Create Azure Key Vault Secret
- Create a new namespace. In this example, I will call it my-app.
oc new-project my-app
- Create Azure Key Vault in the resource group where your ARO cluster resides.
az keyvault create -n ${KEYVAULT_NAME} \
  -g ${KEYVAULT_RESOURCE_GROUP} \
--location ${KEYVAULT_LOCATION} - Create the secret. In this example, the secret is called mysecret and the value is MyPa55w0rd in the type of string.
az keyvault secret set \
  --vault-name ${KEYVAULT_NAME} \
--name mysecret --value "MyPa55w0rd" - Create the service principal for the secret and set the policy for it.
export SERVICE_PRINCIPAL_CLIENT_SECRET="$(az ad sp create-for-rbac \
  --name http://$KEYVAULT_NAME --query 'password' -otsv)"
export SERVICE_PRINCIPAL_CLIENT_ID="$(az ad sp list \
  --display-name http://$KEYVAULT_NAME --query '[0].appId' -otsv)"
az keyvault set-policy -n ${KEYVAULT_NAME} \
  --secret-permissions get \
--spn ${SERVICE_PRINCIPAL_CLIENT_ID} - Create the Kubernetes secret (and label it) so it uses the secret from Azure Key Vault.
oc create secret generic secrets-store-creds \
  -n my-app \
  --from-literal clientid=${SERVICE_PRINCIPAL_CLIENT_ID} \
  --from-literal clientsecret=${SERVICE_PRINCIPAL_CLIENT_SECRET}
oc -n my-app label secret \
secrets-store-creds secrets-store.csi.k8s.io/used=true - Create a SecretProviderClass object to specify this secret.
cat <<EOF | oc apply -f -
apiVersion: secrets-store.csi.x-k8s.io/v1
kind: SecretProviderClass
metadata:
  name: azure-kvname
  namespace: my-app
spec:
  provider: azure
  parameters:
    usePodIdentity: "false"
    useVMManagedIdentity: "false"
    userAssignedIdentityID: ""
    keyvaultName: "${KEYVAULT_NAME}"
    objects: |
      array:
        - |
          objectName: mysecret
          objectType: secret
          objectVersion: ""
    tenantId: "${AZ_TENANT_ID}"
EOF - Create a pod that uses the secret you created. In this example, I will create a BusyBox application.
cat <<EOF | oc apply -f -
kind: Pod
apiVersion: v1
metadata:
  name: busybox-secrets-store-inline
  namespace: my-app
spec:
  containers:
  - name: busybox
    image: k8s.gcr.io/e2e-test-images/busybox:1.29
    command:
      - "/bin/sleep"
      - "10000"
    volumeMounts:
    - name: secrets-store-inline
      mountPath: "/mnt/secrets-store"
      readOnly: true
  volumes:
    - name: secrets-store-inline
      csi:
        driver: secrets-store.csi.k8s.io
        readOnly: true
        volumeAttributes:
          secretProviderClass: "azure-kvname"
        nodePublishSecretRef:
          name: secrets-store-creds
EOF - Finally, check and print the secret to see if it is successfully mounted.
oc exec busybox-secrets-store-inline \
  -- ls /mnt/secrets-store/
oc exec busybox-secrets-store-inline \
  -- cat /mnt/secrets-store/mysecret
This last step should reveal the name of the secret (mysecret) and its value (MyPa55w0rd).
If these were displayed, congratulations! You have successfully created a secret in Azure Key Vault and used it for an application.
Step 5 - Cleanup
- Uninstall and delete the helm chart.
helm uninstall -n secrets-store-csi-project azure-csi-provider
helm delete -n secrets-store-csi-project csi-secrets-store - Delete the SCC policy and the app.
oc adm policy remove-scc-from-user privileged \

  system:serviceaccount:secrets-store-csi-project:secrets-store-csi-driver

oc delete project my-app - Delete the secret.
az keyvault delete -n ${KEYVAULT_NAME} - Finally, delete the service principal.
az ad sp delete --id ${SERVICE_PRINCIPAL_CLIENT_ID}
Sources
- Secret Store CSI Driver - Concepts:https://secrets-store-csi-driver.sigs.k8s.io/concepts.html
- Azure Key Vault CSI on Azure Red Hat OpenShift: https://mobb.ninja/docs/misc/secrets-store-csi/azure-key-vault/
執筆者紹介

チャンネル別に見る

自動化
テクノロジー、チームおよび環境に関する IT 自動化の最新情報

AI (人工知能)
お客様が AI ワークロードをどこでも自由に実行することを可能にするプラットフォームについてのアップデート

オープン・ハイブリッドクラウド
ハイブリッドクラウドで柔軟に未来を築く方法をご確認ください。

セキュリティ
環境やテクノロジー全体に及ぶリスクを軽減する方法に関する最新情報

エッジコンピューティング
エッジでの運用を単純化するプラットフォームのアップデート

インフラストラクチャ
世界有数のエンタープライズ向け Linux プラットフォームの最新情報

アプリケーション
アプリケーションの最も困難な課題に対する Red Hat ソリューションの詳細

オリジナル番組
エンタープライズ向けテクノロジーのメーカーやリーダーによるストーリー
製品
ツール
試用、購入、販売
コミュニケーション
Red Hat について
エンタープライズ・オープンソース・ソリューションのプロバイダーとして世界をリードする Red Hat は、Linux、クラウド、コンテナ、Kubernetes などのテクノロジーを提供しています。Red Hat は強化されたソリューションを提供し、コアデータセンターからネットワークエッジまで、企業が複数のプラットフォームおよび環境間で容易に運用できるようにしています。
言語を選択してください
Red Hat legal and privacy links
- Red Hat について
- 採用情報
- イベント
- 各国のオフィス
- Red Hat へのお問い合わせ
- Red Hat ブログ
- ダイバーシティ、エクイティ、およびインクルージョン
- Cool Stuff Store
- Red Hat Summit