This is part 2 of a tutorial that demonstrates how to add OpenShift Virtualization 2.5 to an existing OpenShift 4.6 cluster and start a Fedora Linux VM inside that cluster.
Please refer to “Your First VM with OpenShift Virtualization Using the Web Console” for the introduction of this tutorial and for links to all of its parts, and refer to “Verifying that your OpenShift cluster can run Virtual Machines Using the Web Console” for part 1 of this tutorial.
Because this tutorial performs all actions using the OpenShift Web Console, you could follow it from any machine you use as a personal workstation, such as a Windows laptop. You do not require a shell prompt to type oc or kubectl commands.
Adding OpenShift Virtualization to your OpenShift 4 cluster is easier than you would expect because it is packaged as an Operator and available from the Red Hat Marketplace. You do not have to deal with multiple resource manifests nor helm charts.
Better yet, all OpenShift users are entitled to OpenShift Virtualization. You need no additional product subscriptions and entitlements. And you have no limits on the number of RHEL VMs you can run in your OpenShift cluster. Again, you need no additional entitlements.
Installing OpenShift Virtualization
Installing OpenShift Virtualization is a two-step process:
1. Install the OpenShift Virtualization operator
2. Create a HyperConverged cluster custom resource.
You can do both using the OpenShift CLI, but it is so much easier using the web console. This tutorial basically “fills in the blanks” of the product documentation at:
https://docs.openshift.com/container-platform/4.6/virt/install/installing-virt-web.html
Installing the OpenShift Virtualization Operator
Follow these instructions to install the OpenShift Virtualization Operator from the Red Hat Market into your OpenShift cluster. Screen shots are truncated to my browser window size, which is small and with a bit of zoom for improved legibility.
Please rely on the written instructions more than on the screen captures. They are here mostly to provide you visual aid and assurance that you are on the correct page for each step.
1. Search for the OpenShift Virtualization operator in the Operator Hub.
Log in on your cluster’s web console as a cluster administrator and navigate to the Operators → OperatorHub page.
Search for “Virtualization.” The OpenShift Virtualization operator by Red Hat should be among your first search results.
2. Install the OpenShift Virtualization operator in your cluster.
Click OpenShift Virtualization to view the information about the operator and click Install to enter the Install Operator page.
Do not make any change. Leave the default update channel as stable and the recommended namespace as openshift-cnv. Let the web console create the openshift-cnv namespace. If you change the namespace of the operator, OpenShift Virtualization will not work correctly.
After you review the Install Operator page, without making changes, scroll to the bottom of the page and click Install.
3. Monitor the installation of the OpenShift Virtualization operator.
The web console displays an Installing Operator page with a spinning wheel animation and status messages about the progress of the operator deployment.
You do not have to stare at that page until the operator finishes installing. If by any reason you have to switch to other pages of the web console to perform other tasks, you can check the status of the OpenShift Virtualization operator in the Operators → Installed Operators page.
Wait until the status changes to “Succeeded” before proceeding to creating a hyperconverged cluster resource.
Create an HyperConverged Cluster Resource
Now that you have the OpenShift Virtualization Operator available on your cluster, you have to create a custom resource to enable creation and management of virtual machines. That custom resource effectively activates OpenShift Virtualization features.
1. Create a hyperconverged cluster custom resource from the OpenShift Virtualization operator.
You are in the Installed Operators page, and the OpenShift Virtualization operator shows a status of “Succeeded.” Click OpenShift Virtualization to enter its Operator Details page, and inside the OpenShift Virtualization Deployment box, click Create Instance.
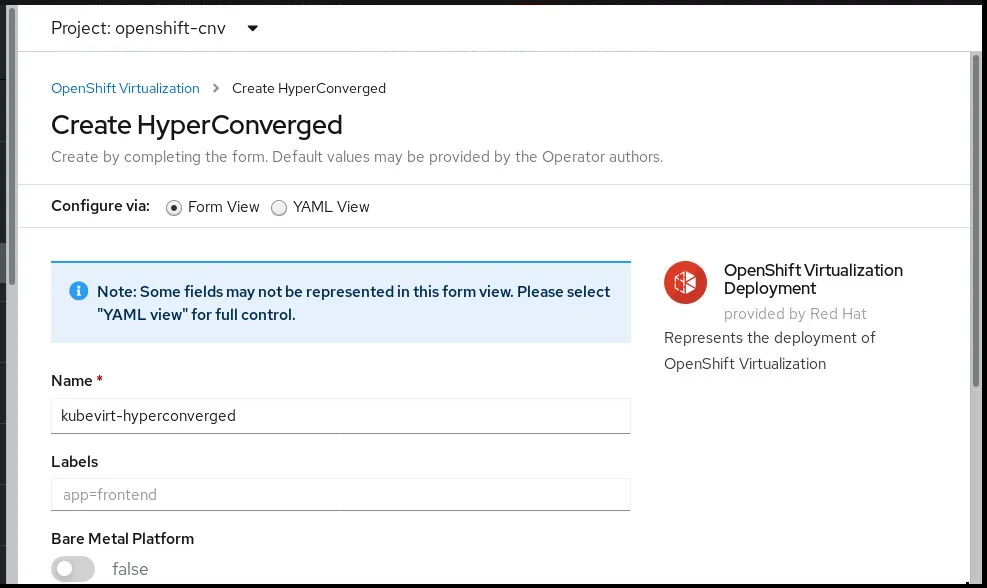
In the Create HyperConverged custom resource page, do not make any change. Leave the custom resource name as kubevirt-hyperconverged, scroll to the bottom of the page, and click Create.
Note that, because my test environment uses nested virtualization, I did not check the Bare Metal Platform field.
3. Monitor the deployment of OpenShift Virtualization pods.
The web console switches back to the Operator Details page of the OpenShift Virtualization operator, in the OpenShift Virtualization Deployment tab.
Be patient and wait until the status of your kubevirt-hyperconverged CR lists “Available” as part of its status.
Navigate to the Workloads → Pods page, be sure you are still on the openshift-cnv project and wait patiently until all pods of that project have their status as “Running”. Only then OpenShift Virtualization will be really ready to manage your virtual machines.
5. Verify that OpenShift Virtualization pages and actions are available in the web console.
Notice that, under Workloads, there is a new entry named Virtualization, where you can create and monitor virtual machines.
Historical note: “CNV” from the openshift-cnv project name stands for “Container Native Virtualization,” which was the old name of OpenShift Virtualization and “Kubevirt” from the kubevirt-hyperconverged CR name is the name of the open source project that serves as the main upstream of OpenShift Virtualization.
Next Steps
Now that your cluster is ready to manage virtual machines, you can proceed to part 3 of this tutorial: “Preparing to Create a VM Using the Web Console.”
執筆者紹介
Fernando lives in Rio de Janeiro, Brazil, and works on Red Hat's certification training for OpenShift, containers, and DevOps.
チャンネル別に見る
自動化
テクノロジー、チームおよび環境に関する IT 自動化の最新情報
AI (人工知能)
お客様が AI ワークロードをどこでも自由に実行することを可能にするプラットフォームについてのアップデート
オープン・ハイブリッドクラウド
ハイブリッドクラウドで柔軟に未来を築く方法をご確認ください。
セキュリティ
環境やテクノロジー全体に及ぶリスクを軽減する方法に関する最新情報
エッジコンピューティング
エッジでの運用を単純化するプラットフォームのアップデート
インフラストラクチャ
世界有数のエンタープライズ向け Linux プラットフォームの最新情報
アプリケーション
アプリケーションの最も困難な課題に対する Red Hat ソリューションの詳細
オリジナル番組
エンタープライズ向けテクノロジーのメーカーやリーダーによるストーリー
製品
ツール
試用、購入、販売
コミュニケーション
Red Hat について
エンタープライズ・オープンソース・ソリューションのプロバイダーとして世界をリードする Red Hat は、Linux、クラウド、コンテナ、Kubernetes などのテクノロジーを提供しています。Red Hat は強化されたソリューションを提供し、コアデータセンターからネットワークエッジまで、企業が複数のプラットフォームおよび環境間で容易に運用できるようにしています。
言語を選択してください
Red Hat legal and privacy links
- Red Hat について
- 採用情報
- イベント
- 各国のオフィス
- Red Hat へのお問い合わせ
- Red Hat ブログ
- ダイバーシティ、エクイティ、およびインクルージョン
- Cool Stuff Store
- Red Hat Summit


